开发环境搭建
Rust 数据结构
函数,结构体(类)
Awesome 算法
通用算法
rust-algorithms
rust-algorithms收集了一些经典的算法和数据结构,更强调算法实现的美观性,因此该库更适用于教学目的,请不要把它当成一个实用算法库在生产环境使用。
TheAlgorithms/Rust
TheAlgorithms/Rust项目所属的组织使用各种语言实现了多种算法,但是仅适用于演示的目的。
Leetcode
rustgym
rustgym 实现了相当多的 leetcode 和 Avent of Code 题解。
分布式算法
raft-rs
raft-rs 是由 Tikv 提供的 Raft 分布式算法实现。Raft是一个强一致性的分布式算法,比 Paxos 协议更简单、更好理解
密码学
Rust Crypto
Rust Crypto提供了一些常用的密码学算法实现,更新较为活跃。
专用算法
rust-bio
rust-bio 有常用的生物信息学所需的算法和数据结构。
位字段
定义和操作位字段
使用 bitflags! 宏可以帮助我们创建安全的位字段类型 MyFlags,然后为其实现基本的 clear 操作。以下代码展示了基本的位操作和格式化:
use bitflags::bitflags;
use std::fmt;

bitflags! {
    struct MyFlags: u32 {
        const FLAG_A       = 0b00000001;
        const FLAG_B       = 0b00000010;
        const FLAG_C       = 0b00000100;
        const FLAG_ABC     = Self::FLAG_A.bits
                           | Self::FLAG_B.bits
                           | Self::FLAG_C.bits;
    }
}

impl MyFlags {
    pub fn clear(&mut self) -> &mut MyFlags {
        self.bits = 0;
        self
    }
}

impl fmt::Display for MyFlags {
    fn fmt(&self, f: &mut fmt::Formatter) -> fmt::Result {
        write!(f, "{:032b}", self.bits)
    }
}

fn main() {
    let e1 = MyFlags::FLAG_A | MyFlags::FLAG_C;
    let e2 = MyFlags::FLAG_B | MyFlags::FLAG_C;
    assert_eq!((e1 | e2), MyFlags::FLAG_ABC);
    assert_eq!((e1 & e2), MyFlags::FLAG_C);
    assert_eq!((e1 - e2), MyFlags::FLAG_A);
    assert_eq!(!e2, MyFlags::FLAG_A);

    let mut flags = MyFlags::FLAG_ABC;
    assert_eq!(format!("{}", flags), "00000000000000000000000000000111");
    assert_eq!(format!("{}", flags.clear()), "00000000000000000000000000000000");
    assert_eq!(format!("{:?}", MyFlags::FLAG_B), "FLAG_B");
    assert_eq!(format!("{:?}", MyFlags::FLAG_A | MyFlags::FLAG_B), "FLAG_A | FLAG_B");
}
生成随机值
生成随机数
使用 rand::thread_rng 可以获取一个随机数生成器 rand::Rng ,该生成器需要在每个线程都初始化一个。
整数的随机分布范围等于类型的取值范围,但是浮点数只分布在 [0, 1) 区间内。
use rand::Rng;

fn main() {
    let mut rng = rand::thread_rng();

    let n1: u8 = rng.gen();
    let n2: u16 = rng.gen();
    println!("Random u8: {}", n1);
    println!("Random u16: {}", n2);
    println!("Random u32: {}", rng.gen::<u32>());
    println!("Random i32: {}", rng.gen::<i32>());
    println!("Random float: {}", rng.gen::<f64>());
}
指定范围生成随机数
使用 Rng::gen_range 生成 [0, 10) 区间内的随机数( 右开区间,不包括 10 )。
use rand::Rng;

fn main() {
    let mut rng = rand::thread_rng();
    println!("Integer: {}", rng.gen_range(0..10));
    println!("Float: {}", rng.gen_range(0.0..10.0));
}
Uniform 可以用于生成均匀分布的随机数。当需要在同一个范围内重复生成随机数时,该方法虽然和之前的方法效果一样,但会更快一些。
use rand::distributions::{Distribution, Uniform};

fn main() {
    let mut rng = rand::thread_rng();
    let die = Uniform::from(1..7);

    loop {
        let throw = die.sample(&mut rng);
        println!("Roll the die: {}", throw);
        if throw == 6 {
            break;
        }
    }
}
使用指定分布来生成随机数
默认情况下,rand 包使用均匀分布来生成随机数,而 rand_distr 包提供了其它类型的分布方式。
首先,你需要获取想要使用的分布的实例,然后在 rand::Rng 的帮助下使用 Distribution::sample 对该实例进行取样。
如果想要查询可用的分布列表,可以访问这里,下面的示例中我们将使用 Normal 分布:
use rand_distr::{Distribution, Normal, NormalError};
use rand::thread_rng;

fn main() -> Result<(), NormalError> {
    let mut rng = thread_rng();
    let normal = Normal::new(2.0, 3.0)?;
    let v = normal.sample(&mut rng);
    println!("{} is from a N(2, 9) distribution", v);
    Ok(())
}
在自定义类型中生成随机值
使用 Distribution 特征包裹我们的自定义类型,并为 Standard 实现该特征,可以为自定义类型的指定字段生成随机数。
use rand::Rng;
use rand::distributions::{Distribution, Standard};

#[derive(Debug)]
struct Point {
    x: i32,
    y: i32,
}

impl Distribution<Point> for Standard {
    fn sample<R: Rng + ?Sized>(&self, rng: &mut R) -> Point {
        let (rand_x, rand_y) = rng.gen();
        Point {
            x: rand_x,
            y: rand_y,
        }
    }
}

fn main() {
    let mut rng = rand::thread_rng();

    // 生成一个随机的 Point
    let rand_point: Point = rng.gen();
    println!("Random Point: {:?}", rand_point);

    // 通过类型暗示( hint )生成一个随机的元组
    let rand_tuple = rng.gen::<(i32, bool, f64)>();
    println!("Random tuple: {:?}", rand_tuple);
}
生成随机的字符串(A-Z, a-z, 0-9)
通过 Alphanumeric 采样来生成随机的 ASCII 字符串,包含从 A-Z, a-z, 0-9 的字符。
use rand::{thread_rng, Rng};
use rand::distributions::Alphanumeric;

fn main() {
    let rand_string: String = thread_rng()
        .sample_iter(&Alphanumeric)
        .take(30)
        .map(char::from)
        .collect();

    println!("{}", rand_string);
}
生成随机的字符串( 用户指定 ASCII 字符 )
通过 gen_string 生成随机的 ASCII 字符串,包含用户指定的字符。
fn main() {
    use rand::Rng;
    const CHARSET: &[u8] = b"ABCDEFGHIJKLMNOPQRSTUVWXYZ\
                            abcdefghijklmnopqrstuvwxyz\
                            0123456789)(*&^%$#@!~";
    const PASSWORD_LEN: usize = 30;
    let mut rng = rand::thread_rng();

    let password: String = (0..PASSWORD_LEN)
        .map(|_| {
            let idx = rng.gen_range(0..CHARSET.len());
            CHARSET[idx] as char
        })
        .collect();

    println!("{:?}", password);
}
Vector 排序
对整数 Vector 排序
以下示例使用 Vec::sort 来排序,如果大家希望获得更高的性能,可以使用 Vec::sort_unstable,但是该方法无法保留相等元素的顺序。
fn main() {
    let mut vec = vec![1, 5, 10, 2, 15];

    vec.sort();

    assert_eq!(vec, vec![1, 2, 5, 10, 15]);
}
对浮点数 Vector 排序
浮点数数组可以使用 Vec::sort_by 和 PartialOrd::partial_cmp 进行排序。
fn main() {
    let mut vec = vec![1.1, 1.15, 5.5, 1.123, 2.0];

    vec.sort_by(|a, b| a.partial_cmp(b).unwrap());

    assert_eq!(vec, vec![1.1, 1.123, 1.15, 2.0, 5.5]);
}
对结构体 Vector 排序
以下示例中的结构体 Person 将实现基于字段 name 和 age 的自然排序。为了让 Person 变为可排序的,我们需要为其派生 Eq、PartialEq、Ord、PartialOrd 特征,关于这几个特征的详情,请见这里。
当然,还可以使用 vec:sort_by 方法配合一个自定义比较函数,只按照 age 的维度对 Person 数组排序。
#[derive(Debug, Eq, Ord, PartialEq, PartialOrd)]
struct Person {
    name: String,
    age: u32
}

impl Person {
    pub fn new(name: String, age: u32) -> Self {
        Person {
            name,
            age
        }
    }
}

fn main() {
    let mut people = vec![
        Person::new("Zoe".to_string(), 25),
        Person::new("Al".to_string(), 60),
        Person::new("John".to_string(), 1),
    ];

    // 通过派生后的自然顺序(Name and age)排序
    people.sort();

    assert_eq!(
        people,
        vec![
            Person::new("Al".to_string(), 60),
            Person::new("John".to_string(), 1),
            Person::new("Zoe".to_string(), 25),
        ]);

    // 只通过 age 排序
    people.sort_by(|a, b| b.age.cmp(&a.age));

    assert_eq!(
        people,
        vec![
            Person::new("Al".to_string(), 60),
            Person::new("Zoe".to_string(), 25),
            Person::new("John".to_string(), 1),
        ]);

}
使用tar包
解压 tar 包
以下代码将解压缩( GzDecoder )当前目录中的 archive.tar.gz ,并将所有文件抽取出( Archive::unpack )来后当入到当前目录中。
use std::fs::File;
use flate2::read::GzDecoder;
use tar::Archive;

fn main() -> Result<(), std::io::Error> {
    let path = "archive.tar.gz";

    let tar_gz = File::open(path)?;
    let tar = GzDecoder::new(tar_gz);
    let mut archive = Archive::new(tar);
    archive.unpack(".")?;

    Ok(())
}
将目录压缩成 tar 包
以下代码将 /var/log 目录压缩成 archive.tar.gz:
- 创建一个 File 文件,并使用 GzEncoder 和 tar::Builder 对其进行包裹
- 通过 Builder::append_dir_all 将
/var/log目录下的所有内容添加到压缩文件中,该文件在backup/logs目录下。 - GzEncoder 负责在写入压缩文件
archive.tar.gz之前对数据进行压缩。
use std::fs::File;
use flate2::Compression;
use flate2::write::GzEncoder;

fn main() -> Result<(), std::io::Error> {
    let tar_gz = File::create("archive.tar.gz")?;
    let enc = GzEncoder::new(tar_gz, Compression::default());
    let mut tar = tar::Builder::new(enc);
    tar.append_dir_all("backup/logs", "/var/log")?;
    Ok(())
}
解压的同时删除指定的文件前缀
遍历目录中的文件 Archive::entries,若解压前的文件名包含 bundle/logs 前缀,需要将前缀从文件名移除( Path::strip_prefix )后,再解压。
use std::fs::File;
use std::path::PathBuf;
use flate2::read::GzDecoder;
use tar::Archive;

fn main() -> Result<()> {
    let file = File::open("archive.tar.gz")?;
    let mut archive = Archive::new(GzDecoder::new(file));
    let prefix = "bundle/logs";

    println!("Extracted the following files:");
    archive
        .entries()? // 获取压缩档案中的文件条目列表
        .filter_map(|e| e.ok())
        // 对每个文件条目进行 map 处理
        .map(|mut entry| -> Result<PathBuf> {
            // 将文件路径名中的前缀移除,获取一个新的路径名
            let path = entry.path()?.strip_prefix(prefix)?.to_owned();
            // 将内容解压到新的路径名中
            entry.unpack(&path)?;
            Ok(path)
        })
        .filter_map(|e| e.ok())
        .for_each(|x| println!("> {}", x.display()));

    Ok(())
}
哈希
计算文件的 SHA-256 摘要
写入一些数据到文件中,然后使用 digest::Context 来计算文件内容的 SHA-256 摘要 digest::Digest。
use error_chain::error_chain;
use data_encoding::HEXUPPER;
use ring::digest::{Context, Digest, SHA256};
use std::fs::File;
use std::io::{BufReader, Read, Write};

error_chain! {
   foreign_links {
       Io(std::io::Error);
       Decode(data_encoding::DecodeError);
   }
}

fn sha256_digest<R: Read>(mut reader: R) -> Result<Digest> {
    let mut context = Context::new(&SHA256);
    let mut buffer = [0; 1024];

    loop {
        let count = reader.read(&mut buffer)?;
        if count == 0 {
            break;
        }
        context.update(&buffer[..count]);
    }

    Ok(context.finish())
}

fn main() -> Result<()> {
    let path = "file.txt";

    let mut output = File::create(path)?;
    write!(output, "We will generate a digest of this text")?;

    let input = File::open(path)?;
    let reader = BufReader::new(input);
    let digest = sha256_digest(reader)?;

    println!("SHA-256 digest is {}", HEXUPPER.encode(digest.as_ref()));

    Ok(())
}
使用 HMAC 摘要来签名和验证消息
使用 ring::hmac 创建一个字符串签名并检查该签名的正确性。
use ring::{hmac, rand};
use ring::rand::SecureRandom;
use ring::error::Unspecified;

fn main() -> Result<(), Unspecified> {
    let mut key_value = [0u8; 48];
    let rng = rand::SystemRandom::new();
    rng.fill(&mut key_value)?;
    let key = hmac::Key::new(hmac::HMAC_SHA256, &key_value);

    let message = "Legitimate and important message.";
    let signature = hmac::sign(&key, message.as_bytes());
    hmac::verify(&key, message.as_bytes(), signature.as_ref())?;

    Ok(())
}
加密
使用 PBKDF2 对密码进行哈希和加盐( salt )
ring::pbkdf2 可以对一个加盐密码进行哈希。
use data_encoding::HEXUPPER;
use ring::error::Unspecified;
use ring::rand::SecureRandom;
use ring::{digest, pbkdf2, rand};
use std::num::NonZeroU32;

fn main() -> Result<(), Unspecified> {
    const CREDENTIAL_LEN: usize = digest::SHA512_OUTPUT_LEN;
    let n_iter = NonZeroU32::new(100_000).unwrap();
    let rng = rand::SystemRandom::new();

    let mut salt = [0u8; CREDENTIAL_LEN];
    // 生成 salt: 将安全生成的随机数填入到字节数组中
    rng.fill(&mut salt)?;

    let password = "Guess Me If You Can!";
    let mut pbkdf2_hash = [0u8; CREDENTIAL_LEN];
    pbkdf2::derive(
        pbkdf2::PBKDF2_HMAC_SHA512,
        n_iter,
        &salt,
        password.as_bytes(),
        &mut pbkdf2_hash,
    );
    println!("Salt: {}", HEXUPPER.encode(&salt));
    println!("PBKDF2 hash: {}", HEXUPPER.encode(&pbkdf2_hash));

    // `verify` 检查哈希是否正确
    let should_`succeed = pbkdf2::verify(
        pbkdf2::PBKDF2_HMAC_SHA512,
        n_iter,
        &salt,
        password.as_bytes(),
        &pbkdf2_hash,
    );
    let wrong_password = "Definitely not the correct password";
    let should_fail = pbkdf2::verify(
        pbkdf2::PBKDF2_HMAC_SHA512,
        n_iter,
        &salt,
        wrong_password.as_bytes(),
        &pbkdf2_hash,
    );

    assert!(should_succeed.is_ok());
    assert!(!should_fail.is_ok());

    Ok(())
}
线性代数
矩阵相加
使用 ndarray::arr2 可以创建二阶矩阵,并计算它们的和。
use ndarray::arr2;

fn main() {
    let a = arr2(&[[1, 2, 3],
                   [4, 5, 6]]);

    let b = arr2(&[[6, 5, 4],
                   [3, 2, 1]]);

    // 借用 a 和 b,求和后生成新的矩阵 sum
    let sum = &a + &b;

    println!("{}", a);
    println!("+");
    println!("{}", b);
    println!("=");
    println!("{}", sum);
}
矩阵相乘
ndarray::ArrayBase::dot 可以用于计算矩阵乘法。
use ndarray::arr2;

fn main() {
    let a = arr2(&[[1, 2, 3],
                   [4, 5, 6]]);

    let b = arr2(&[[6, 3],
                   [5, 2],
                   [4, 1]]);

    println!("{}", a.dot(&b));
}
标量、向量、矩阵相乘
在 ndarry中,1 阶数组根据上下文既可以作为行向量也可以作为列向量。如果对你来说,这个行或列的方向很重要,可以考虑使用一行或一列的 2 阶数组来表示。
在下面例子中,由于 1 阶数组处于乘号的右边位置,因此 dot 会把它当成列向量来处理。
use ndarray::{arr1, arr2, Array1};

fn main() {
    let scalar = 4;

    let vector = arr1(&[1, 2, 3]);

    let matrix = arr2(&[[4, 5, 6],
                        [7, 8, 9]]);

    let new_vector: Array1<_> = scalar * vector;
    println!("{}", new_vector);

    let new_matrix = matrix.dot(&new_vector);
    println!("{}", new_matrix);
}
向量比较
浮点数通常是不精确的,因此比较浮点数不是一件简单的事。approx 提供的 assert_abs_diff_eq! 宏提供了方便的按元素比较的方式。为了使用 approx ,你需要在 ndarray 的依赖中开启相应的 feature:例如,在 Cargo.toml 中修改 ndarray 的依赖引入为 ndarray = { version = "0.13", features = ["approx"] }。
use approx::assert_abs_diff_eq;
use ndarray::Array;

fn main() {
  let a = Array::from(vec![1., 2., 3., 4., 5.]);
  let b = Array::from(vec![5., 4., 3., 2., 1.]);
  let mut c = Array::from(vec![1., 2., 3., 4., 5.]);
  let mut d = Array::from(vec![5., 4., 3., 2., 1.]);

  // 消耗 a 和 b 的所有权
  let z = a + b;
  // 借用 c 和 d
  let w =  &c + &d;

  assert_abs_diff_eq!(z, Array::from(vec![6., 6., 6., 6., 6.]));

  println!("c = {}", c);
  c[0] = 10.;
  d[1] = 10.;

  assert_abs_diff_eq!(w, Array::from(vec![6., 6., 6., 6., 6.]));

}
向量范数( norm )
需要注意的是 Array 和 ArrayView 都是 ArrayBase 的别名。因此一个更通用的参数应该是 &ArrayBase<S, Ix1> where S: Data,特别是在你提供一个公共 API 给其它用户时,但由于咱们是内部使用,因此更精准的 ArrayView1<f64> 会更适合。
use ndarray::{array, Array1, ArrayView1};

fn l1_norm(x: ArrayView1<f64>) -> f64 {
    x.fold(0., |acc, elem| acc + elem.abs())
}

fn l2_norm(x: ArrayView1<f64>) -> f64 {
    x.dot(&x).sqrt()
}

fn normalize(mut x: Array1<f64>) -> Array1<f64> {
    let norm = l2_norm(x.view());
    x.mapv_inplace(|e| e/norm);
    x
}

fn main() {
    let x = array![1., 2., 3., 4., 5.];
    println!("||x||_2 = {}", l2_norm(x.view()));
    println!("||x||_1 = {}", l1_norm(x.view()));
    println!("Normalizing x yields {:?}", normalize(x));
}
矩阵的逆变换
例子中使用 nalgebra::Matrix3 创建一个 3x3 的矩阵,然后尝试对其进行逆变换,获取一个逆矩阵。
use nalgebra::Matrix3;

fn main() {
    let m1 = Matrix3::new(2.0, 1.0, 1.0, 3.0, 2.0, 1.0, 2.0, 1.0, 2.0);
    println!("m1 = {}", m1);
    match m1.try_inverse() {
        Some(inv) => {
            println!("The inverse of m1 is: {}", inv);
        }
        None => {
            println!("m1 is not invertible!");
        }
    }
}
序列/反序列化一个矩阵
下面将展示如何将矩阵序列化为 JSON ,然后再反序列化为原矩阵。
extern crate nalgebra;
extern crate serde_json;

use nalgebra::DMatrix;

fn main() -> Result<(), std::io::Error> {
    let row_slice: Vec<i32> = (1..5001).collect();
    let matrix = DMatrix::from_row_slice(50, 100, &row_slice);

    // 序列化矩阵
    let serialized_matrix = serde_json::to_string(&matrix)?;

    // 反序列化
    let deserialized_matrix: DMatrix<i32> = serde_json::from_str(&serialized_matrix)?;

    // 验证反序列化后的矩阵跟原始矩阵相等
    assert!(deserialized_matrix == matrix);

    Ok(())
}
三角函数
三角形边长计算
计算角为 2 弧度、对边长度为 80 的直角三角形的斜边长度。
fn main() {
    let angle: f64 = 2.0;
    let side_length = 80.0;

    let hypotenuse = side_length / angle.sin();

    println!("Hypotenuse: {}", hypotenuse);
}
验证 tan = sin / cos
fn main() {
    let x: f64 = 6.0;

    let a = x.tan();
    let b = x.sin() / x.cos();

    assert_eq!(a, b);
}
地球上两点间的距离
下面的代码使用 Haversine 公式 计算地球上两点之间的公里数。
fn main() {
    let earth_radius_kilometer = 6371.0_f64;
    let (paris_latitude_degrees, paris_longitude_degrees) = (48.85341_f64, -2.34880_f64);
    let (london_latitude_degrees, london_longitude_degrees) = (51.50853_f64, -0.12574_f64);

    let paris_latitude = paris_latitude_degrees.to_radians();
    let london_latitude = london_latitude_degrees.to_radians();

    let delta_latitude = (paris_latitude_degrees - london_latitude_degrees).to_radians();
    let delta_longitude = (paris_longitude_degrees - london_longitude_degrees).to_radians();

    let central_angle_inner = (delta_latitude / 2.0).sin().powi(2)
        + paris_latitude.cos() * london_latitude.cos() * (delta_longitude / 2.0).sin().powi(2);
    let central_angle = 2.0 * central_angle_inner.sqrt().asin();

    let distance = earth_radius_kilometer * central_angle;

    println!(
        "Distance between Paris and London on the surface of Earth is {:.1} kilometers",
        distance
    );
}
复数
创建复数
num::complex::Complex 可以帮助我们创建复数,其中实部和虚部必须是一样的类型。
fn main() {
    let complex_integer = num::complex::Complex::new(10, 20);
    let complex_float = num::complex::Complex::new(10.1, 20.1);

    println!("Complex integer: {}", complex_integer);
    println!("Complex float: {}", complex_float);
}
复数相加
复数计算和 Rust 基本类型的计算并无区别。
fn main() {
    let complex_num1 = num::complex::Complex::new(10.0, 20.0); // Must use floats
    let complex_num2 = num::complex::Complex::new(3.1, -4.2);

    let sum = complex_num1 + complex_num2;

    println!("Sum: {}", sum);
}
数学函数
在 num::complex::Complex 中定义了一些内置的数学函数,可用于对复数进行数学运算。
use std::f64::consts::PI;
use num::complex::Complex;

fn main() {
    let x = Complex::new(0.0, 2.0*PI);

    println!("e^(2i * pi) = {}", x.exp()); // =~1
}
统计
测量中心趋势
下面的一些例子为 Rust 数组中的数据计算它们的中心趋势。
平均值
首先计算的是平均值。
fn main() {
    let data = [3, 1, 6, 1, 5, 8, 1, 8, 10, 11];

    let sum = data.iter().sum::<i32>() as f32;
    let count = data.len();

    let mean = match count {
       positive if positive > 0 => Some(sum  / count as f32),
       _ => None
    };

    println!("Mean of the data is {:?}", mean);
}
中位数
下面使用快速选择算法来计算中位数。该算法只会对可能包含中位数的数据分区进行排序,从而避免了对所有数据进行全排序。
use std::cmp::Ordering;

fn partition(data: &[i32]) -> Option<(Vec<i32>, i32, Vec<i32>)> {
    match data.len() {
        0 => None,
        _ => {
            let (pivot_slice, tail) = data.split_at(1);
            let pivot = pivot_slice[0];
            let (left, right) = tail.iter()
                .fold((vec![], vec![]), |mut splits, next| {
                    {
                        let (ref mut left, ref mut right) = &mut splits;
                        if next < &pivot {
                            left.push(*next);
                        } else {
                            right.push(*next);
                        }
                    }
                    splits
                });

            Some((left, pivot, right))
        }
    }
}

fn select(data: &[i32], k: usize) -> Option<i32> {
    let part = partition(data);

    match part {
        None => None,
        Some((left, pivot, right)) => {
            let pivot_idx = left.len();

            match pivot_idx.cmp(&k) {
                Ordering::Equal => Some(pivot),
                Ordering::Greater => select(&left, k),
                Ordering::Less => select(&right, k - (pivot_idx + 1)),
            }
        },
    }
}

fn median(data: &[i32]) -> Option<f32> {
    let size = data.len();

    match size {
        even if even % 2 == 0 => {
            let fst_med = select(data, (even / 2) - 1);
            let snd_med = select(data, even / 2);

            match (fst_med, snd_med) {
                (Some(fst), Some(snd)) => Some((fst + snd) as f32 / 2.0),
                _ => None
            }
        },
        odd => select(data, odd / 2).map(|x| x as f32)
    }
}

fn main() {
    let data = [3, 1, 6, 1, 5, 8, 1, 8, 10, 11];

    let part = partition(&data);
    println!("Partition is {:?}", part);

    let sel = select(&data, 5);
    println!("Selection at ordered index {} is {:?}", 5, sel);

    let med = median(&data);
    println!("Median is {:?}", med);
}
众数( mode )
下面使用了 HashMap 对不同数字出现的次数进行了分别统计。
use std::collections::HashMap;

fn main() {
    let data = [3, 1, 6, 1, 5, 8, 1, 8, 10, 11];

    let frequencies = data.iter().fold(HashMap::new(), |mut freqs, value| {
        *freqs.entry(value).or_insert(0) += 1;
        freqs
    });

    let mode = frequencies
        .into_iter()
        .max_by_key(|&(_, count)| count)
        .map(|(value, _)| *value);

    println!("Mode of the data is {:?}", mode);
}
标准偏差
下面一起来看看该如何计算一组测量值的标准偏差和 z-score。
fn mean(data: &[i32]) -> Option<f32> {
    let sum = data.iter().sum::<i32>() as f32;
    let count = data.len();

    match count {
        positive if positive > 0 => Some(sum / count as f32),
        _ => None,
    }
}

fn std_deviation(data: &[i32]) -> Option<f32> {
    match (mean(data), data.len()) {
        (Some(data_mean), count) if count > 0 => {
            let variance = data.iter().map(|value| {
                let diff = data_mean - (*value as f32);

                diff * diff
            }).sum::<f32>() / count as f32;

            Some(variance.sqrt())
        },
        _ => None
    }
}

fn main() {
    let data = [3, 1, 6, 1, 5, 8, 1, 8, 10, 11];

    let data_mean = mean(&data);
    println!("Mean is {:?}", data_mean);

    let data_std_deviation = std_deviation(&data);
    println!("Standard deviation is {:?}", data_std_deviation);

    let zscore = match (data_mean, data_std_deviation) {
        (Some(mean), Some(std_deviation)) => {
            let diff = data[4] as f32 - mean;

            Some(diff / std_deviation)
        },
        _ => None
    };
    println!("Z-score of data at index 4 (with value {}) is {:?}", data[4], zscore);
}
杂项
大整数 Big int
使用 BitInt 可以对超过 128bit 的整数进行计算。
use num::bigint::{BigInt, ToBigInt};

fn factorial(x: i32) -> BigInt {
    if let Some(mut factorial) = 1.to_bigint() {
        for i in 1..=x {
            factorial = factorial * i;
        }
        factorial
    }
    else {
        panic!("Failed to calculate factorial!");
    }
}

fn main() {
    println!("{}! equals {}", 100, factorial(100));
}
命令行工具
对于每一个程序员而言,命令行工具都非常关键。你对他越熟悉,在使用计算机、处理工作流程等越是高效。
下面我们收集了一些优秀的Rust所写的命令行工具,它们相比目前已有的其它语言的实现,可以提供更加现代化的代码实现、更加高效的性能以及更好的可用性。
索引目录
| 新工具 | 替代的目标或功能描述 |
|---|---|
| bat | cat |
| exa | ls |
| lsd | ls |
| fd | find |
| procs | ps |
| sd | sed |
| dust | du |
| starship | 现代化的命令行提示 |
| ripgrep | grep |
| tokei | 代码统计工具 |
| hyperfine | 命令行benchmark工具 |
| bottom | top |
| teeldear | tldr |
| grex | 根据文本示例生成正则 |
| bandwitch | 显示进程、连接网络使用情况 |
| zoxide | cd |
| delta | git可视化 |
| nushell | 全新的现代化shell |
| mcfly | 替代ctrl + R命令搜索 |
| fselect | 使用SQL语法查找文件 |
| pueue | 命令行任务管理工具 |
| watchexec | 监视目录文件变动并执行命令 |
| dura | 更加安全的使用git |
| alacritty | 强大的基于OpenGL的终端 |
| broot | 可视化访问目录树 |
bat
bat克隆了**cat**的功能并提供了语法高亮和Git集成,它支持Windows,MacOS和Linux`。同时,它默认提供了多种文件后缀的语法高亮。

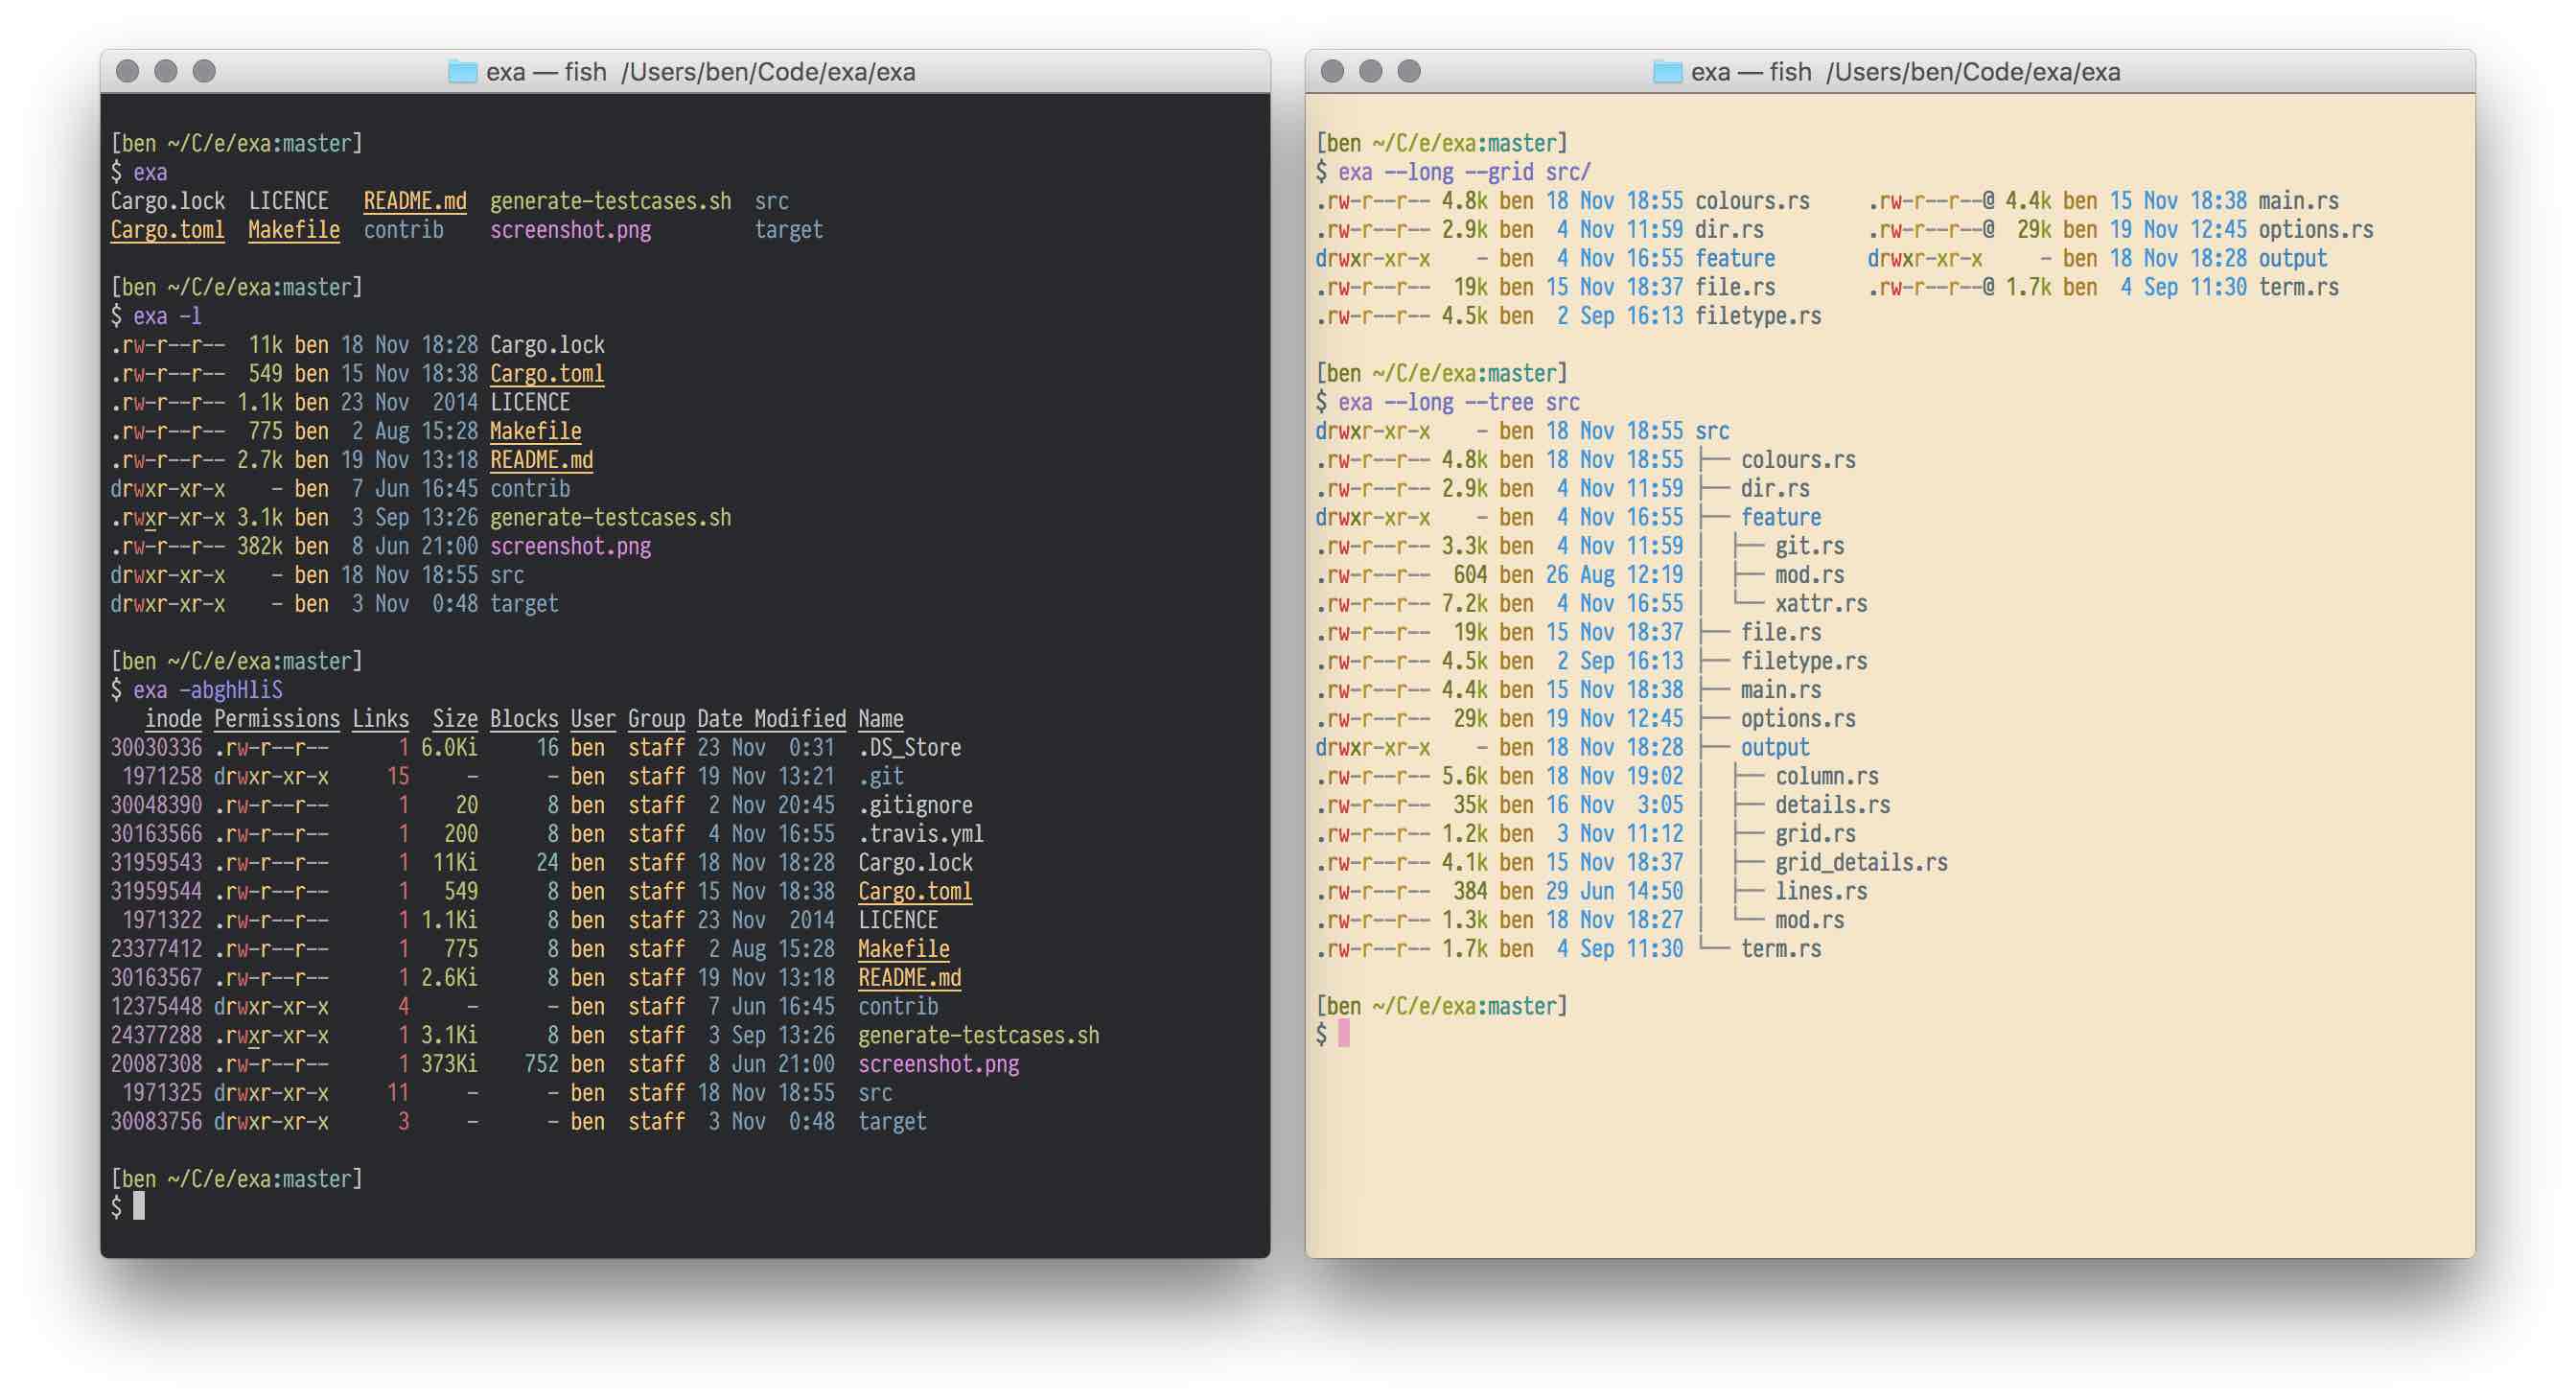
exa
exa是ls命令的现代化实现,后者是目前Unix/Linux系统的默认命令,用于列出当前目录中的内容。
lsd
lsd 也是 ls 的新实现,同时增加了很多特性,例如:颜色标注、icons、树形查看、更多的格式化选项等。

fd
fd 是一个更快、对用户更友好的find实现,后者是 Unix/Linux 内置的文件目录搜索工具。之所以说它用户友好,一方面是 API 非常清晰明了,其次是它对最常用的场景提供了有意义的默认值:例如,想要通过名称搜索文件:
fd:fd PATTERNfind:find -iname 'PATTERN'
同时 fd 性能非常非常高,还提供了非常多的搜索选项,例如允许用户通过 .gitignore 文件忽略隐藏的目录、文件等。

procs
procs 是 ps 的默认实现,后者是 Unix/Linux 的内置命令,用于获取进程( process )的信息。proc 提供了更便利、可读性更好的格式化输出。

sd
sd 是 sed 命令的现代化实现,后者是 Unix/Linux 中内置的工具,用于分析和转换文本。
sd 拥有更简单的使用方式,而且支持方便的正则表达式语法,sd 拥有闪电般的性能,比 sed 快 2x-11x 倍。
以下是其中一个性能测试结果:
对1.5G大小的 JSON 文本进行简单替换
hyperfine -w 3 'sed -E "s/\"/\'/g" *.json >/dev/null' 'sd "\"" "\'" *.json >/dev/null' --export-markdown out.md
| Command | Mean [s] | Min…Max [s] |
|---|---|---|
sed -E "s/\"/'/g" *.json >/dev/null | 2.338 ± 0.008 | 2.332…2.358 |
sed "s/\"/'/g" *.json >/dev/null | 2.365 ± 0.009 | 2.351…2.378 |
sd "\"" "'" *.json >/dev/null | 0.997 ± 0.006 | 0.987…1.007 |
结果: ~2.35 times faster
dust
dust 是一个更符合使用习惯的du,后者是 Unix/Linux 内置的命令行工具,用于显示硬盘使用情况的统计。

starship
starship 是一个命令行提示,支持任何 shell ,包括 zsh ,简单易用、非常快且拥有极高的可配置性, 同时支持智能提示。
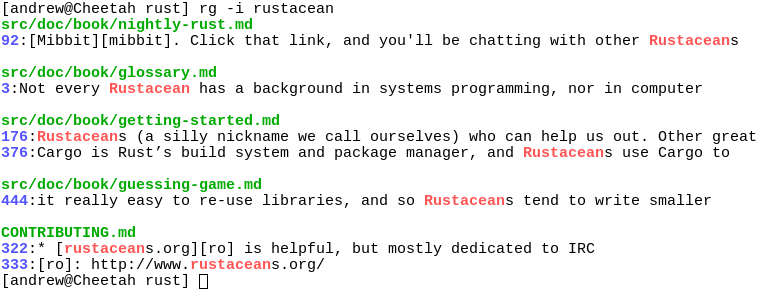
ripgrep
ripgrep 是一个性能极高的现代化 grep 实现,后者是 Unix/Linux 下的内置文件搜索工具。该项目是 Rust 的明星项目,一个是因为性能极其的高,另一个就是源代码质量很高,值得学习, 同时 Vscode 使用它作为内置的搜索引擎。
从功能来说,除了全面支持 grep 的功能外,repgre 支持使用正则递归搜索指定的文件目录,默认使用 .gitignore 对指定的文件进行忽略。
tokei
tokei 可以分门别类的统计目录内的代码行数,速度非常快!

hyperfine
hyperfine 是命令行benchmark工具,它支持在多次运行中提供静态的分析,同时支持任何的 shell 命令,准确的 benchmark 进度和当前预估等等高级特性。

bottom
bottom 是一个现代化实现的 top,可以跨平台、图形化的显示进程/系统的当前信息。

tealdear
tealdear 是一个更快实现的tldr, 一个用于显示 man pages 的命令行程序,简单易用、基于例子和社区驱动是主要特性。

bandwhich
bandwhich 是一个客户端实用工具,用于显示当前进程、连接、远程 IP( hostname ) 的网络信息。

grex
grex 既是一个命令行工具又是一个库,可以根据用户提供的文本示例生成对应的正则表达式,非常强大。

zoxide
zoxide 是一个智能化的 cd 命令,它甚至会记忆你常用的目录。

delta
delta 是一个 git 分页展示工具,支持语法高亮、代码比对、输出 grep 等。

nushell
nushell 是一个全新的 shell ,使用 Rust 实现。它的目标是创建一个现代化的 shell :虽然依然基于 Unix 的哲学,但是更适合现在的时代。例如,你可以使用 SQL 语法来选择你想要的内容!

mcfly
mcfly 会替换默认的 ctrl-R,用于在终端中搜索历史命令, 它提供了智能提示功能,并且会根据当前目录中最近执行过的上下文命令进行提示。mcfly 甚至使用了一个小型的神经网络用于智能提示!

fselect
fselect 允许使用 SQL 语法来查找系统中的文件。它支持复杂查询、聚合查询、.gitignore 忽略文件、通过宽度高度搜索图片、通过 hash 搜索文件、文件属性查询等等,相当强大!
# 复杂查询
fselect "name from /tmp where (name = *.tmp and size = 0) or (name = *.cfg and size > 1000000)"

# 聚合函数
fselect "MIN(size), MAX(size), AVG(size), SUM(size), COUNT(*) from /home/user/Downloads"

# 格式化函数
fselect "LOWER(name), UPPER(name), LENGTH(name), YEAR(modified) from /home/user/Downloads"
pueue
pueue 是一个命令行任务管理工具,它可以管理你的长时间运行的命令,支持顺序或并行执行。简单来说,它可以管理一个命令队列。

watchexec
watchexec 可以监视指定的目录、文件的改动,并执行你预设的命令,支持多种配置项和操作系统。
# 监视当前目录/子目录中的所有js、css、html文件,一旦发生改变,运行`npm run build`命令
$ watchexec -e js,css,html npm run build

# 当前目录/子目录下任何python文件发生改变时,重启`python server.py`
$ watchexec -r -e py -- python server.py
dura
dura 运行在后台,监视你的 git 目录,提交你未提交的更改但是并不会影响 HEAD、当前的分支和 git 索引(staged文件)。
如果你曾经遇到过**"完蛋, 我这几天的工作内容丢了"**的情况,那么就可以尝试下 dura,checkout dura brach,然后代码就可以顺利恢复了:)
恢复代码
- 你可以使用
dura分支来恢复
$ echo "dura/$(git rev-parse HEAD)"
- 也可以手动恢复
# Or, if you don't trust dura yet, `git stash`
$ git reset HEAD --hard
# get the changes into your working directory
$ git checkout $THE_HASH
# last few commands reset HEAD back to master but with changes uncommitted
$ git checkout -b temp-branch
$ git reset master
$ git checkout master
$ git branch -D temp-branch
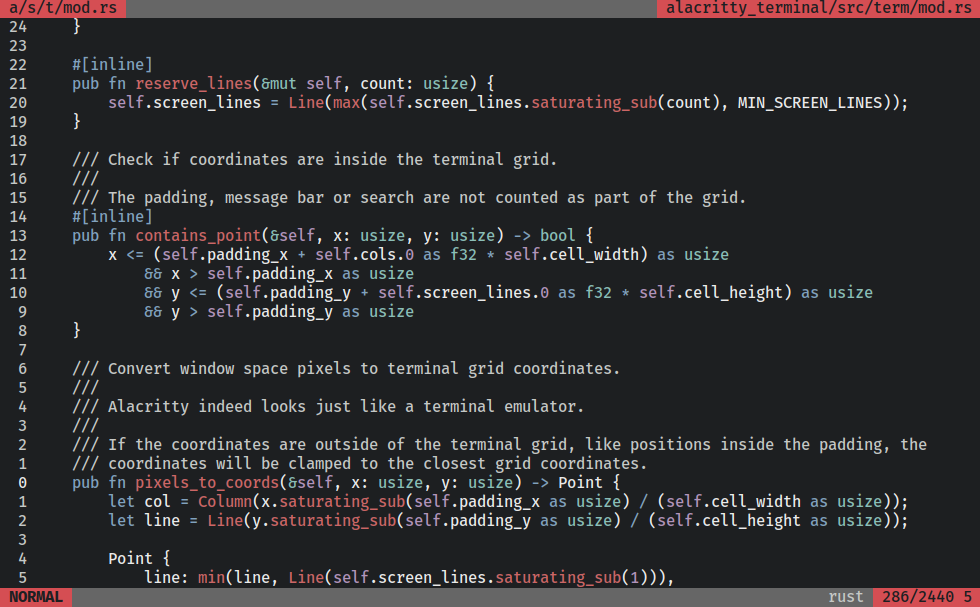
alacritty
alacritty 是一个跨平台、基于OpenGL的终端,性能极高的同时还支持丰富的自定义和可扩展性,可以说是非常优秀的现代化终端。
目前已经是 beta 阶段,可以作为日常工具来使用。
broot
broot 允许你可视化的去访问一个目录结构。

参数解析
Clap
下面的程序给出了使用 clap 来解析命令行参数的样式结构,如果大家想了解更多,在 clap 文档中还给出了另外两种初始化一个应用的方式。
在下面的构建中,value_of 将获取通过 with_name 解析出的值。short 和 long 用于设置用户输入的长短命令格式,例如短命令 -f 和长命令 --file。
use clap::{Arg, App};

fn main() {
    let matches = App::new("My Test Program")
        .version("0.1.0")
        .author("Hackerman Jones <hckrmnjones@hack.gov>")
        .about("Teaches argument parsing")
        .arg(Arg::with_name("file")
                 .short("f")
                 .long("file")
                 .takes_value(true)
                 .help("A cool file"))
        .arg(Arg::with_name("num")
                 .short("n")
                 .long("number")
                 .takes_value(true)
                 .help("Five less than your favorite number"))
        .get_matches();

    let myfile = matches.value_of("file").unwrap_or("input.txt");
    println!("The file passed is: {}", myfile);

    let num_str = matches.value_of("num");
    match num_str {
        None => println!("No idea what your favorite number is."),
        Some(s) => {
            match s.parse::<i32>() {
                Ok(n) => println!("Your favorite number must be {}.", n + 5),
                Err(_) => println!("That's not a number! {}", s),
            }
        }
    }
}
clap 针对上面提供的构建样式,会自动帮我们生成相应的使用方式说明。例如,上面代码生成的使用说明如下:
My Test Program 0.1.0
Hackerman Jones <hckrmnjones@hack.gov>
Teaches argument parsing

USAGE:
    testing [OPTIONS]

FLAGS:
    -h, --help       Prints help information
    -V, --version    Prints version information

OPTIONS:
    -f, --file <file>     A cool file
    -n, --number <num>    Five less than your favorite number
最后,再使用一些参数来运行下我们的代码:
$ cargo run -- -f myfile.txt -n 251
The file passed is: myfile.txt
Your favorite number must be 256.
Structopt
@todo
ANSI 终端
ansi_term 包可以帮我们控制终端上的输出样式,例如使用颜色文字、控制输出格式等,当然,前提是在 ANSI 终端上。
ansi_term 中有两个主要数据结构:ANSIString 和 Style。
Style 用于控制样式:颜色、加粗、闪烁等,而前者是一个带有样式的字符串。
颜色字体
use ansi_term::Colour;

fn main() {
    println!("This is {} in color, {} in color and {} in color",
             Colour::Red.paint("red"),
             Colour::Blue.paint("blue"),
             Colour::Green.paint("green"));
}
加粗字体
比颜色复杂的样式构建需要使用 Style 结构体:
use ansi_term::Style;

fn main() {
    println!("{} and this is not",
             Style::new().bold().paint("This is Bold"));
}
加粗和颜色
Colour 实现了很多跟 Style 类似的函数,因此可以实现链式调用。
use ansi_term::Colour;
use ansi_term::Style;

fn main(){
    println!("{}, {} and {}",
             Colour::Yellow.paint("This is colored"),
             Style::new().bold().paint("this is bold"),
             // Colour 也可以使用 bold 方法进行加粗
             Colour::Yellow.bold().paint("this is bold and colored"));
}
操作系统
操作系统范畴很大,本章节中精选的内容聚焦在用Rust实现的操作系统以及用Rust写操作系统的教程。
目录
| 系统 | 描述 |
|---|---|
| redox | Unix风格的微内核OS |
| tock | 嵌入式操作系统 |
| theseus | 独特设计的OS |
| writing os in rust | 使用Rust开发简单的操作系统 |
| rust-raspberrypi-OS-tutorials | Rust嵌入式系统开发教程 |
| rcore-os | 清华大学提供的rcore操作系统教程 |
| edu-os | 亚琛工业大学操作系统课程的配套项目 |
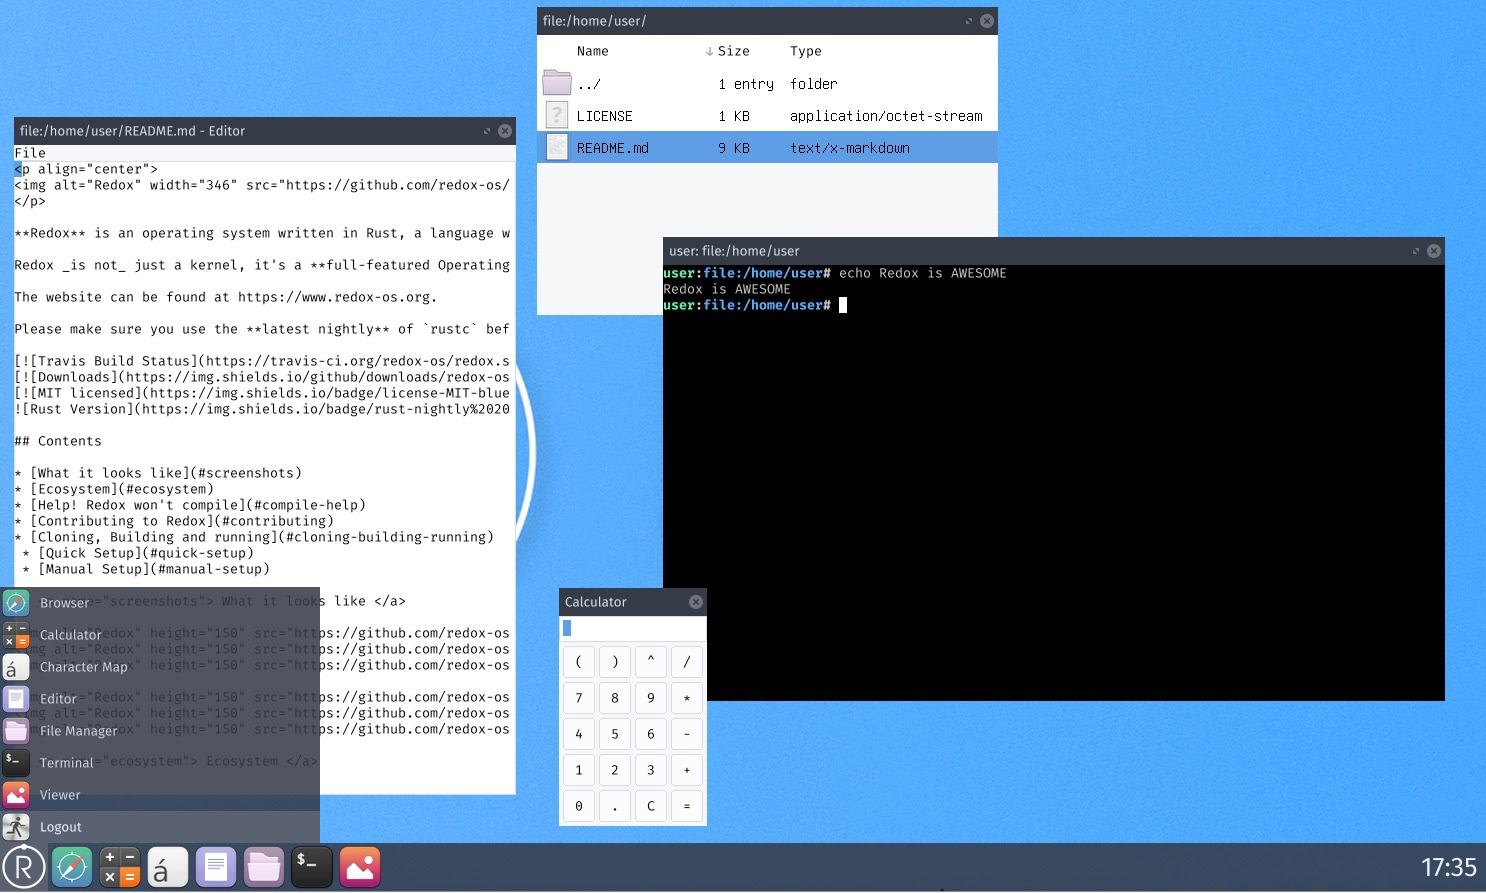
redox
redox 是一个 Unix 风格的微内核操作系统,使用 Rust 实现。redox 的目标是安全、快速、免费、可用,它在内核设计上借鉴了很多优秀的内核,例如:SeL4, MINIX, Plan 9和BSD。
但 redox 不仅仅是一个内核,它还是一个功能齐全的操作系统,提供了操作系统该有的功能,例如:内存分配器、文件系统、显示管理、核心工具等等。你可以大概认为它是一个 GNU 或 BSD 生态,但是是通过一门现代化、内存安全的语言实现的。
不过据我仔细观察,redox目前的开发进度不是很活跃,不知道发生了什么,未来若有新的发现会在这里进行更新 - Sunface

tock
tock 是一个嵌入式操作系统,设计用于在低内存和低功耗的微控制器上运行多个并发的、相互不信任的应用程序,例如它可在 Cortex-M 和 RISC-V 平台上运行。
Tock 使用两个核心机制保护操作系统中不同组件的安全运行:
- 内核和设备驱动全部使用Rust编写,提供了很好安全性的同时,还将内核和设备进行了隔离
- 使用了内存保护单元技术,让应用之间、应用和内核之间实现了安全隔离
具体可通过这本书了解: The Tock Book.

Theseus
Theseus 是从零开始构建的操作系统,完全使用Rust进行开发。它使用了新的操作系统结构、更好的状态管理,以及利用语言内设计原则将操作系统的职责(如资源管理)转移到编译器中。
该OS目前尚处于早期阶段,但是看上去作者很有信心未来可以落地,如果想要了解,可以通过官方提供的在线书籍进行学习。
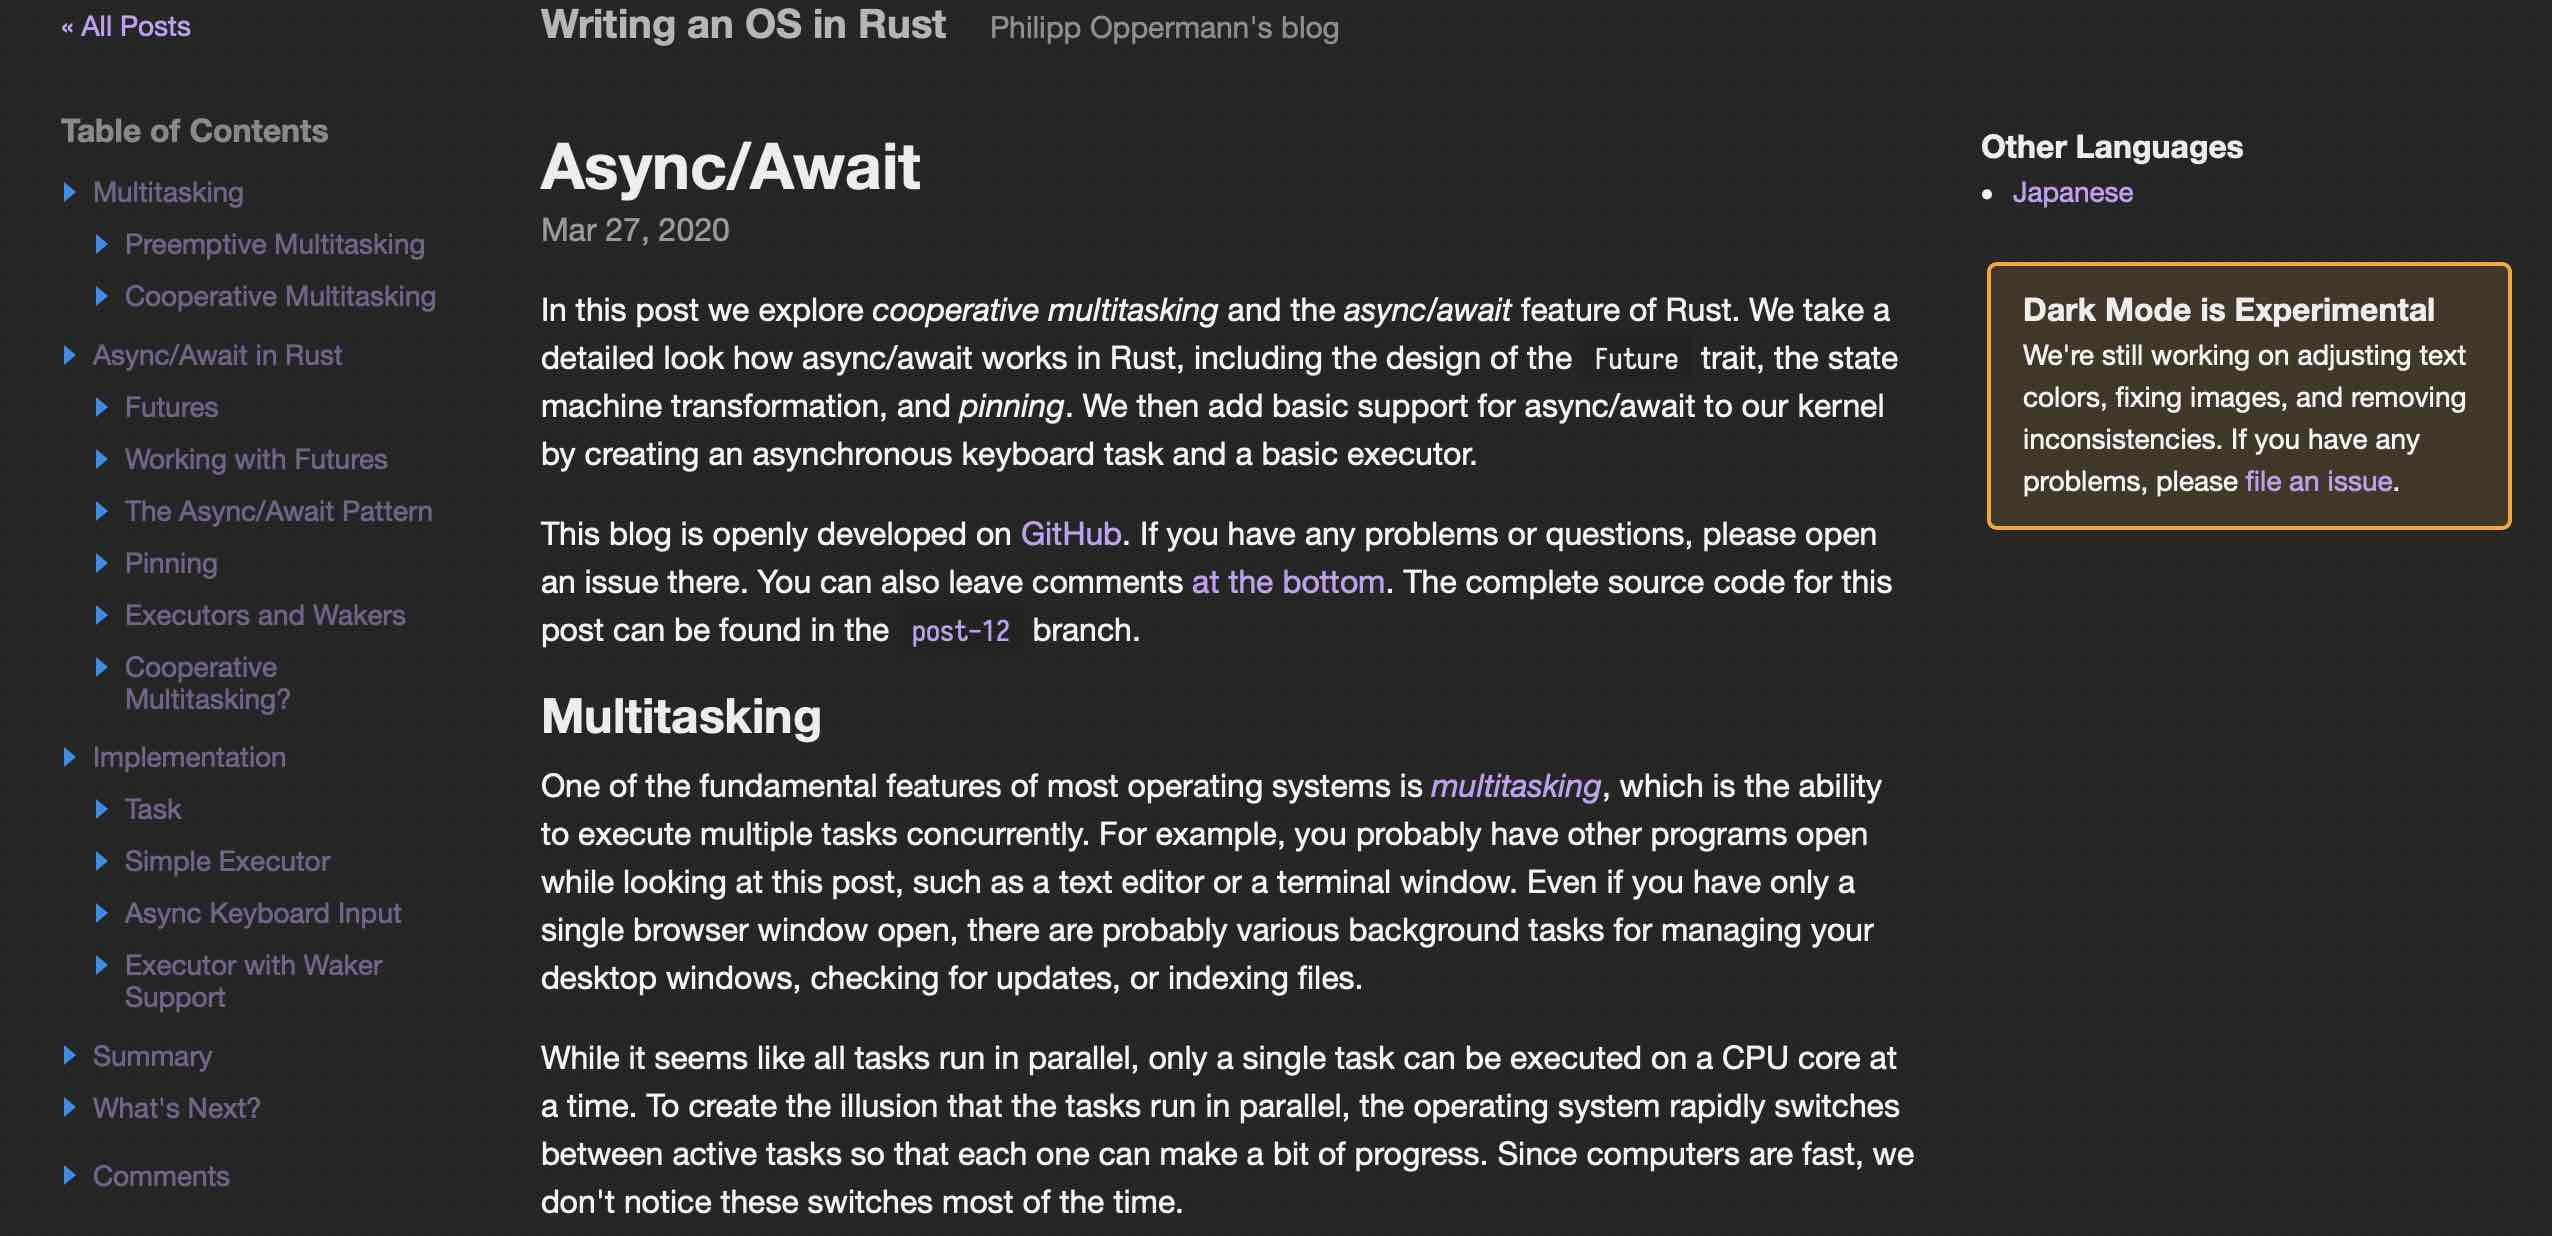
Writing an OS in Rust
Writing an OS in Rust 是非常有名的博客系列,专门讲解如何使用Rust来写一个简单的操作系统,配套源码在这里,目前已经发布了第二版。
以下是async/await的目录截图:
rust-raspberrypi-OS-tutorials
rust-raspberrypi-OS-tutorials 教大家如何用Rust开发一个嵌入式操作系统,可以运行在树莓派上。这个教程讲得很细,号称手把手教学,而且是从零实现,因此很值得学习。


rcore-os
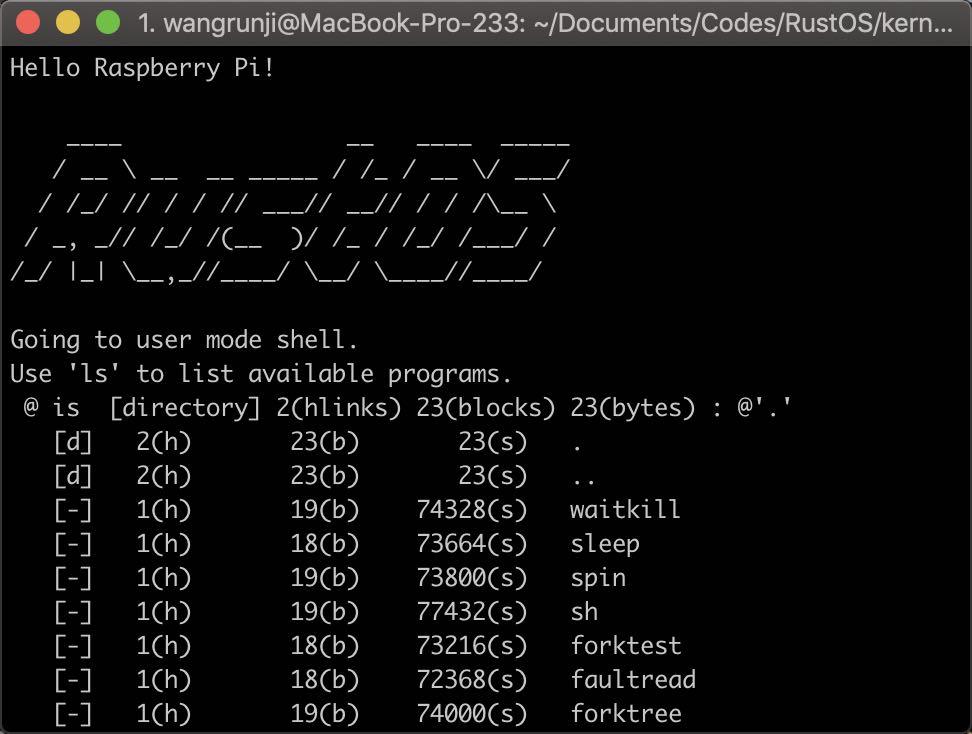
rcore-os 是由清华大学开发的操作系统,用 Rus t实现, 与 linux 相兼容,主要目的目前还是用于教学,因为还有相关的配套教程,非常值得学习。目前支持的功能不完全列表如下:linux 兼容的 syscall 接口、网络协议栈、简单的文件系统、信号系统、异步IO、内核模块化。
以下是在树莓派上运行的图:
edu-os
edu-os 是 Unix 风格的操作系统,用于教学目的,它是亚琛工业大学(RWTH Aachen University)操作系统课程的配套大项目,但是我并没有找到对应的课程资料,根据作者的描述,上面部分的Writing an OS in Rust对他有很大的启发。

处理器
获取逻辑CPU的核心数
num_cpus 可以用于获取逻辑和物理的 CPU 核心数,下面的例子是获取逻辑核心数。
fn main() {
    println!("Number of logical cores is {}", num_cpus::get());
}
调用系统命令
调用一个外部命令并处理输出内容
下面的代码将调用操作系统中的 git log --oneline 命令,然后使用 regex 对它输出到 stdout 上的调用结果进行解析,以获取哈希值和最后 5 条提交信息( commit )。
use error_chain::error_chain;

use std::process::Command;
use regex::Regex;

error_chain!{
   foreign_links {
       Io(std::io::Error);
       Regex(regex::Error);
       Utf8(std::string::FromUtf8Error);
   }
}

#[derive(PartialEq, Default, Clone, Debug)]
struct Commit {
    hash: String,
    message: String,
}

fn main() -> Result<()> {
    let output = Command::new("git").arg("log").arg("--oneline").output()?;

    if !output.status.success() {
        error_chain::bail!("Command executed with failing error code");
    }

    let pattern = Regex::new(r"(?x)
                               ([0-9a-fA-F]+) # commit hash
                               (.*)           # The commit message")?;

    String::from_utf8(output.stdout)?
        .lines()
        .filter_map(|line| pattern.captures(line))
        .map(|cap| {
                 Commit {
                     hash: cap[1].to_string(),
                     message: cap[2].trim().to_string(),
                 }
             })
        .take(5)
        .for_each(|x| println!("{:?}", x));

    Ok(())
}
调用 python 解释器运行代码并检查返回的错误码
use error_chain::error_chain;

use std::collections::HashSet;
use std::io::Write;
use std::process::{Command, Stdio};

error_chain!{
   errors { CmdError }
   foreign_links {
       Io(std::io::Error);
       Utf8(std::string::FromUtf8Error);
   }
}

fn main() -> Result<()> {
    let mut child = Command::new("python").stdin(Stdio::piped())
        .stderr(Stdio::piped())
        .stdout(Stdio::piped())
        .spawn()?;

    child.stdin
        .as_mut()
        .ok_or("Child process stdin has not been captured!")?
        .write_all(b"import this; copyright(); credits(); exit()")?;

    let output = child.wait_with_output()?;

    if output.status.success() {
        let raw_output = String::from_utf8(output.stdout)?;
        let words = raw_output.split_whitespace()
            .map(|s| s.to_lowercase())
            .collect::<HashSet<_>>();
        println!("Found {} unique words:", words.len());
        println!("{:#?}", words);
        Ok(())
    } else {
        let err = String::from_utf8(output.stderr)?;
        error_chain::bail!("External command failed:\n {}", err)
    }
}
通过管道来运行外部命令
下面的例子将显示当前目录中大小排名前十的文件和子目录,效果等效于命令 du -ah . | sort -hr | head -n 10。
Command 命令代表一个进程,其中父进程通过 Stdio::piped 来捕获子进程的输出。
use error_chain::error_chain;

use std::process::{Command, Stdio};

error_chain! {
   foreign_links {
       Io(std::io::Error);
       Utf8(std::string::FromUtf8Error);
   }
}

fn main() -> Result<()> {
    let directory = std::env::current_dir()?;
    let mut du_output_child = Command::new("du")
        .arg("-ah")
        .arg(&directory)
        .stdout(Stdio::piped())
        .spawn()?;

    if let Some(du_output) = du_output_child.stdout.take() {
        let mut sort_output_child = Command::new("sort")
            .arg("-hr")
            .stdin(du_output)
            .stdout(Stdio::piped())
            .spawn()?;

        du_output_child.wait()?;

        if let Some(sort_output) = sort_output_child.stdout.take() {
            let head_output_child = Command::new("head")
                .args(&["-n", "10"])
                .stdin(sort_output)
                .stdout(Stdio::piped())
                .spawn()?;

            let head_stdout = head_output_child.wait_with_output()?;

            sort_output_child.wait()?;

            println!(
                "Top 10 biggest files and directories in '{}':\n{}",
                directory.display(),
                String::from_utf8(head_stdout.stdout).unwrap()
            );
        }
    }

    Ok(())
}
将子进程的 stdout 和 stderr 重定向到同一个文件
下面的例子将生成一个子进程,然后将它的标准输出和标准错误输出都输出到同一个文件中。最终的效果跟 Unix 命令 ls . oops >out.txt 2>&1 相同。
File::try_clone 会克隆一份文件句柄的引用,然后保证这两个句柄在写的时候会使用相同的游标位置。
use std::fs::File;
use std::io::Error;
use std::process::{Command, Stdio};

fn main() -> Result<(), Error> {
    let outputs = File::create("out.txt")?;
    let errors = outputs.try_clone()?;

    Command::new("ls")
        .args(&[".", "oops"])
        .stdout(Stdio::from(outputs))
        .stderr(Stdio::from(errors))
        .spawn()?
        .wait_with_output()?;

    Ok(())
}
持续处理子进程的输出
下面的代码会创建一个管道,然后当 BufReader 更新时,就持续从 stdout 中读取数据。最终效果等同于 Unix 命令 journalctl | grep usb。
use std::process::{Command, Stdio};
use std::io::{BufRead, BufReader, Error, ErrorKind};

fn main() -> Result<(), Error> {
    let stdout = Command::new("journalctl")
        .stdout(Stdio::piped())
        .spawn()?
        .stdout
        .ok_or_else(|| Error::new(ErrorKind::Other,"Could not capture standard output."))?;

    let reader = BufReader::new(stdout);

    reader
        .lines()
        .filter_map(|line| line.ok())
        .filter(|line| line.find("usb").is_some())
        .for_each(|line| println!("{}", line));

     Ok(())
}
读取环境变量
使用 std::env::var 可以读取系统中的环境变量。
use std::env;
use std::fs;
use std::io::Error;

fn main() -> Result<(), Error> {
    // 读取环境变量 `CONFIG` 的值并写入到 `config_path` 中。
    // 若 `CONFIG` 环境变量没有设置,则使用一个默认的值 "/etc/myapp/config"
    let config_path = env::var("CONFIG")
        .unwrap_or("/etc/myapp/config".to_string());

    let config: String = fs::read_to_string(config_path)?;
    println!("Config: {}", config);

    Ok(())
}
线程
生成一个临时性的线程
下面例子用到了 crossbeam 包,它提供了非常实用的、用于并发和并行编程的数据结构和函数。
Scope::spawn 会生成一个被限定了作用域的线程,该线程最大的特点就是:它会在传给 crossbeam::scope 的闭包函数返回前先行结束。得益于这个特点,子线程的创建使用就像是本地闭包函数调用,因此生成的线程内部可以使用外部环境中的变量!
fn main() {
    let arr = &[1, 25, -4, 10];
    let max = find_max(arr);
    assert_eq!(max, Some(25));
}

// 将数组分成两个部分,并使用新的线程对它们进行处理
fn find_max(arr: &[i32]) -> Option<i32> {
    const THRESHOLD: usize = 2;

    if arr.len() <= THRESHOLD {
        return arr.iter().cloned().max();
    }

    let mid = arr.len() / 2;
    let (left, right) = arr.split_at(mid);

    crossbeam::scope(|s| {
        let thread_l = s.spawn(|_| find_max(left));
        let thread_r = s.spawn(|_| find_max(right));

        let max_l = thread_l.join().unwrap()?;
        let max_r = thread_r.join().unwrap()?;

        Some(max_l.max(max_r))
    }).unwrap()
}
创建并行流水线
下面我们使用 crossbeam 和 crossbeam-channel 来创建一个并行流水线:流水线的两端分别是数据源和数据下沉( sink ),在流水线中间,有两个工作线程会从源头接收数据,对数据进行并行处理,最后将数据下沉。
- 消息通道( channel )是 crossbeam_channel::bounded,它只能缓存一条消息。当缓存满后,发送者继续调用 [crossbeam_channel::Sender::send] 发送消息时会阻塞,直到一个工作线程( 消费者 ) 拿走这条消息
- 消费者获取消息时先到先得的策略,因此两个工作线程只有一个能取到消息,保证消息不会被重复消费、处理
- 通过迭代器 crossbeam_channel::Receiver::iter 读取消息会阻塞当前线程,直到新消息的到来或 channel 关闭
- channel 只有在所有的发送者或消费者关闭后,才能被关闭。而其中一个消费者
rcv2处于阻塞读取状态,无比被关闭,因此我们必须要关闭所有发送者:drop(snd1);drop(snd2),这样 channel 关闭后,主线程的rcv2才能从阻塞状态退出,最后整个程序结束。大家还是迷惑的话,可以看看这篇文章。
extern crate crossbeam;
extern crate crossbeam_channel;

use std::thread;
use std::time::Duration;
use crossbeam_channel::bounded;

fn main() {
    let (snd1, rcv1) = bounded(1);
    let (snd2, rcv2) = bounded(1);
    let n_msgs = 4;
    let n_workers = 2;

    crossbeam::scope(|s| {
        // 生产者线程
        s.spawn(|_| {
            for i in 0..n_msgs {
                snd1.send(i).unwrap();
                println!("Source sent {}", i);
            }

            // 关闭其中一个发送者 snd1
            // 该关闭操作对于结束最后的循环是必须的
            drop(snd1);
        });

        // 通过两个线程并行处理
        for _ in 0..n_workers {
            // 从数据源接收数据,然后发送到下沉端
            let (sendr, recvr) = (snd2.clone(), rcv1.clone());
            // 生成单独的工作线程
            s.spawn(move |_| {
            thread::sleep(Duration::from_millis(500));
                // 等待通道的关闭
                for msg in recvr.iter() {
                    println!("Worker {:?} received {}.",
                             thread::current().id(), msg);
                    sendr.send(msg * 2).unwrap();
                }
            });
        }
        // 关闭通道,如果不关闭,下沉端将永远无法结束循环
        drop(snd2);

        // 下沉端
        for msg in rcv2.iter() {
            println!("Sink received {}", msg);
        }
    }).unwrap();
}
线程间传递数据
下面我们来看看 crossbeam-channel 的单生产者单消费者( SPSC ) 使用场景。
use std::{thread, time};
use crossbeam_channel::unbounded;

fn main() {
    // unbounded 意味着 channel 可以存储任意多的消息
    let (snd, rcv) = unbounded();
    let n_msgs = 5;
    crossbeam::scope(|s| {
        s.spawn(|_| {
            for i in 0..n_msgs {
                snd.send(i).unwrap();
                thread::sleep(time::Duration::from_millis(100));
            }
        });
    }).unwrap();
    for _ in 0..n_msgs {
        let msg = rcv.recv().unwrap();
        println!("Received {}", msg);
    }
}
维护全局可变的状态
lazy_static 会创建一个全局的静态引用( static ref ),该引用使用了 Mutex 以支持可变性,因此我们可以在代码中对其进行修改。Mutex 能保证该全局状态同时只能被一个线程所访问。
use error_chain::error_chain;
use lazy_static::lazy_static;
use std::sync::Mutex;

error_chain!{ }

lazy_static! {
    static ref FRUIT: Mutex<Vec<String>> = Mutex::new(Vec::new());
}

fn insert(fruit: &str) -> Result<()> {
    let mut db = FRUIT.lock().map_err(|_| "Failed to acquire MutexGuard")?;
    db.push(fruit.to_string());
    Ok(())
}

fn main() -> Result<()> {
    insert("apple")?;
    insert("orange")?;
    insert("peach")?;
    {
        let db = FRUIT.lock().map_err(|_| "Failed to acquire MutexGuard")?;

        db.iter().enumerate().for_each(|(i, item)| println!("{}: {}", i, item));
    }
    insert("grape")?;
    Ok(())
}
并行计算 iso 文件的 SHA256
下面的示例将为当前目录中的每一个 .iso 文件都计算一个 SHA256 sum。其中线程池中会初始化和 CPU 核心数一致的线程数,其中核心数是通过 num_cpus::get 函数获取。
Walkdir::new 可以遍历当前的目录,然后调用 execute 来执行读操作和 SHA256 哈希计算。
use walkdir::WalkDir;
use std::fs::File;
use std::io::{BufReader, Read, Error};
use std::path::Path;
use threadpool::ThreadPool;
use std::sync::mpsc::channel;
use ring::digest::{Context, Digest, SHA256};

// Verify the iso extension
fn is_iso(entry: &Path) -> bool {
    match entry.extension() {
        Some(e) if e.to_string_lossy().to_lowercase() == "iso" => true,
        _ => false,
    }
}

fn compute_digest<P: AsRef<Path>>(filepath: P) -> Result<(Digest, P), Error> {
    let mut buf_reader = BufReader::new(File::open(&filepath)?);
    let mut context = Context::new(&SHA256);
    let mut buffer = [0; 1024];

    loop {
        let count = buf_reader.read(&mut buffer)?;
        if count == 0 {
            break;
        }
        context.update(&buffer[..count]);
    }

    Ok((context.finish(), filepath))
}

fn main() -> Result<(), Error> {
    let pool = ThreadPool::new(num_cpus::get());

    let (tx, rx) = channel();

    for entry in WalkDir::new("/home/user/Downloads")
        .follow_links(true)
        .into_iter()
        .filter_map(|e| e.ok())
        .filter(|e| !e.path().is_dir() && is_iso(e.path())) {
            let path = entry.path().to_owned();
            let tx = tx.clone();
            pool.execute(move || {
                let digest = compute_digest(path);
                tx.send(digest).expect("Could not send data!");
            });
        }

    drop(tx);
    for t in rx.iter() {
        let (sha, path) = t?;
        println!("{:?} {:?}", sha, path);
    }
    Ok(())
}
使用线程池来绘制分形
下面例子中将基于 Julia Set 来绘制一个分形图片,其中使用到了线程池来做分布式计算。

use error_chain::error_chain;
use std::sync::mpsc::{channel, RecvError};
use threadpool::ThreadPool;
use num::complex::Complex;
use image::{ImageBuffer, Pixel, Rgb};


error_chain! {
    foreign_links {
        MpscRecv(RecvError);
        Io(std::io::Error);
    }
}

// Function converting intensity values to RGB
// Based on http://www.efg2.com/Lab/ScienceAndEngineering/Spectra.htm
fn wavelength_to_rgb(wavelength: u32) -> Rgb<u8> {
    let wave = wavelength as f32;

    let (r, g, b) = match wavelength {
        380..=439 => ((440. - wave) / (440. - 380.), 0.0, 1.0),
        440..=489 => (0.0, (wave - 440.) / (490. - 440.), 1.0),
        490..=509 => (0.0, 1.0, (510. - wave) / (510. - 490.)),
        510..=579 => ((wave - 510.) / (580. - 510.), 1.0, 0.0),
        580..=644 => (1.0, (645. - wave) / (645. - 580.), 0.0),
        645..=780 => (1.0, 0.0, 0.0),
        _ => (0.0, 0.0, 0.0),
    };

    let factor = match wavelength {
        380..=419 => 0.3 + 0.7 * (wave - 380.) / (420. - 380.),
        701..=780 => 0.3 + 0.7 * (780. - wave) / (780. - 700.),
        _ => 1.0,
    };

    let (r, g, b) = (normalize(r, factor), normalize(g, factor), normalize(b, factor));
    Rgb::from_channels(r, g, b, 0)
}

// Maps Julia set distance estimation to intensity values
fn julia(c: Complex<f32>, x: u32, y: u32, width: u32, height: u32, max_iter: u32) -> u32 {
    let width = width as f32;
    let height = height as f32;

    let mut z = Complex {
        // scale and translate the point to image coordinates
        re: 3.0 * (x as f32 - 0.5 * width) / width,
        im: 2.0 * (y as f32 - 0.5 * height) / height,
    };

    let mut i = 0;
    for t in 0..max_iter {
        if z.norm() >= 2.0 {
            break;
        }
        z = z * z + c;
        i = t;
    }
    i
}

// Normalizes color intensity values within RGB range
fn normalize(color: f32, factor: f32) -> u8 {
    ((color * factor).powf(0.8) * 255.) as u8
}

fn main() -> Result<()> {
    let (width, height) = (1920, 1080);
    // 为指定宽高的输出图片分配内存
    let mut img = ImageBuffer::new(width, height);
    let iterations = 300;

    let c = Complex::new(-0.8, 0.156);

    let pool = ThreadPool::new(num_cpus::get());
    let (tx, rx) = channel();

    for y in 0..height {
        let tx = tx.clone();
        // execute 将每个像素作为单独的作业接收
        pool.execute(move || for x in 0..width {
                         let i = julia(c, x, y, width, height, iterations);
                         let pixel = wavelength_to_rgb(380 + i * 400 / iterations);
                         tx.send((x, y, pixel)).expect("Could not send data!");
                     });
    }

    for _ in 0..(width * height) {
        let (x, y, pixel) = rx.recv()?;
        // 使用数据来设置像素的颜色
        img.put_pixel(x, y, pixel);
    }

    // 输出图片内容到指定文件中
    let _ = img.save("output.png")?;
    Ok(())
}
任务并行处理
并行修改数组中的元素
rayon 提供了一个 par_iter_mut 方法用于并行化迭代一个数据集合。
use rayon::prelude::*;

fn main() {
    let mut arr = [0, 7, 9, 11];
    arr.par_iter_mut().for_each(|p| *p -= 1);
    println!("{:?}", arr);
}
并行测试集合中的元素是否满足给定的条件
rayon::any 和 rayon::all 类似于 std::any / std::all ,但是是并行版本的。
rayon::any并行检查迭代器中是否有任何元素满足给定的条件,一旦发现符合条件的元素,就立即返回rayon::all并行检查迭代器中的所有元素是否满足给定的条件,一旦发现不满足条件的元素,就立即返回
use rayon::prelude::*;

fn main() {
    let mut vec = vec![2, 4, 6, 8];

    assert!(!vec.par_iter().any(|n| (*n % 2) != 0));
    assert!(vec.par_iter().all(|n| (*n % 2) == 0));
    assert!(!vec.par_iter().any(|n| *n > 8 ));
    assert!(vec.par_iter().all(|n| *n <= 8 ));

    vec.push(9);

    assert!(vec.par_iter().any(|n| (*n % 2) != 0));
    assert!(!vec.par_iter().all(|n| (*n % 2) == 0));
    assert!(vec.par_iter().any(|n| *n > 8 ));
    assert!(!vec.par_iter().all(|n| *n <= 8 ));
}
使用给定条件并行搜索
下面例子使用 par_iter 和 rayon::find_any 来并行搜索一个数组,直到找到任意一个满足条件的元素。
如果有多个元素满足条件,rayon 会返回第一个找到的元素,注意:第一个找到的元素未必是数组中的顺序最靠前的那个。
use rayon::prelude::*;

fn main() {
    let v = vec![6, 2, 1, 9, 3, 8, 11];

    // 这里使用了 `&&x` 的形式,大家可以在以下链接阅读更多 https://doc.rust-lang.org/std/iter/trait.Iterator.html#method.find
    let f1 = v.par_iter().find_any(|&&x| x == 9);
    let f2 = v.par_iter().find_any(|&&x| x % 2 == 0 && x > 6);
    let f3 = v.par_iter().find_any(|&&x| x > 8);

    assert_eq!(f1, Some(&9));
    assert_eq!(f2, Some(&8));
    assert!(f3 > Some(&8));
}
对数组进行并行排序
下面的例子将对字符串数组进行并行排序。
par_sort_unstable 方法的排序性能往往要比稳定的排序算法更高。
use rand::{Rng, thread_rng};
use rand::distributions::Alphanumeric;
use rayon::prelude::*;

fn main() {
  let mut vec = vec![String::new(); 100_000];
  // 并行生成数组中的字符串
  vec.par_iter_mut().for_each(|p| {
    let mut rng = thread_rng();
    *p = (0..5).map(|_| rng.sample(&Alphanumeric)).collect()
  });

  //
  vec.par_sort_unstable();
}
并行化 Map-Reuduce
下面例子使用 rayon::filter, rayon::map, 和 rayon::reduce 来超过 30 岁的 Person 的平均年龄。
rayon::filter返回集合中所有满足给定条件的元素rayon::map对集合中的每一个元素执行一个操作,创建并返回新的迭代器,类似于迭代器适配器rayon::reduce则迭代器的元素进行不停的聚合运算,直到获取一个最终结果,这个结果跟例子中rayon::sum获取的结果是相同的
use rayon::prelude::*;

struct Person {
    age: u32,
}

fn main() {
    let v: Vec<Person> = vec![
        Person { age: 23 },
        Person { age: 19 },
        Person { age: 42 },
        Person { age: 17 },
        Person { age: 17 },
        Person { age: 31 },
        Person { age: 30 },
    ];

    let num_over_30 = v.par_iter().filter(|&x| x.age > 30).count() as f32;
    let sum_over_30 = v.par_iter()
        .map(|x| x.age)
        .filter(|&x| x > 30)
        .reduce(|| 0, |x, y| x + y);

    let alt_sum_30: u32 = v.par_iter()
        .map(|x| x.age)
        .filter(|&x| x > 30)
        .sum();

    let avg_over_30 = sum_over_30 as f32 / num_over_30;
    let alt_avg_over_30 = alt_sum_30 as f32/ num_over_30;

    assert!((avg_over_30 - alt_avg_over_30).abs() < std::f32::EPSILON);
    println!("The average age of people older than 30 is {}", avg_over_30);
}
并行生成缩略图
下面例子将为目录中的所有图片并行生成缩略图,然后将结果存到新的目录 thumbnails 中。
glob::glob_with 可以找出当前目录下的所有 .jpg 文件,rayon 通过 DynamicImage::resize 来并行调整图片的大小。
use error_chain::error_chain;

use std::path::Path;
use std::fs::create_dir_all;

use error_chain::ChainedError;
use glob::{glob_with, MatchOptions};
use image::{FilterType, ImageError};
use rayon::prelude::*;

error_chain! {
   foreign_links {
       Image(ImageError);
       Io(std::io::Error);
       Glob(glob::PatternError);
   }
}

fn main() -> Result<()> {
    let options: MatchOptions = Default::default();
    // 找到当前目录中的所有 `jpg` 文件
    let files: Vec<_> = glob_with("*.jpg", options)?
        .filter_map(|x| x.ok())
        .collect();

    if files.len() == 0 {
        error_chain::bail!("No .jpg files found in current directory");
    }

    let thumb_dir = "thumbnails";
    create_dir_all(thumb_dir)?;

    println!("Saving {} thumbnails into '{}'...", files.len(), thumb_dir);

    let image_failures: Vec<_> = files
        .par_iter()
        .map(|path| {
            make_thumbnail(path, thumb_dir, 300)
                .map_err(|e| e.chain_err(|| path.display().to_string()))
        })
        .filter_map(|x| x.err())
        .collect();

    image_failures.iter().for_each(|x| println!("{}", x.display_chain()));

    println!("{} thumbnails saved successfully", files.len() - image_failures.len());
    Ok(())
}

fn make_thumbnail<PA, PB>(original: PA, thumb_dir: PB, longest_edge: u32) -> Result<()>
where
    PA: AsRef<Path>,
    PB: AsRef<Path>,
{
    let img = image::open(original.as_ref())?;
    let file_path = thumb_dir.as_ref().join(original);

    Ok(img.resize(longest_edge, longest_edge, FilterType::Nearest)
        .save(file_path)?)
}
SQLite
创建 SQLite 数据库
使用 rusqlite 可以创建 SQLite 数据库,Connection::open 会尝试打开一个数据库,若不存在,则创建新的数据库。
这里创建的
cats.db数据库将被后面的例子所使用
use rusqlite::{Connection, Result};
use rusqlite::NO_PARAMS;

fn main() -> Result<()> {
    let conn = Connection::open("cats.db")?;

    conn.execute(
        "create table if not exists cat_colors (
             id integer primary key,
             name text not null unique
         )",
        NO_PARAMS,
    )?;
    conn.execute(
        "create table if not exists cats (
             id integer primary key,
             name text not null,
             color_id integer not null references cat_colors(id)
         )",
        NO_PARAMS,
    )?;

    Ok(())
}
插入和查询
use rusqlite::NO_PARAMS;
use rusqlite::{Connection, Result};
use std::collections::HashMap;

#[derive(Debug)]
struct Cat {
    name: String,
    color: String,
}

fn main() -> Result<()> {
    // 打开第一个例子所创建的数据库
    let conn = Connection::open("cats.db")?;

    let mut cat_colors = HashMap::new();
    cat_colors.insert(String::from("Blue"), vec!["Tigger", "Sammy"]);
    cat_colors.insert(String::from("Black"), vec!["Oreo", "Biscuit"]);

    for (color, catnames) in &cat_colors {
        // 插入一条数据行
        conn.execute(
            "INSERT INTO cat_colors (name) values (?1)",
            &[&color.to_string()],
        )?;
        // 获取最近插入数据行的 id
        let last_id: String = conn.last_insert_rowid().to_string();

        for cat in catnames {
            conn.execute(
                "INSERT INTO cats (name, color_id) values (?1, ?2)",
                &[&cat.to_string(), &last_id],
            )?;
        }
    }
    let mut stmt = conn.prepare(
        "SELECT c.name, cc.name from cats c
         INNER JOIN cat_colors cc
         ON cc.id = c.color_id;",
    )?;

    let cats = stmt.query_map(NO_PARAMS, |row| {
        Ok(Cat {
            name: row.get(0)?,
            color: row.get(1)?,
        })
    })?;

    for cat in cats {
        println!("Found cat {:?}", cat);
    }

    Ok(())
}
使用事务
使用 Connection::transaction 可以开始新的事务,若没有对事务进行显式地提交 Transaction::commit,则会进行回滚。
下面的例子中,rolled_back_tx 插入了重复的颜色名称,会发生回滚。
use rusqlite::{Connection, Result, NO_PARAMS};

fn main() -> Result<()> {
    // 打开第一个例子所创建的数据库
    let mut conn = Connection::open("cats.db")?;

    successful_tx(&mut conn)?;

    let res = rolled_back_tx(&mut conn);
    assert!(res.is_err());

    Ok(())
}

fn successful_tx(conn: &mut Connection) -> Result<()> {
    let tx = conn.transaction()?;

    tx.execute("delete from cat_colors", NO_PARAMS)?;
    tx.execute("insert into cat_colors (name) values (?1)", &[&"lavender"])?;
    tx.execute("insert into cat_colors (name) values (?1)", &[&"blue"])?;

    tx.commit()
}

fn rolled_back_tx(conn: &mut Connection) -> Result<()> {
    let tx = conn.transaction()?;

    tx.execute("delete from cat_colors", NO_PARAMS)?;
    tx.execute("insert into cat_colors (name) values (?1)", &[&"lavender"])?;
    tx.execute("insert into cat_colors (name) values (?1)", &[&"blue"])?;
    tx.execute("insert into cat_colors (name) values (?1)", &[&"lavender"])?;

    tx.commit()
}
Postgres
在数据库中创建表格
我们通过 postgres 来操作数据库。下面的例子有一个前提:数据库 library 已经存在,其中用户名和密码都是 postgres。
use postgres::{Client, NoTls, Error};

fn main() -> Result<(), Error> {
    // 连接到数据库 library
    let mut client = Client::connect("postgresql://postgres:postgres@localhost/library", NoTls)?;

    client.batch_execute("
        CREATE TABLE IF NOT EXISTS author (
            id              SERIAL PRIMARY KEY,
            name            VARCHAR NOT NULL,
            country         VARCHAR NOT NULL
            )
    ")?;

    client.batch_execute("
        CREATE TABLE IF NOT EXISTS book  (
            id              SERIAL PRIMARY KEY,
            title           VARCHAR NOT NULL,
            author_id       INTEGER NOT NULL REFERENCES author
            )
    ")?;

    Ok(())

}
插入和查询
use postgres::{Client, NoTls, Error};
use std::collections::HashMap;

struct Author {
    _id: i32,
    name: String,
    country: String
}

fn main() -> Result<(), Error> {
    let mut client = Client::connect("postgresql://postgres:postgres@localhost/library",
                                    NoTls)?;

    let mut authors = HashMap::new();
    authors.insert(String::from("Chinua Achebe"), "Nigeria");
    authors.insert(String::from("Rabindranath Tagore"), "India");
    authors.insert(String::from("Anita Nair"), "India");

    for (key, value) in &authors {
        let author = Author {
            _id: 0,
            name: key.to_string(),
            country: value.to_string()
        };

        // 插入数据
        client.execute(
                "INSERT INTO author (name, country) VALUES ($1, $2)",
                &[&author.name, &author.country],
        )?;
    }

    // 查询数据
    for row in client.query("SELECT id, name, country FROM author", &[])? {
        let author = Author {
            _id: row.get(0),
            name: row.get(1),
            country: row.get(2),
        };
        println!("Author {} is from {}", author.name, author.country);
    }

    Ok(())

}
聚合数据
下面代码将使用降序的方式列出 Museum of Modern Art 数据库中的前 7999 名艺术家的国籍分布.
use postgres::{Client, Error, NoTls};

struct Nation {
    nationality: String,
    count: i64,
}

fn main() -> Result<(), Error> {
    let mut client = Client::connect(
        "postgresql://postgres:postgres@127.0.0.1/moma",
        NoTls,
    )?;

    for row in client.query
    ("SELECT nationality, COUNT(nationality) AS count
    FROM artists GROUP BY nationality ORDER BY count DESC", &[])? {

        let (nationality, count) : (Option<String>, Option<i64>)
        = (row.get (0), row.get (1));

        if nationality.is_some () && count.is_some () {

            let nation = Nation{
                nationality: nationality.unwrap(),
                count: count.unwrap(),
        };
            println!("{} {}", nation.nationality, nation.count);

        }
    }

    Ok(())
}
时间计算和转换
测量某段代码的耗时
测量从 time::Instant::now 开始所经过的时间 time::Instant::elapsed.
use std::time::{Duration, Instant};

fn main() {
    let start = Instant::now();
    expensive_function();
    let duration = start.elapsed();

    println!("Time elapsed in expensive_function() is: {:?}", duration);
}
对日期和时间进行计算
使用 DateTime::checked_add_signed 计算和显示从现在开始两周后的日期和时间,然后再计算一天前的日期 DateTime::checked_sub_signed。
DateTime::format 所支持的转义序列可以在 chrono::format::strftime 找到.
use chrono::{DateTime, Duration, Utc};

fn day_earlier(date_time: DateTime<Utc>) -> Option<DateTime<Utc>> {
    date_time.checked_sub_signed(Duration::days(1))
}

fn main() {
    let now = Utc::now();
    println!("{}", now);

    let almost_three_weeks_from_now = now.checked_add_signed(Duration::weeks(2))
            .and_then(|in_2weeks| in_2weeks.checked_add_signed(Duration::weeks(1)))
            .and_then(day_earlier);

    match almost_three_weeks_from_now {
        Some(x) => println!("{}", x),
        None => eprintln!("Almost three weeks from now overflows!"),
    }

    match now.checked_add_signed(Duration::max_value()) {
        Some(x) => println!("{}", x),
        None => eprintln!("We can't use chrono to tell the time for the Solar System to complete more than one full orbit around the galactic center."),
    }
}
将本地时间转换成其它时区
使用 offset::Local::now 获取本地时间并进行显示,接着,使用 DateTime::from_utc 将它转换成 UTC 标准时间。最后,再使用 offset::FixedOffset 将 UTC 时间转换成 UTC+8 和 UTC-2 的时间。
use chrono::{DateTime, FixedOffset, Local, Utc};

fn main() {
    let local_time = Local::now();
    let utc_time = DateTime::<Utc>::from_utc(local_time.naive_utc(), Utc);
    let china_timezone = FixedOffset::east(8 * 3600);
    let rio_timezone = FixedOffset::west(2 * 3600);
    println!("Local time now is {}", local_time);
    println!("UTC time now is {}", utc_time);
    println!(
        "Time in Hong Kong now is {}",
        utc_time.with_timezone(&china_timezone)
    );
    println!("Time in Rio de Janeiro now is {}", utc_time.with_timezone(&rio_timezone));
}
解析和显示
检查日期和时间
通过 DateTime 获取当前的 UTC 时间:
use chrono::{Datelike, Timelike, Utc};

fn main() {
    let now = Utc::now();

    let (is_pm, hour) = now.hour12();
    println!(
        "The current UTC time is {:02}:{:02}:{:02} {}",
        hour,
        now.minute(),
        now.second(),
        if is_pm { "PM" } else { "AM" }
    );
    println!(
        "And there have been {} seconds since midnight",
        now.num_seconds_from_midnight()
    );

    let (is_common_era, year) = now.year_ce();
    println!(
        "The current UTC date is {}-{:02}-{:02} {:?} ({})",
        year,
        now.month(),
        now.day(),
        now.weekday(),
        if is_common_era { "CE" } else { "BCE" }
    );
    println!(
        "And the Common Era began {} days ago",
        now.num_days_from_ce()
    );
}
日期和时间戳的相互转换
use chrono::{NaiveDate, NaiveDateTime};

fn main() {
    // 生成一个具体的日期时间
    let date_time: NaiveDateTime = NaiveDate::from_ymd(2017, 11, 12).and_hms(17, 33, 44);
    println!(
        "Number of seconds between 1970-01-01 00:00:00 and {} is {}.",
        // 打印日期和日期对应的时间戳
        date_time, date_time.timestamp());

    // 计算从 1970 1月1日 0:00:00 UTC 开始,10亿秒后是什么日期时间
    let date_time_after_a_billion_seconds = NaiveDateTime::from_timestamp(1_000_000_000, 0);
    println!(
        "Date after a billion seconds since 1970-01-01 00:00:00 was {}.",
        date_time_after_a_billion_seconds);
}
显示格式化的日期和时间
通过 Utc::now 可以获取当前的 UTC 时间。
use chrono::{DateTime, Utc};

fn main() {
    let now: DateTime<Utc> = Utc::now();

    println!("UTC now is: {}", now);
    // 使用 RFC 2822 格式显示当前时间
    println!("UTC now in RFC 2822 is: {}", now.to_rfc2822());
    // 使用 RFC 3339 格式显示当前时间
    println!("UTC now in RFC 3339 is: {}", now.to_rfc3339());
    // 使用自定义格式显示当前时间
    println!("UTC now in a custom format is: {}", now.format("%a %b %e %T %Y"));
}
将字符串解析为 DateTime 结构体
我们可以将多种格式的日期时间字符串转换成 DateTime 结构体。DateTime::parse_from_str 使用的转义序列可以在 chrono::format::strftime 找到.
只有当能唯一的标识出日期和时间时,才能创建 DateTime。如果要在没有时区的情况下解析日期或时间,你需要使用 NativeDate 等函数。
use chrono::{DateTime, NaiveDate, NaiveDateTime, NaiveTime};
use chrono::format::ParseError;


fn main() -> Result<(), ParseError> {
    let rfc2822 = DateTime::parse_from_rfc2822("Tue, 1 Jul 2003 10:52:37 +0200")?;
    println!("{}", rfc2822);

    let rfc3339 = DateTime::parse_from_rfc3339("1996-12-19T16:39:57-08:00")?;
    println!("{}", rfc3339);

    let custom = DateTime::parse_from_str("5.8.1994 8:00 am +0000", "%d.%m.%Y %H:%M %P %z")?;
    println!("{}", custom);

    let time_only = NaiveTime::parse_from_str("23:56:04", "%H:%M:%S")?;
    println!("{}", time_only);

    let date_only = NaiveDate::parse_from_str("2015-09-05", "%Y-%m-%d")?;
    println!("{}", date_only);

    let no_timezone = NaiveDateTime::parse_from_str("2015-09-05 23:56:04", "%Y-%m-%d %H:%M:%S")?;
    println!("{}", no_timezone);

    Ok(())
}
日志
log 包
log 提供了日志相关的实用工具。
在控制台打印 debug 信息
env_logger 通过环境变量来配置日志。log::debug! 使用起来跟 std::fmt 中的格式化字符串很像。
fn execute_query(query: &str) {
    log::debug!("Executing query: {}", query);
}

fn main() {
    env_logger::init();

    execute_query("DROP TABLE students");
}
如果大家运行代码,会发现没有任何日志输出,原因是默认的日志级别是 error,因此我们需要通过 RUST_LOG 环境变量来设置下新的日志级别:
$ RUST_LOG=debug cargo run
然后你将成功看到以下输出:
DEBUG:main: Executing query: DROP TABLE students
将错误日志输出到控制台
下面我们通过 log::error! 将错误日志输出到标准错误 stderr。
fn execute_query(_query: &str) -> Result<(), &'static str> {
    Err("I'm afraid I can't do that")
}

fn main() {
    env_logger::init();

    let response = execute_query("DROP TABLE students");
    if let Err(err) = response {
        log::error!("Failed to execute query: {}", err);
    }
}
将错误输出到标准输出 stdout
默认的错误会输出到标准错误输出 stderr,下面我们通过自定的配置来让错误输出到标准输出 stdout。
use env_logger::{Builder, Target};

fn main() {
    Builder::new()
        .target(Target::Stdout)
        .init();

    log::error!("This error has been printed to Stdout");
}
使用自定义 logger
下面的代码将实现一个自定义 logger ConsoleLogger,输出到标准输出 stdout。为了使用日志宏,ConsoleLogger 需要实现 log::Log 特征,然后使用 log::set_logger 来安装使用。
use log::{Record, Level, Metadata, LevelFilter, SetLoggerError};

static CONSOLE_LOGGER: ConsoleLogger = ConsoleLogger;

struct ConsoleLogger;

impl log::Log for ConsoleLogger {
  fn enabled(&self, metadata: &Metadata) -> bool {
     metadata.level() <= Level::Info
    }

    fn log(&self, record: &Record) {
        if self.enabled(record.metadata()) {
            println!("Rust says: {} - {}", record.level(), record.args());
        }
    }

    fn flush(&self) {}
}

fn main() -> Result<(), SetLoggerError> {
    log::set_logger(&CONSOLE_LOGGER)?;
    log::set_max_level(LevelFilter::Info);

    log::info!("hello log");
    log::warn!("warning");
    log::error!("oops");
    Ok(())
}
输出到 Unix syslog
下面的代码将使用 syslog 包将日志输出到 Unix Syslog.
#[cfg(target_os = "linux")]
#[cfg(target_os = "linux")]
use syslog::{Facility, Error};

#[cfg(target_os = "linux")]
fn main() -> Result<(), Error> {
    // 初始化 logger
    syslog::init(Facility::LOG_USER,
                 log::LevelFilter::Debug,
                 // 可选的应用名称
                 Some("My app name"))?;
    log::debug!("this is a debug {}", "message");
    log::error!("this is an error!");
    Ok(())
}

#[cfg(not(target_os = "linux"))]
fn main() {
    println!("So far, only Linux systems are supported.");
}
tracing
@todo
配置日志
为每个模块开启独立的日志级别
下面代码创建了模块 foo 和嵌套模块 foo::bar,并通过 RUST_LOG 环境变量对各自的日志级别进行了控制。
mod foo {
    mod bar {
        pub fn run() {
            log::warn!("[bar] warn");
            log::info!("[bar] info");
            log::debug!("[bar] debug");
        }
    }

    pub fn run() {
        log::warn!("[foo] warn");
        log::info!("[foo] info");
        log::debug!("[foo] debug");
        bar::run();
    }
}

fn main() {
    env_logger::init();
    log::warn!("[root] warn");
    log::info!("[root] info");
    log::debug!("[root] debug");
    foo::run();
}
要让环境变量生效,首先需要通过 env_logger::init() 开启相关的支持。然后通过以下命令来运行程序:
RUST_LOG="warn,test::foo=info,test::foo::bar=debug" ./test
此时的默认日志级别被设置为 warn,但我们还将 foo 模块级别设置为 info, foo::bar 模块日志级别设置为 debug。
WARN:test: [root] warn
WARN:test::foo: [foo] warn
INFO:test::foo: [foo] info
WARN:test::foo::bar: [bar] warn
INFO:test::foo::bar: [bar] info
DEBUG:test::foo::bar: [bar] debug
使用自定义环境变量来设置日志
Builder 将对日志进行配置,以下代码使用 MY_APP_LOG 来替代 RUST_LOG 环境变量:
use std::env;
use env_logger::Builder;

fn main() {
    Builder::new()
        .parse(&env::var("MY_APP_LOG").unwrap_or_default())
        .init();

    log::info!("informational message");
    log::warn!("warning message");
    log::error!("this is an error {}", "message");
}
在日志中包含时间戳
use std::io::Write;
use chrono::Local;
use env_logger::Builder;
use log::LevelFilter;

fn main() {
    Builder::new()
        .format(|buf, record| {
            writeln!(buf,
                "{} [{}] - {}",
                Local::now().format("%Y-%m-%dT%H:%M:%S"),
                record.level(),
                record.args()
            )
        })
        .filter(None, LevelFilter::Info)
        .init();

    log::warn!("warn");
    log::info!("info");
    log::debug!("debug");
}
以下是 stderr 的输出:
2022-03-22T21:57:06 [WARN] - warn
2022-03-22T21:57:06 [INFO] - info
将日志输出到指定文件
log4rs 可以帮我们将日志输出指定的位置,它可以使用外部 YAML 文件或 builder 的方式进行配置。
use error_chain::error_chain;

use log::LevelFilter;
use log4rs::append::file::FileAppender;
use log4rs::encode::pattern::PatternEncoder;
use log4rs::config::{Appender, Config, Root};

error_chain! {
   foreign_links {
       Io(std::io::Error);
       LogConfig(log4rs::config::Errors);
       SetLogger(log::SetLoggerError);
   }
}

fn main() -> Result<()> {
    // 创建日志配置,并指定输出的位置
    let logfile = FileAppender::builder()
        // 编码模式的详情参见: https://docs.rs/log4rs/1.0.0/log4rs/encode/pattern/index.html
        .encoder(Box::new(PatternEncoder::new("{l} - {m}\n")))
        .build("log/output.log")?;

    let config = Config::builder()
        .appender(Appender::builder().build("logfile", Box::new(logfile)))
        .build(Root::builder()
                   .appender("logfile")
                   .build(LevelFilter::Info))?;

    log4rs::init_config(config)?;

    log::info!("Hello, world!");

    Ok(())
}
版本号
解析并增加版本号
下面例子使用 Version::parse 将一个字符串转换成 semver::Version 版本号,然后将它的 patch, minor, major 版本号都增加 1。
注意,为了符合语义化版本的说明,增加 minor 版本时,patch 版本会被重设为 0,当增加 major 版本时,minor 和 patch 都将被重设为 0。
use semver::{Version, SemVerError};

fn main() -> Result<(), SemVerError> {
    let mut parsed_version = Version::parse("0.2.6")?;

    assert_eq!(
        parsed_version,
        Version {
            major: 0,
            minor: 2,
            patch: 6,
            pre: vec![],
            build: vec![],
        }
    );

    parsed_version.increment_patch();
    assert_eq!(parsed_version.to_string(), "0.2.7");
    println!("New patch release: v{}", parsed_version);

    parsed_version.increment_minor();
    assert_eq!(parsed_version.to_string(), "0.3.0");
    println!("New minor release: v{}", parsed_version);

    parsed_version.increment_major();
    assert_eq!(parsed_version.to_string(), "1.0.0");
    println!("New major release: v{}", parsed_version);

    Ok(())
}
解析一个复杂的版本号字符串
这里的版本号字符串还将包含 SemVer 中定义的预发布和构建元信息。
值得注意的是,为了符合 SemVer 的规则,构建元信息虽然会被解析,但是在做版本号比较时,该信息会被忽略。换而言之,即使两个版本号的构建字符串不同,它们的版本号依然可能相同。
use semver::{Identifier, Version, SemVerError};

fn main() -> Result<(), SemVerError> {
    let version_str = "1.0.49-125+g72ee7853";
    let parsed_version = Version::parse(version_str)?;

    assert_eq!(
        parsed_version,
        Version {
            major: 1,
            minor: 0,
            patch: 49,
            pre: vec![Identifier::Numeric(125)],
            build: vec![],
        }
    );
    assert_eq!(
        parsed_version.build,
        vec![Identifier::AlphaNumeric(String::from("g72ee7853"))]
    );

    let serialized_version = parsed_version.to_string();
    assert_eq!(&serialized_version, version_str);

    Ok(())
}
检查给定的版本号是否是预发布
下面例子给出两个版本号,然后通过 is_prerelease 判断哪个是预发布的版本号。
use semver::{Version, SemVerError};

fn main() -> Result<(), SemVerError> {
    let version_1 = Version::parse("1.0.0-alpha")?;
    let version_2 = Version::parse("1.0.0")?;

    assert!(version_1.is_prerelease());
    assert!(!version_2.is_prerelease());

    Ok(())
}
找出给定范围内的最新版本
下面例子给出了一个版本号列表,我们需要找到其中最新的版本。
use error_chain::error_chain;

use semver::{Version, VersionReq};

error_chain! {
   foreign_links {
       SemVer(semver::SemVerError);
       SemVerReq(semver::ReqParseError);
   }
3}

fn find_max_matching_version<'a, I>(version_req_str: &str, iterable: I) -> Result<Option<Version>>
where
    I: IntoIterator<Item = &'a str>,
{
    let vreq = VersionReq::parse(version_req_str)?;

    Ok(
        iterable
            .into_iter()
            .filter_map(|s| Version::parse(s).ok())
            .filter(|s| vreq.matches(s))
            .max(),
    )
}

fn main() -> Result<()> {
    assert_eq!(
        find_max_matching_version("<= 1.0.0", vec!["0.9.0", "1.0.0", "1.0.1"])?,
        Some(Version::parse("1.0.0")?)
    );

    assert_eq!(
        find_max_matching_version(
            ">1.2.3-alpha.3",
            vec![
                "1.2.3-alpha.3",
                "1.2.3-alpha.4",
                "1.2.3-alpha.10",
                "1.2.3-beta.4",
                "3.4.5-alpha.9",
            ]
        )?,
        Some(Version::parse("1.2.3-beta.4")?)
    );

    Ok(())
}
检查外部命令的版本号兼容性
下面将通过 Command 来执行系统命令 git --version,并对该系统命令返回的 git 版本号进行解析。
use error_chain::error_chain;

use std::process::Command;
use semver::{Version, VersionReq};

error_chain! {
   foreign_links {
       Io(std::io::Error);
       Utf8(std::string::FromUtf8Error);
       SemVer(semver::SemVerError);
       SemVerReq(semver::ReqParseError);
   }
}

fn main() -> Result<()> {
    let version_constraint = "> 1.12.0";
    let version_test = VersionReq::parse(version_constraint)?;
    let output = Command::new("git").arg("--version").output()?;

    if !output.status.success() {
        error_chain::bail!("Command executed with failing error code");
    }

    let stdout = String::from_utf8(output.stdout)?;
    let version = stdout.split(" ").last().ok_or_else(|| {
        "Invalid command output"
    })?;
    let parsed_version = Version::parse(version)?;

    if !version_test.matches(&parsed_version) {
        error_chain::bail!("Command version lower than minimum supported version (found {}, need {})",
            parsed_version, version_constraint);
    }

    Ok(())
}
构建时工具
本章节的内容是关于构建工具的,如果大家没有听说过 build.rs 文件,强烈建议先看看这里了解下何为构建工具。
编译并静态链接一个 C 库
cc 包能帮助我们更好地跟 C/C++/汇编进行交互:它提供了简单的 API 可以将外部的库编译成静态库( .a ),然后通过 rustc 进行静态链接。
下面的例子中,我们将在 Rust 代码中使用 C 的代码: src/hello.c。在开始编译 Rust 的项目代码前,build.rs 构建脚本将先被执行。通过 cc 包,一个静态的库可以被生成( libhello.a ),然后该库将被 Rust的代码所使用:通过 extern 声明外部函数签名的方式来使用。
由于例子中的 C 代码很简单,因此只需要将一个文件传递给 cc::Build。如果大家需要更复杂的构建,cc::Build 还提供了通过 include 来包含路径的方式,以及额外的编译标志( flags )。
Cargo.toml
[package]
...
build = "build.rs"

[build-dependencies]
cc = "1"

[dependencies]
error-chain = "0.11"
build.rs
fn main() {
    cc::Build::new()
        .file("src/hello.c")
        .compile("hello");   // outputs `libhello.a`
}
src/hello.c
#include <stdio.h>


void hello() {
    printf("Hello from C!\n");
}

void greet(const char* name) {
    printf("Hello, %s!\n", name);
}
src/main.rs
use error_chain::error_chain;
use std::ffi::CString;
use std::os::raw::c_char;

error_chain! {
    foreign_links {
        NulError(::std::ffi::NulError);
        Io(::std::io::Error);
    }
}
fn prompt(s: &str) -> Result<String> {
    use std::io::Write;
    print!("{}", s);
    std::io::stdout().flush()?;
    let mut input = String::new();
    std::io::stdin().read_line(&mut input)?;
    Ok(input.trim().to_string())
}

extern {
    fn hello();
    fn greet(name: *const c_char);
}

fn main() -> Result<()> {
    unsafe { hello() }
    let name = prompt("What's your name? ")?;
    let c_name = CString::new(name)?;
    unsafe { greet(c_name.as_ptr()) }
    Ok(())
}
编译并静态链接一个 C++ 库
链接到 C++ 库跟之前的方式非常相似。主要的区别在于链接到 C++ 库时,你需要通过构建方法 cpp(true) 来指定一个 C++ 编译器,然后在 C++ 的代码顶部添加 extern "C" 来阻止 C++ 编译器对库名进行名称重整( name mangling )。
Cargo.toml
[package]
...
build = "build.rs"

[build-dependencies]
cc = "1"
build.rs
fn main() {
    cc::Build::new()
        .cpp(true)
        .file("src/foo.cpp")
        .compile("foo");
}
src/foo.cpp
extern "C" {
    int multiply(int x, int y);
}

int multiply(int x, int y) {
    return x*y;
}
src/main.rs
extern {
    fn multiply(x : i32, y : i32) -> i32;
}

fn main(){
    unsafe {
        println!("{}", multiply(5,7));
    }
}
为 C 库创建自定义的 define
cc::Build::define 可以让我们使用自定义的 define 来构建 C 库。
以下示例在构建脚本 build.rs 中动态定义了一个 define,然后在运行时打印出 Welcome to foo - version 1.0.2。Cargo 会设置一些环境变量,它们对于自定义的 define 会有所帮助。
Cargo.toml
[package]
...
version = "1.0.2"
build = "build.rs"

[build-dependencies]
cc = "1"
build.rs
fn main() {
    cc::Build::new()
        .define("APP_NAME", "\"foo\"")
        .define("VERSION", format!("\"{}\"", env!("CARGO_PKG_VERSION")).as_str())
        .define("WELCOME", None)
        .file("src/foo.c")
        .compile("foo");
}
src/foo.c
#include <stdio.h>

void print_app_info() {
#ifdef WELCOME
    printf("Welcome to ");
#endif
    printf("%s - version %s\n", APP_NAME, VERSION);
}
src/main.rs
extern {
    fn print_app_info();
}

fn main(){
    unsafe {
        print_app_info();
    }
}
字符编码
百分号编码( Percent encoding )
百分号编码又称 URL 编码。
percent-encoding 包提供了两个函数:utf8_percent_encode 函数用于编码、percent_decode 用于解码。
use percent_encoding::{utf8_percent_encode, percent_decode, AsciiSet, CONTROLS};
use std::str::Utf8Error;

/// https://url.spec.whatwg.org/#fragment-percent-encode-set
const FRAGMENT: &AsciiSet = &CONTROLS.add(b' ').add(b'"').add(b'<').add(b'>').add(b'`');

fn main() -> Result<(), Utf8Error> {
    let input = "confident, productive systems programming";

    let iter = utf8_percent_encode(input, FRAGMENT);
    // 将元素类型为 &str 的迭代器收集为 String 类型
    let encoded: String = iter.collect();
    assert_eq!(encoded, "confident,%20productive%20systems%20programming");

    let iter = percent_decode(encoded.as_bytes());
    let decoded = iter.decode_utf8()?;
    assert_eq!(decoded, "confident, productive systems programming");

    Ok(())
}
该编码集定义了哪些字符( 特别是非 ASCII 和控制字符 )需要被百分比编码。具体的选择取决于上下文,例如 url 会对 URL 路径中的 ? 进行编码,但是在路径后的查询字符串中,并不会进行编码。
将字符串编码为 application/x-www-form-urlencoded
使用 form_urlencoded::byte_serialize 函数将一个字符串编码成 application/x-www-form-urlencoded 格式,然后再使用 form_urlencoded::parse 对其进行解码。
use url::form_urlencoded::{byte_serialize, parse};

fn main() {
    let urlencoded: String = byte_serialize("What is ❤?".as_bytes()).collect();
    assert_eq!(urlencoded, "What+is+%E2%9D%A4%3F");
    println!("urlencoded:'{}'", urlencoded);

    let decoded: String = parse(urlencoded.as_bytes())
        .map(|(key, val)| [key, val].concat())
        .collect();
    assert_eq!(decoded, "What is ❤?");
    println!("decoded:'{}'", decoded);
}
十六进制编解码
data_encoding 可以将一个字符串编码成十六进制字符串,反之亦然。
下面的例子将 &[u8] 转换成十六进制等效形式,然后与期待的值进行比较。
use data_encoding::{HEXUPPER, DecodeError};

fn main() -> Result<(), DecodeError> {
    let original = b"The quick brown fox jumps over the lazy dog.";
    let expected = "54686520717569636B2062726F776E20666F78206A756D7073206F76\
        657220746865206C617A7920646F672E";

    let encoded = HEXUPPER.encode(original);
    assert_eq!(encoded, expected);

    let decoded = HEXUPPER.decode(&encoded.into_bytes())?;
    assert_eq!(&decoded[..], &original[..]);

    Ok(())
}
Base64 编解码
base64 可以把一个字节切片编码成 base64 String。
use error_chain::error_chain;

use std::str;
use base64::{encode, decode};

error_chain! {
    foreign_links {
        Base64(base64::DecodeError);
        Utf8Error(str::Utf8Error);
    }
}

fn main() -> Result<()> {
    // 将 `&str` 转换成 `&[u8; N]`
    let hello = b"hello rustaceans";
    let encoded = encode(hello);
    let decoded = decode(&encoded)?;

    println!("origin: {}", str::from_utf8(hello)?);
    println!("base64 encoded: {}", encoded);
    println!("back to origin: {}", str::from_utf8(&decoded)?);

    Ok(())
}
CSV
读取 CSV 记录
我们可以将标准的 CSV 记录值读取到 csv::StringRecord 中,但是该数据结构期待合法的 UTF8 数据行,你还可以使用 csv::ByteRecord 来读取非 UTF8 数据。
use csv::Error;

fn main() -> Result<(), Error> {
    let csv = "year,make,model,description
        1948,Porsche,356,Luxury sports car
        1967,Ford,Mustang fastback 1967,American car";

    let mut reader = csv::Reader::from_reader(csv.as_bytes());
    for record in reader.records() {
        let record = record?;
        println!(
            "In {}, {} built the {} model. It is a {}.",
            &record[0],
            &record[1],
            &record[2],
            &record[3]
        );
    }

    Ok(())
}
还可以使用 serde 将数据反序列化成一个强类型的结构体。
use serde::Deserialize;
#[derive(Deserialize)]
struct Record {
    year: u16,
    make: String,
    model: String,
    description: String,
}

fn main() -> Result<(), csv::Error> {
    let csv = "year,make,model,description
1948,Porsche,356,Luxury sports car
1967,Ford,Mustang fastback 1967,American car";

    let mut reader = csv::Reader::from_reader(csv.as_bytes());

    for record in reader.deserialize() {
        let record: Record = record?;
        println!(
            "In {}, {} built the {} model. It is a {}.",
            record.year,
            record.make,
            record.model,
            record.description
        );
    }

    Ok(())
}
读取使用了不同分隔符的 CSV 记录
下面的例子将读取使用了 tab 作为分隔符的 CSV 记录。
use csv::Error;
use serde::Deserialize;
#[derive(Debug, Deserialize)]
struct Record {
    name: String,
    place: String,
    #[serde(deserialize_with = "csv::invalid_option")]
    id: Option<u64>,
}

use csv::ReaderBuilder;

fn main() -> Result<(), Error> {
    let data = "name\tplace\tid
        Mark\tMelbourne\t46
        Ashley\tZurich\t92";

    let mut reader = ReaderBuilder::new().delimiter(b'\t').from_reader(data.as_bytes());
    for result in reader.deserialize::<Record>() {
        println!("{:?}", result?);
    }

    Ok(())
}
基于给定条件来过滤 CSV 记录
use error_chain::error_chain;

use std::io;

error_chain!{
    foreign_links {
        Io(std::io::Error);
        CsvError(csv::Error);
    }
}

fn main() -> Result<()> {
    let query = "CA";
    let data = "\
City,State,Population,Latitude,Longitude
Kenai,AK,7610,60.5544444,-151.2583333
Oakman,AL,,33.7133333,-87.3886111
Sandfort,AL,,32.3380556,-85.2233333
West Hollywood,CA,37031,34.0900000,-118.3608333";

    let mut rdr = csv::ReaderBuilder::new().from_reader(data.as_bytes());
    let mut wtr = csv::Writer::from_writer(io::stdout());

    wtr.write_record(rdr.headers()?)?;

    for result in rdr.records() {
        let record = result?;
        if record.iter().any(|field| field == query) {
            wtr.write_record(&record)?;
        }
    }

    wtr.flush()?;
    Ok(())
}
序列化为 CSV
下面例子展示了如何将 Rust 类型序列化为 CSV。
use std::io;

fn main() -> Result<()> {
    let mut wtr = csv::Writer::from_writer(io::stdout());

    wtr.write_record(&["Name", "Place", "ID"])?;

    wtr.serialize(("Mark", "Sydney", 87))?;
    wtr.serialize(("Ashley", "Dublin", 32))?;
    wtr.serialize(("Akshat", "Delhi", 11))?;

    wtr.flush()?;
    Ok(())
}
使用 serde 序列化为 CSV
下面例子将自定义数据结构通过 serde 序列化 CSV。
use error_chain::error_chain;
use serde::Serialize;
use std::io;

error_chain! {
   foreign_links {
       IOError(std::io::Error);
       CSVError(csv::Error);
   }
}

#[derive(Serialize)]
struct Record<'a> {
    name: &'a str,
    place: &'a str,
    id: u64,
}

fn main() -> Result<()> {
    let mut wtr = csv::Writer::from_writer(io::stdout());

    let rec1 = Record { name: "Mark", place: "Melbourne", id: 56};
    let rec2 = Record { name: "Ashley", place: "Sydney", id: 64};
    let rec3 = Record { name: "Akshat", place: "Delhi", id: 98};

    wtr.serialize(rec1)?;
    wtr.serialize(rec2)?;
    wtr.serialize(rec3)?;

    wtr.flush()?;

    Ok(())
}
CSV 列转换
下面代码将包含有颜色名和十六进制颜色的 CSV 文件转换为包含颜色名和 rgb 颜色。这里使用 csv 包对 CSV 文件进行读写,然后用 serde 进行序列化和反序列化。
use error_chain::error_chain;
use csv::{Reader, Writer};
use serde::{de, Deserialize, Deserializer};
use std::str::FromStr;

error_chain! {
  foreign_links {
      CsvError(csv::Error);
      ParseInt(std::num::ParseIntError);
      CsvInnerError(csv::IntoInnerError<Writer<Vec<u8>>>);
      IO(std::fmt::Error);
      UTF8(std::string::FromUtf8Error);
  }
}

#[derive(Debug)]
struct HexColor {
    red: u8,
    green: u8,
    blue: u8,
}

#[derive(Debug, Deserialize)]
struct Row {
    color_name: String,
    color: HexColor,
}

impl FromStr for HexColor {
    type Err = Error;

    fn from_str(hex_color: &str) -> std::result::Result<Self, Self::Err> {
        let trimmed = hex_color.trim_matches('#');
        if trimmed.len() != 6 {
            Err("Invalid length of hex string".into())
        } else {
            Ok(HexColor {
                red: u8::from_str_radix(&trimmed[..2], 16)?,
                green: u8::from_str_radix(&trimmed[2..4], 16)?,
                blue: u8::from_str_radix(&trimmed[4..6], 16)?,
            })
        }
    }
}

impl<'de> Deserialize<'de> for HexColor {
    fn deserialize<D>(deserializer: D) -> std::result::Result<Self, D::Error>
    where
        D: Deserializer<'de>,
    {
        let s = String::deserialize(deserializer)?;
        FromStr::from_str(&s).map_err(de::Error::custom)
    }
}

fn main() -> Result<()> {
    let data = "color_name,color
red,#ff0000
green,#00ff00
blue,#0000FF
periwinkle,#ccccff
magenta,#ff00ff"
        .to_owned();
    let mut out = Writer::from_writer(vec![]);
    let mut reader = Reader::from_reader(data.as_bytes());
    for result in reader.deserialize::<Row>() {
        let res = result?;
        out.serialize((
            res.color_name,
            res.color.red,
            res.color.green,
            res.color.blue,
        ))?;
    }
    let written = String::from_utf8(out.into_inner()?)?;
    assert_eq!(Some("magenta,255,0,255"), written.lines().last());
    println!("{}", written);
    Ok(())
}
结构化数据
序列和反序列非结构化的JSON
serde_json 是一个高性能的 JSON 包,它支持我们在不声明结构体的情况下,去解析 JSON。
use serde_json::json;
use serde_json::{Value, Error};

fn main() -> Result<(), Error> {
    let j = r#"{
                 "userid": 103609,
                 "verified": true,
                 "access_privileges": [
                   "user",
                   "admin"
                 ]
               }"#;

    let parsed: Value = serde_json::from_str(j)?;

    let expected = json!({
        "userid": 103609,
        "verified": true,
        "access_privileges": [
            "user",
            "admin"
        ]
    });

    assert_eq!(parsed, expected);

    Ok(())
}
解析 TOML 文件
toml 包可以将 TOML 文件的内容解析为一个 toml::Value 值,该值能代表任何合法的 TOML 数据。
use toml::{Value, de::Error};

fn main() -> Result<(), Error> {
    let toml_content = r#"
          [package]
          name = "your_package"
          version = "0.1.0"
          authors = ["You! <you@example.org>"]

          [dependencies]
          serde = "1.0"
          "#;

    let package_info: Value = toml::from_str(toml_content)?;

    assert_eq!(package_info["dependencies"]["serde"].as_str(), Some("1.0"));
    assert_eq!(package_info["package"]["name"].as_str(),
               Some("your_package"));

    Ok(())
}
还可以配合 serde 将 TOML 解析到我们自定义的结构体中:
use serde::Deserialize;

use toml::de::Error;
use std::collections::HashMap;

#[derive(Deserialize)]
struct Config {
    package: Package,
    dependencies: HashMap<String, String>,
}

#[derive(Deserialize)]
struct Package {
    name: String,
    version: String,
    authors: Vec<String>,
}

fn main() -> Result<(), Error> {
    let toml_content = r#"
          [package]
          name = "your_package"
          version = "0.1.0"
          authors = ["You! <you@example.org>"]

          [dependencies]
          serde = "1.0"
          "#;

    let package_info: Config = toml::from_str(toml_content)?;

    assert_eq!(package_info.package.name, "your_package");
    assert_eq!(package_info.package.version, "0.1.0");
    assert_eq!(package_info.package.authors, vec!["You! <you@example.org>"]);
    assert_eq!(package_info.dependencies["serde"], "1.0");

    Ok(())
}
使用小端字节序来读写整数
byteorder 在自行接收或发送网络字节流时会非常有用( 除非性能要求高,否则还是建议使用 JSON 等数据协议,不要自己做字节流解析 )。
use byteorder::{LittleEndian, ReadBytesExt, WriteBytesExt};
use std::io::Error;

#[derive(Default, PartialEq, Debug)]
struct Payload {
    kind: u8,
    value: u16,
}

fn main() -> Result<(), Error> {
    let original_payload = Payload::default();
    let encoded_bytes = encode(&original_payload)?;
    let decoded_payload = decode(&encoded_bytes)?;
    assert_eq!(original_payload, decoded_payload);
    Ok(())
}

fn encode(payload: &Payload) -> Result<Vec<u8>, Error> {
    let mut bytes = vec![];
    bytes.write_u8(payload.kind)?;
    bytes.write_u16::<LittleEndian>(payload.value)?;
    Ok(bytes)
}

fn decode(mut bytes: &[u8]) -> Result<Payload, Error> {
    let payload = Payload {
        kind: bytes.read_u8()?,
        value: bytes.read_u16::<LittleEndian>()?,
    };
    Ok(payload)
}
文件读写
迭代文件中的内容行
use std::fs::File;
use std::io::{Write, BufReader, BufRead, Error};

fn main() -> Result<(), Error> {
    let path = "lines.txt";

    // 创建文件
    let mut output = File::create(path)?;
    // 写入三行内容
    write!(output, "Rust\n💖\nFun")?;

    let input = File::open(path)?;
    let buffered = BufReader::new(input);

    // 迭代文件中的每一行内容,line 是字符串
    for line in buffered.lines() {
        println!("{}", line?);
    }

    Ok(())
}
避免对同一个文件进行读写
same_file 可以帮我们识别两个文件是否是相同的。
use same_file::Handle;
use std::fs::File;
use std::io::{BufRead, BufReader, Error, ErrorKind};
use std::path::Path;

fn main() -> Result<(), Error> {
    let path_to_read = Path::new("new.txt");

    // 从标准输出上获取待写入的文件名
    let stdout_handle = Handle::stdout()?;
    // 将待写入的文件名跟待读取的文件名进行比较
    let handle = Handle::from_path(path_to_read)?;

    if stdout_handle == handle {
        return Err(Error::new(
            ErrorKind::Other,
            "You are reading and writing to the same file",
        ));
    } else {
        let file = File::open(&path_to_read)?;
        let file = BufReader::new(file);
        for (num, line) in file.lines().enumerate() {
            println!("{} : {}", num, line?.to_uppercase());
        }
    }

    Ok(())
}
以下代码会报错,因为待写入的文件名也是 new.txt,跟待读取的文件名相同
cargo run >> ./new.txt
使用内存映射访问文件
memmap 能创建一个文件的内存映射( memory map ),然后模拟一些非顺序读。
使用内存映射,意味着你将相关的索引加载到内存中,而不是通过 seek 的方式去访问文件。
Mmap::map 函数会假定待映射的文件不会同时被其它进程修改。
use memmap::Mmap;
use std::fs::File;
use std::io::{Write, Error};

fn main() -> Result<(), Error> {
    write!(File::create("content.txt")?, "My hovercraft is full of eels!")?;

    let file = File::open("content.txt")?;
    let map = unsafe { Mmap::map(&file)? };

    let random_indexes = [0, 1, 2, 19, 22, 10, 11, 29];
    assert_eq!(&map[3..13], b"hovercraft");
    let random_bytes: Vec<u8> = random_indexes.iter()
        .map(|&idx| map[idx])
        .collect();
    assert_eq!(&random_bytes[..], b"My loaf!");
    Ok(())
}
目录访问
获取24小时内被修改过的文件
通过遍历读取目录中文件的 Metadata::modified 属性,来获取目标文件名列表。
use error_chain::error_chain;

use std::{env, fs};

error_chain! {
    foreign_links {
        Io(std::io::Error);
        SystemTimeError(std::time::SystemTimeError);
    }
}

fn main() -> Result<()> {
    let current_dir = env::current_dir()?;
    println!(
        "Entries modified in the last 24 hours in {:?}:",
        current_dir
    );

    for entry in fs::read_dir(current_dir)? {
        let entry = entry?;
        let path = entry.path();

        let metadata = fs::metadata(&path)?;
        let last_modified = metadata.modified()?.elapsed()?.as_secs();

        if last_modified < 24 * 3600 && metadata.is_file() {
            println!(
                "Last modified: {:?} seconds, is read only: {:?}, size: {:?} bytes, filename: {:?}",
                last_modified,
                metadata.permissions().readonly(),
                metadata.len(),
                path.file_name().ok_or("No filename")?
            );
        }
    }

    Ok(())
}
获取给定路径的 loops
使用 same_file::is_same_file 可以检查给定路径的 loops,loop 可以通过以下方式创建:
mkdir -p /tmp/foo/bar/baz
ln -s /tmp/foo/  /tmp/foo/bar/baz/qux
use std::io;
use std::path::{Path, PathBuf};
use same_file::is_same_file;

fn contains_loop<P: AsRef<Path>>(path: P) -> io::Result<Option<(PathBuf, PathBuf)>> {
    let path = path.as_ref();
    let mut path_buf = path.to_path_buf();
    while path_buf.pop() {
        if is_same_file(&path_buf, path)? {
            return Ok(Some((path_buf, path.to_path_buf())));
        } else if let Some(looped_paths) = contains_loop(&path_buf)? {
            return Ok(Some(looped_paths));
        }
    }
    return Ok(None);
}

fn main() {
    assert_eq!(
        contains_loop("/tmp/foo/bar/baz/qux/bar/baz").unwrap(),
        Some((
            PathBuf::from("/tmp/foo"),
            PathBuf::from("/tmp/foo/bar/baz/qux")
        ))
    );
}
递归查找重复的文件名
walkdir 可以帮助我们遍历指定的目录。
use std::collections::HashMap;
use walkdir::WalkDir;

fn main() {
    let mut filenames = HashMap::new();

    // 遍历当前目录
    for entry in WalkDir::new(".")
            .into_iter()
            .filter_map(Result::ok)
            .filter(|e| !e.file_type().is_dir()) {
        let f_name = String::from(entry.file_name().to_string_lossy());
        let counter = filenames.entry(f_name.clone()).or_insert(0);
        *counter += 1;

        if *counter == 2 {
            println!("{}", f_name);
        }
    }
}
递归查找满足条件的所有文件
下面的代码通过 walkdir 来查找当前目录中最近一天内发生过修改的所有文件。
follow_links 为 true 时,那软链接会被当成正常的文件或目录一样对待,也就是说软链接指向的文件或目录也会被访问和检查。若软链接指向的目标不存在或它是一个 loops,就会导致错误的发生。
use error_chain::error_chain;

use walkdir::WalkDir;

error_chain! {
   foreign_links {
       WalkDir(walkdir::Error);
       Io(std::io::Error);
       SystemTime(std::time::SystemTimeError);
   }
}

fn main() -> Result<()> {
    for entry in WalkDir::new(".")
            .follow_links(true)
            .into_iter()
            .filter_map(|e| e.ok()) {
        let f_name = entry.file_name().to_string_lossy();
        let sec = entry.metadata()?.modified()?;

        if f_name.ends_with(".json") && sec.elapsed()?.as_secs() < 86400 {
            println!("{}", f_name);
        }
    }

    Ok(())
}
遍历目录跳过隐藏文件
下面例子使用 walkdir 来遍历一个目录,同时跳过隐藏文件 is_not_hidden。
use walkdir::{DirEntry, WalkDir};

fn is_not_hidden(entry: &DirEntry) -> bool {
    entry
         .file_name()
         .to_str()
         .map(|s| entry.depth() == 0 || !s.starts_with("."))
         .unwrap_or(false)
}

fn main() {
    WalkDir::new(".")
        .into_iter()
        .filter_entry(|e| is_not_hidden(e))
        .filter_map(|v| v.ok())
        .for_each(|x| println!("{}", x.path().display()));
}
递归计算给定深度的文件大小
递归访问的深度可以使用 WalkDir::min_depth 和 WalkDir::max_depth 来控制。
use walkdir::WalkDir;

fn main() {
    let total_size = WalkDir::new(".")
        .min_depth(1)
        .max_depth(3)
        .into_iter()
        .filter_map(|entry| entry.ok())
        .filter_map(|entry| entry.metadata().ok())
        .filter(|metadata| metadata.is_file())
        .fold(0, |acc, m| acc + m.len());

    println!("Total size: {} bytes.", total_size);
}
递归查找所有 png 文件
例子中使用了 glob 包,其中的 ** 代表当前目录及其所有子目录,例如,/media/**/*.png 代表在 media 和它的所有子目录下查找 png 文件.
use error_chain::error_chain;

use glob::glob;

error_chain! {
   foreign_links {
       Glob(glob::GlobError);
       Pattern(glob::PatternError);
   }
}

fn main() -> Result<()> {
    for entry in glob("**/*.png")? {
        println!("{}", entry?.display());
    }

    Ok(())
}
查找满足给定正则的所有文件且忽略文件名大小写
glob_with 函数可以按照给定的正则表达式进行查找,同时还能使用选项来控制一些匹配设置。
use error_chain::error_chain;
use glob::{glob_with, MatchOptions};

error_chain! {
    foreign_links {
        Glob(glob::GlobError);
        Pattern(glob::PatternError);
    }
}

fn main() -> Result<()> {
    let options = MatchOptions {
        case_sensitive: false,
        ..Default::default()
    };

    for entry in glob_with("/media/img_[0-9]*.png", options)? {
        println!("{}", entry?.display());
    }

    Ok(())
}
全局变量
使用 lazy_static 在运行期初始化全局变量
下面的例子,我们将使用 lazy_static 声明一个在运行期初始化( 懒求值 )的 Hashmap,它会被求值一次,然后保存在一个全局的 static 引用之后。
use lazy_static::lazy_static;
use std::collections::HashMap;

lazy_static! {
    static ref PRIVILEGES: HashMap<&'static str, Vec<&'static str>> = {
        let mut map = HashMap::new();
        map.insert("James", vec!["user", "admin"]);
        map.insert("Jim", vec!["user"]);
        map
    };
}

fn show_access(name: &str) {
    let access = PRIVILEGES.get(name);
    println!("{}: {:?}", name, access);
}

fn main() {
    let access = PRIVILEGES.get("James");
    println!("James: {:?}", access);

    show_access("Jim");
}
TCP/IP
监听 TCP 端口
以下代码会监听指定的 TCP 端口,并接收一条外部进入的 TCP 连接,然后将读取到的一条信息输出到标准输出( println! )。
use std::net::{SocketAddrV4, Ipv4Addr, TcpListener};
use std::io::{Read, Error};

fn main() -> Result<(), Error> {
    let loopback = Ipv4Addr::new(127, 0, 0, 1);
    let socket = SocketAddrV4::new(loopback, 0);
    let listener = TcpListener::bind(socket)?;
    let port = listener.local_addr()?;
    println!("Listening on {}, access this port to end the program", port);
    let (mut tcp_stream, addr) = listener.accept()?; //block  until requested
    println!("Connection received! {:?} is sending data.", addr);
    let mut input = String::new();
    let _ = tcp_stream.read_to_string(&mut input)?;
    println!("{:?} says {}", addr, input);
    Ok(())
}
循环接收进入的 TCP 连接
@todo
正则表达式
验证邮件格式并取出 @ 前的信息
下面代码使用 regex 包来验证邮件格式的正确性,然后提取出 @ 符号前的所有内容。
use lazy_static::lazy_static;

use regex::Regex;

fn extract_login(input: &str) -> Option<&str> {
    lazy_static! {
        static ref RE: Regex = Regex::new(r"(?x)
            ^(?P<login>[^@\s]+)@
            ([[:word:]]+\.)*
            [[:word:]]+$
            ").unwrap();
    }
    RE.captures(input).and_then(|cap| {
        cap.name("login").map(|login| login.as_str())
    })
}

fn main() {
    assert_eq!(extract_login(r"I❤email@example.com"), Some(r"I❤email"));
    assert_eq!(
        extract_login(r"sdf+sdsfsd.as.sdsd@jhkk.d.rl"),
        Some(r"sdf+sdsfsd.as.sdsd")
    );
    assert_eq!(extract_login(r"More@Than@One@at.com"), None);
    assert_eq!(extract_login(r"Not an email@email"), None);
}
从文本中提出 # 开头的标签
例子对标签进行提取、排序和去重。需要注意,下面的标签仅仅是拉丁字母的,如果你要支持更多的字母,可以参考下 Twitter 的正则语法,友情提示,复杂的多!
use lazy_static::lazy_static;

use regex::Regex;
use std::collections::HashSet;

fn extract_hashtags(text: &str) -> HashSet<&str> {
    lazy_static! {
        static ref HASHTAG_REGEX : Regex = Regex::new(
                r"\#[a-zA-Z][0-9a-zA-Z_]*"
            ).unwrap();
    }
    HASHTAG_REGEX.find_iter(text).map(|mat| mat.as_str()).collect()
}

fn main() {
    let tweet = "Hey #world, I just got my new #dog, say hello to Till. #dog #forever #2 #_ ";
    let tags = extract_hashtags(tweet);
    assert!(tags.contains("#dog") && tags.contains("#forever") && tags.contains("#world"));
    assert_eq!(tags.len(), 3);
}
从文本中提取出所有手机号
[Regex::captures_iter] 可以对字符串型文本进行处理,以获取文本中的多个手机号。下面的例子适用于美国的号码。
use error_chain::error_chain;

use regex::Regex;
use std::fmt;

error_chain!{
   foreign_links {
       Regex(regex::Error);
       Io(std::io::Error);
   }
}

struct PhoneNumber<'a> {
    area: &'a str,
    exchange: &'a str,
    subscriber: &'a str,
}

impl<'a> fmt::Display for PhoneNumber<'a> {
    fn fmt(&self, f: &mut fmt::Formatter) -> fmt::Result {
        write!(f, "1 ({}) {}-{}", self.area, self.exchange, self.subscriber)
    }
}

fn main() -> Result<()> {
    let phone_text = "
    +1 505 881 9292 (v) +1 505 778 2212 (c) +1 505 881 9297 (f)
    (202) 991 9534
    Alex 5553920011
    1 (800) 233-2010
    1.299.339.1020";

    let re = Regex::new(
        r#"(?x)
          (?:\+?1)?                       # Country Code Optional
          [\s\.]?
          (([2-9]\d{2})|\(([2-9]\d{2})\)) # Area Code
          [\s\.\-]?
          ([2-9]\d{2})                    # Exchange Code
          [\s\.\-]?
          (\d{4})                         # Subscriber Number"#,
    )?;

    let phone_numbers = re.captures_iter(phone_text).filter_map(|cap| {
        let groups = (cap.get(2).or(cap.get(3)), cap.get(4), cap.get(5));
        match groups {
            (Some(area), Some(ext), Some(sub)) => Some(PhoneNumber {
                area: area.as_str(),
                exchange: ext.as_str(),
                subscriber: sub.as_str(),
            }),
            _ => None,
        }
    });

    assert_eq!(
        phone_numbers.map(|m| m.to_string()).collect::<Vec<_>>(),
        vec![
            "1 (505) 881-9292",
            "1 (505) 778-2212",
            "1 (505) 881-9297",
            "1 (202) 991-9534",
            "1 (555) 392-0011",
            "1 (800) 233-2010",
            "1 (299) 339-1020",
        ]
    );

    Ok(())
}
通过多个正则来过滤日志文件
例子的目标是过滤出包含 "version X.X.X"、以 443 结尾的 IP 地址和特别的警告的日志行。
值得注意的是,由于在正则中反斜杠非常常见,因此使用 r#"" 形式的原生字符串对于开发者和使用者都更加友好。
use error_chain::error_chain;

use std::fs::File;
use std::io::{BufReader, BufRead};
use regex::RegexSetBuilder;

error_chain! {
   foreign_links {
       Io(std::io::Error);
       Regex(regex::Error);
   }
}

fn main() -> Result<()> {
    let log_path = "application.log";
    let buffered = BufReader::new(File::open(log_path)?);

    let set = RegexSetBuilder::new(&[
        r#"version "\d\.\d\.\d""#,
        r#"\d{1,3}\.\d{1,3}\.\d{1,3}\.\d{1,3}:443"#,
        r#"warning.*timeout expired"#,
    ]).case_insensitive(true)
        .build()?;

    buffered
        .lines()
        .filter_map(|line| line.ok())
        .filter(|line| set.is_match(line.as_str()))
        .for_each(|x| println!("{}", x));

    Ok(())
}
将文本中所有的指定模式替换成另外一种模式
下面代码将标准的 ISO 8601 YYYY-MM-DD 日期模式替换成带有斜杠的美式英语日期。例如 2013-01-15 -> 01/15/2013。
use lazy_static::lazy_static;

use std::borrow::Cow;
use regex::Regex;

fn reformat_dates(before: &str) -> Cow<str> {
    lazy_static! {
        static ref ISO8601_DATE_REGEX : Regex = Regex::new(
            r"(?P<y>\d{4})-(?P<m>\d{2})-(?P<d>\d{2})"
            ).unwrap();
    }
    ISO8601_DATE_REGEX.replace_all(before, "$m/$d/$y")
}

fn main() {
    let before = "2012-03-14, 2013-01-15 and 2014-07-05";
    let after = reformat_dates(before);
    assert_eq!(after, "03/14/2012, 01/15/2013 and 07/05/2014");
}
字符串解析
访问 Unicode 字符
unicode-segmentation 包的 UnicodeSegmentation::graphemes 函数可以将 UTF-8 字符串收集成一个 Unicode 字符组成的数组。这样我们就可以通过索引的方式来访问对应的字符了。
use unicode_segmentation::UnicodeSegmentation;

fn main() {
    let name = "José Guimarães\r\n";
    let graphemes = UnicodeSegmentation::graphemes(name, true)
    	.collect::<Vec<&str>>();
    assert_eq!(graphemes[3], "é");
}
为自定义结构体实现 FromStr 特征
为我们的 RGB 结构体实现 FromStr 特征后,就可以将一个十六进制的颜色表示字符串转换成 RGB 结构体。
use std::str::FromStr;

#[derive(Debug, PartialEq)]
struct RGB {
    r: u8,
    g: u8,
    b: u8,
}

impl FromStr for RGB {
    type Err = std::num::ParseIntError;


    // 将十六进制的颜色码解析为 `RGB` 的实例
    fn from_str(hex_code: &str) -> Result<Self, Self::Err> {

        // u8::from_str_radix(src: &str, radix: u32) 将一个字符串切片按照指定的基数转换为 u8 类型
        let r: u8 = u8::from_str_radix(&hex_code[1..3], 16)?;
        let g: u8 = u8::from_str_radix(&hex_code[3..5], 16)?;
        let b: u8 = u8::from_str_radix(&hex_code[5..7], 16)?;

        Ok(RGB { r, g, b })
    }
}

fn main() {
    let code: &str = &r"#fa7268";
    match RGB::from_str(code) {
        Ok(rgb) => {
            println!(
                r"The RGB color code is: R: {} G: {} B: {}",
                rgb.r, rgb.g, rgb.b
            );
        }
        Err(_) => {
            println!("{} is not a valid color hex code!", code);
        }
    }

    // 测试 from_str 是否按照预期工作
    assert_eq!(
        RGB::from_str(&r"#fa7268").unwrap(),
        RGB {
            r: 250,
            g: 114,
            b: 104
        }
    );
}
实现 Display 特征
@todo
提取网络链接( 爬虫 )
从目标网页 HTML 中提取出所有链接
下面代码使用 reqwest::get 发起一次 http 请求,然后通过 select 包的 Document::from_read 将请求的结果解析为 HTML 文档。
use error_chain::error_chain;
use select::document::Document;
use select::predicate::Name;

error_chain! {
     foreign_links {
         ReqError(reqwest::Error);
         IoError(std::io::Error);
     }
}

#[tokio::main]
async fn main() -> Result<()> {
  let res = reqwest::get("https://www.rust-lang.org/en-US/")
    .await?
    .text()
    .await?;

  Document::from(res.as_str())
    .find(Name("a"))
    .filter_map(|n| n.attr("href"))
    .for_each(|x| println!("{}", x));

  Ok(())
}
关于 practice.rs
值得学习的小型项目
变量绑定与解构
基本类型
学习资料:
- English: Rust Book 3.2 and 3.3
- 简体中文: Rust语言圣经 - 基本类型
数值类型
整数
- 🌟
Tips: 如果我们没有显式的给予变量一个类型,那编译器会自动帮我们推导一个类型
// 移除某个部分让代码工作
fn main() {
    let x: i32 = 5;
    let mut y: u32 = 5;

    y = x;

    let z = 10; // 这里 z 的类型是?
}
- 🌟
// 填空
fn main() {
    let v: u16 = 38_u8 as __;
}
- 🌟🌟🌟
Tips: 如果我们没有显式的给予变量一个类型,那编译器会自动帮我们推导一个类型
// 修改 `assert_eq!` 让代码工作
fn main() {
    let x = 5;
    assert_eq!("u32".to_string(), type_of(&x));
}

// 以下函数可以获取传入参数的类型,并返回类型的字符串形式,例如  "i8", "u8", "i32", "u32"
fn type_of<T>(_: &T) -> String {
    format!("{}", std::any::type_name::<T>())
}
- 🌟🌟
// 填空,让代码工作
fn main() {
    assert_eq!(i8::MAX, __);
    assert_eq!(u8::MAX, __);
}
- 🌟🌟
// 解决代码中的错误和 `panic`
fn main() {
   let v1 = 251_u8 + 8;
   let v2 = i8::checked_add(251, 8).unwrap();
   println!("{},{}",v1,v2);
}
- 🌟🌟
// 修改 `assert!` 让代码工作
fn main() {
    let v = 1_024 + 0xff + 0o77 + 0b1111_1111;
    assert!(v == 1579);
}
浮点数
- 🌟
// 将 ? 替换成你的答案
fn main() {
    let x = 1_000.000_1; // ?
    let y: f32 = 0.12; // f32
    let z = 0.01_f64; // f64
}
- 🌟🌟 使用两种方法来让下面代码工作
fn main() {
    assert!(0.1+0.2==0.3);
}
序列Range
- 🌟🌟 两个目标: 1. 修改
assert!让它工作 2. 让println!输出: 97 - 122
fn main() {
    let mut sum = 0;
    for i in -3..2 {
        sum += i
    }

    assert!(sum == -3);

    for c in 'a'..='z' {
        println!("{}",c);
    }
}
- 🌟🌟
// 填空
use std::ops::{Range, RangeInclusive};
fn main() {
    assert_eq!((1..__), Range{ start: 1, end: 5 });
    assert_eq!((1..__), RangeInclusive::new(1, 5));
}
计算
- 🌟
// 填空,并解决错误
fn main() {
    // 整数加法
    assert!(1u32 + 2 == __);

    // 整数减法
    assert!(1i32 - 2 == __);
    assert!(1u8 - 2 == -1);

    assert!(3 * 50 == __);

    assert!(9.6 / 3.2 == 3.0); // error ! 修改它让代码工作

    assert!(24 % 5 == __);

    // 逻辑与或非操作
    assert!(true && false == __);
    assert!(true || false == __);
    assert!(!true == __);

    // 位操作
    println!("0011 AND 0101 is {:04b}", 0b0011u32 & 0b0101);
    println!("0011 OR 0101 is {:04b}", 0b0011u32 | 0b0101);
    println!("0011 XOR 0101 is {:04b}", 0b0011u32 ^ 0b0101);
    println!("1 << 5 is {}", 1u32 << 5);
    println!("0x80 >> 2 is 0x{:x}", 0x80u32 >> 2);
}
你可以在这里找到答案(在 solutions 路径下)
字符、布尔、单元类型
字符
- 🌟
// 修改2处 `assert_eq!` 让代码工作

use std::mem::size_of_val;
fn main() {
    let c1 = 'a';
    assert_eq!(size_of_val(&c1),1);

    let c2 = '中';
    assert_eq!(size_of_val(&c2),3);

    println!("Success!")
}
- 🌟
// 修改一行让代码正常打印
fn main() {
    let c1 = "中";
    print_char(c1);
}

fn print_char(c : char) {
    println!("{}", c);
}
布尔
- 🌟
// 使成功打印
fn main() {
    let _f: bool = false;

    let t = true;
    if !t {
        println!("Success!")
    }
}
- 🌟
fn main() {
    let f = true;
    let t = true && false;
    assert_eq!(t, f);

    println!("Success!")
}
单元类型
- 🌟🌟
// 让代码工作,但不要修改 `implicitly_ret_unit` !
fn main() {
    let _v: () = ();

    let v = (2, 3);
    assert_eq!(v, implicitly_ret_unit());

    println!("Success!")
}

fn implicitly_ret_unit() {
    println!("I will return a ()")
}

// 不要使用下面的函数,它只用于演示!
fn explicitly_ret_unit() -> () {
    println!("I will return a ()")
}
- 🌟🌟 单元类型占用的内存大小是多少?
// 让代码工作:修改 `assert!` 中的 `4`
use std::mem::size_of_val;
fn main() {
    let unit: () = ();
    assert!(size_of_val(&unit) == 4);

    println!("Success!")
}
你可以在这里找到答案(在 solutions 路径下)
语句与表达式
示例
fn main() {
    let x = 5u32;

    let y = {
        let x_squared = x * x;
        let x_cube = x_squared * x;

        // 下面表达式的值将被赋给 `y`
        x_cube + x_squared + x
    };

    let z = {
        // 分号让表达式变成了语句,因此返回的不再是表达式 `2 * x` 的值,而是语句的值 `()`
        2 * x;
    };

    println!("x is {:?}", x);
    println!("y is {:?}", y);
    println!("z is {:?}", z);
}
练习
- 🌟🌟
// 使用两种方法让代码工作起来
fn main() {
   let v = {
       let mut x = 1;
       x += 2
   };

   assert_eq!(v, 3);
}
- 🌟
fn main() {
   let v = (let x = 3);

   assert!(v == 3);
}
- 🌟
fn main() {
    let s = sum(1 , 2);
    assert_eq!(s, 3);
}

fn sum(x: i32, y: i32) -> i32 {
    x + y;
}
你可以在这里找到答案(在 solutions 路径下)
函数
- 🌟🌟🌟
fn main() {
    // 不要修改下面两行代码!
    let (x, y) = (1, 2);
    let s = sum(x, y);

    assert_eq!(s, 3);
}

fn sum(x, y: i32) {
    x + y;
}
- 🌟🌟
fn main() {
   print();
}

// 使用另一个类型来替代 i32
fn print() -> i32 {
   println!("hello,world");
}
- 🌟🌟🌟
// 用两种方法求解
fn main() {
    never_return();
}

fn never_return() -> ! {
    // 实现这个函数,不要修改函数签名!

}
- 🌟🌟 发散函数( Diverging function )不会返回任何值,因此它们可以用于替代需要返回任何值的地方
fn main() {
    println!("Success!");
}

fn get_option(tp: u8) -> Option<i32> {
    match tp {
        1 => {
            // TODO
        }
        _ => {
            // TODO
        }
    };

    // 这里与其返回一个 None,不如使用发散函数替代
    never_return_fn()
}

// 使用三种方法实现以下发散函数
fn never_return_fn() -> ! {

}
- 🌟🌟
fn main() {
    // 填空
    let b = __;

    let _v = match b {
        true => 1,
        // 发散函数也可以用于 `match` 表达式,用于替代任何类型的值
        false => {
            println!("Success!");
            panic!("we have no value for `false`, but we can panic")
        }
    };

    println!("Exercise Failed if printing out this line!");
}
你可以在这里找到答案(在 solutions 路径下)
所有权与借用
学习资料 :
- English: Rust Book 4.1-4.4
- 简体中文: Rust语言圣经 - 所有权与借用
所有权
- 🌟🌟
fn main() {
    // 使用尽可能多的方法来通过编译
    let x = String::from("hello, world");
    let y = x;
    println!("{},{}",x,y);
}
- 🌟🌟
// 不要修改 main 中的代码
fn main() {
    let s1 = String::from("hello, world");
    let s2 = take_ownership(s1);

    println!("{}", s2);
}

// 只能修改下面的代码!
fn take_ownership(s: String) {
    println!("{}", s);
}
- 🌟🌟
fn main() {
    let s = give_ownership();
    println!("{}", s);
}

// 只能修改下面的代码!
fn give_ownership() -> String {
    let s = String::from("hello, world");
    // convert String to Vec
    // 将 String 转换成 Vec 类型
    let _s = s.into_bytes();
    s
}
- 🌟🌟
// 修复错误,不要删除任何代码行
fn main() {
    let s = String::from("hello, world");

    print_str(s);

    println!("{}", s);
}

fn print_str(s: String)  {
    println!("{}",s)
}
- 🌟🌟
// 不要使用 clone,使用 copy 的方式替代
fn main() {
    let x = (1, 2, (), "hello".to_string());
    let y = x.clone();
    println!("{:?}, {:?}", x, y);
}
可变性
当所有权转移时,可变性也可以随之改变。
- 🌟
fn main() {
    let s = String::from("hello, ");

    // 只修改下面这行代码 !
    let s1 = s;

    s1.push_str("world")
}
- 🌟🌟🌟
fn main() {
    let x = Box::new(5);

    let ...      // 完成该行代码,不要修改其它行!

    *y = 4;

    assert_eq!(*x, 5);
}
部分 move
当解构一个变量时,可以同时使用 move 和引用模式绑定的方式。当这么做时,部分 move 就会发生:变量中一部分的所有权被转移给其它变量,而另一部分我们获取了它的引用。
在这种情况下,原变量将无法再被使用,但是它没有转移所有权的那一部分依然可以使用,也就是之前被引用的那部分。
示例
fn main() {
    #[derive(Debug)]
    struct Person {
        name: String,
        age: Box<u8>,
    }

    let person = Person {
        name: String::from("Alice"),
        age: Box::new(20),
    };

    // 通过这种解构式模式匹配,person.name 的所有权被转移给新的变量 `name`
    // 但是,这里 `age` 变量却是对 person.age 的引用, 这里 ref 的使用相当于: let age = &person.age
    let Person { name, ref age } = person;

    println!("The person's age is {}", age);

    println!("The person's name is {}", name);

    // Error! 原因是 person 的一部分已经被转移了所有权,因此我们无法再使用它
    //println!("The person struct is {:?}", person);

    // 虽然 `person` 作为一个整体无法再被使用,但是 `person.age` 依然可以使用
    println!("The person's age from person struct is {}", person.age);
}
练习
- 🌟
fn main() {
   let t = (String::from("hello"), String::from("world"));

   let _s = t.0;

   // 仅修改下面这行代码,且不要使用 `_s`
   println!("{:?}", t);
}
- 🌟🌟
fn main() {
   let t = (String::from("hello"), String::from("world"));

   // 填空,不要修改其它代码
   let (__, __) = __;

   println!("{:?}, {:?}, {:?}", s1, s2, t); // -> "hello", "world", ("hello", "world")
}
你可以在这里找到答案(在 solutions 路径下)
引用和借用
引用
- 🌟
fn main() {
   let x = 5;
   // 填写空白处
   let p = __;

   println!("x 的内存地址是 {:p}", p); // output: 0x16fa3ac84
}
- 🌟
fn main() {
    let x = 5;
    let y = &x;

    // 只能修改以下行
    assert_eq!(5, y);
}
- 🌟
// 修复错误
fn main() {
    let mut s = String::from("hello, ");

    borrow_object(s)
}

fn borrow_object(s: &String) {}
- 🌟
// 修复错误
fn main() {
    let mut s = String::from("hello, ");

    push_str(s)
}

fn push_str(s: &mut String) {
    s.push_str("world")
}
- 🌟🌟
fn main() {
    let mut s = String::from("hello, ");

    // 填写空白处,让代码工作
    let p = __;

    p.push_str("world");
}
ref
ref 与 & 类似,可以用来获取一个值的引用,但是它们的用法有所不同。
- 🌟🌟🌟
fn main() {
    let c = '中';

    let r1 = &c;
    // 填写空白处,但是不要修改其它行的代码
    let __ r2 = c;

    assert_eq!(*r1, *r2);

    // 判断两个内存地址的字符串是否相等
    assert_eq!(get_addr(r1),get_addr(r2));
}

// 获取传入引用的内存地址的字符串形式
fn get_addr(r: &char) -> String {
    format!("{:p}", r)
}
借用规则
- 🌟
// 移除代码某个部分,让它工作
// 你不能移除整行的代码!
fn main() {
    let mut s = String::from("hello");

    let r1 = &mut s;
    let r2 = &mut s;

    println!("{}, {}", r1, r2);
}
可变性
- 🌟 错误: 从不可变对象借用可变
fn main() {
    // 通过修改下面一行代码来修复错误
    let  s = String::from("hello, ");

    borrow_object(&mut s)
}

fn borrow_object(s: &mut String) {}
- 🌟🌟 Ok: 从可变对象借用不可变
// 下面的代码没有任何错误
fn main() {
    let mut s = String::from("hello, ");

    borrow_object(&s);

    s.push_str("world");
}

fn borrow_object(s: &String) {}
NLL
- 🌟🌟
// 注释掉一行代码让它工作
fn main() {
    let mut s = String::from("hello, ");

    let r1 = &mut s;
    r1.push_str("world");
    let r2 = &mut s;
    r2.push_str("!");

    println!("{}",r1);
}
- 🌟🌟
fn main() {
    let mut s = String::from("hello, ");

    let r1 = &mut s;
    let r2 = &mut s;

    // 在下面增加一行代码人为制造编译错误:cannot borrow `s` as mutable more than once at a time
    // 你不能同时使用 r1 和 r2
}
你可以在这里找到答案(在 solutions 路径下)
复合类型
学习资料:
- English: Rust Book 4.3, 5.1, 6.1, 8.2
- 简体中文: Rust语言圣经 - 复合类型
字符串
字符串字面量的类型是 &str, 例如 let s: &str = "hello, world" 中的 "hello, world" 的类型就是 &str。
str 和 &str
- 🌟 正常情况下我们无法使用
str类型,但是可以使用&str来替代
// 修复错误,不要新增代码行
fn main() {
    let s: str = "hello, world";
}
- 🌟🌟 如果要使用
str类型,只能配合Box。&可以用来将Box<str>转换为&str类型
// 使用至少两种方法来修复错误
fn main() {
    let s: Box<str> = "hello, world".into();
    greetings(s)
}

fn greetings(s: &str) {
    println!("{}",s)
}
String
String 是定义在标准库中的类型,分配在堆上,可以动态的增长。它的底层存储是动态字节数组的方式( Vec<u8> ),但是与字节数组不同,String 是 UTF-8 编码。
- 🌟
// 填空
fn main() {
    let mut s = __;
    s.push_str("hello, world");
    s.push('!');

    assert_eq!(s, "hello, world!");
}
- 🌟🌟🌟
// 修复所有错误,并且不要新增代码行
fn main() {
    let  s = String::from("hello");
    s.push(',');
    s.push(" world");
    s += "!".to_string();

    println!("{}", s)
}
- 🌟🌟 我们可以用
replace方法来替换指定的子字符串
// 填空
fn main() {
    let s = String::from("I like dogs");
    // 以下方法会重新分配一块内存空间,然后将修改后的字符串存在这里
    let s1 = s.__("dogs", "cats");

    assert_eq!(s1, "I like cats")
}
在标准库的 String 模块中,有更多的实用方法,感兴趣的同学可以看看。
- 🌟🌟 你只能将
String跟&str类型进行拼接,并且String的所有权在此过程中会被 move
// 修复所有错误,不要删除任何一行代码
fn main() {
    let s1 = String::from("hello,");
    let s2 = String::from("world!");
    let s3 = s1 + s2;
    assert_eq!(s3,"hello,world!");
    println!("{}",s1);
}
&str 和 String
与 str 的很少使用相比,&str 和 String 类型却非常常用,因此也非常重要。
- 🌟🌟 我们可以使用两种方法将
&str转换成String类型
// 使用至少两种方法来修复错误
fn main() {
    let s = "hello, world";
    greetings(s)
}

fn greetings(s: String) {
    println!("{}",s)
}
- 🌟🌟 我们可以使用
String::from或to_string将&str转换成String类型
// 使用两种方法来解决错误,不要新增代码行
fn main() {
    let s = "hello, world".to_string();
    let s1: &str = s;
}
字符串转义
- 🌟
fn main() {
    // 你可以使用转义的方式来输出想要的字符,这里我们使用十六进制的值,例如 \x73 会被转义成小写字母 's'
    // 填空以输出 "I'm writing Rust"
    let byte_escape = "I'm writing Ru\x73__!";
    println!("What are you doing\x3F (\\x3F means ?) {}", byte_escape);

    // 也可以使用 Unicode 形式的转义字符
    let unicode_codepoint = "\u{211D}";
    let character_name = "\"DOUBLE-STRUCK CAPITAL R\"";

    println!("Unicode character {} (U+211D) is called {}",
                unicode_codepoint, character_name );

    // 还能使用 \ 来连接多行字符串
    let long_string = "String literals
                        can span multiple lines.
                        The linebreak and indentation here \
                         can be escaped too!";
    println!("{}", long_string);
}
- 🌟🌟🌟 有时候需要转义的字符很多,我们会希望使用更方便的方式来书写字符串: raw string.
/* 填空并修复所有错误 */
fn main() {
    let raw_str = r"Escapes don't work here: \x3F \u{211D}";
    // 修改上面的行让代码工作
    assert_eq!(raw_str, "Escapes don't work here: ? ℝ");

    // 如果你希望在字符串中使用双引号,可以使用以下形式
    let quotes = r#"And then I said: "There is no escape!""#;
    println!("{}", quotes);

    // 如果希望在字符串中使用 # 号,可以如下使用:
    let  delimiter = r###"A string with "# in it. And even "##!"###;
    println!("{}", delimiter);

    // 填空
    let long_delimiter = __;
    assert_eq!(long_delimiter, "Hello, \"##\"")
}
字节字符串
想要一个非 UTF-8 形式的字符串吗(我们之前的 str, &str, String 都是 UTF-8 字符串) ? 可以试试字节字符串或者说字节数组:
示例:
use std::str;

fn main() {
    // 注意,这并不是 `&str` 类型了!
    let bytestring: &[u8; 21] = b"this is a byte string";


    // 字节数组没有实现 `Display` 特征,因此只能使用 `Debug` 的方式去打印
    println!("A byte string: {:?}", bytestring);

    // 字节数组也可以使用转义
    let escaped = b"\x52\x75\x73\x74 as bytes";
    // ...但是不支持 unicode 转义
    // let escaped = b"\u{211D} is not allowed";
    println!("Some escaped bytes: {:?}", escaped);


    // raw string
    let raw_bytestring = br"\u{211D} is not escaped here";
    println!("{:?}", raw_bytestring);

    // 将字节数组转成 `str` 类型可能会失败
    if let Ok(my_str) = str::from_utf8(raw_bytestring) {
        println!("And the same as text: '{}'", my_str);
    }

    let _quotes = br#"You can also use "fancier" formatting, \
                    like with normal raw strings"#;

    // 字节数组可以不是 UTF-8 格式
    let shift_jis = b"\x82\xe6\x82\xa8\x82\xb1\x82\xbb"; // "ようこそ" in SHIFT-JIS

    // 但是它们未必能转换成 `str` 类型
    match str::from_utf8(shift_jis) {
        Ok(my_str) => println!("Conversion successful: '{}'", my_str),
        Err(e) => println!("Conversion failed: {:?}", e),
    };
}
如果大家想要了解更多关于字符串字面量、转义字符的话,可以看看 Rust Reference 的 'Tokens' 章节.
字符串索引string index
- 🌟🌟 你无法通过索引的方式去访问字符串中的某个字符,但是可以使用切片的方式
&s1[start..end],但是start和end必须准确落在字符的边界处.
fn main() {
    let s1 = String::from("hi,中国");
    let h = s1[0]; // 修改当前行来修复错误,提示: `h` 字符在 UTF-8 格式中只需要 1 个字节来表示
    assert_eq!(h, "h");

    let h1 = &s1[3..5];// 修改当前行来修复错误,提示: `中` 字符在 UTF-8 格式中需要 3 个字节来表示
    assert_eq!(h1, "中");
}
操作 UTF-8 字符串
- 🌟
fn main() { // 填空,打印出 "你好,世界" 中的每一个字符 for c in "你好,世界".__ { println!("{}", c) } }
utf8_slice
我们可以使用三方库 utf8_slice 来访问 UTF-8 字符串的某个子串,但是与之前不同的是,该库索引的是字符,而不是字节.
Example
use utf8_slice; fn main() { let s = "The 🚀 goes to the 🌑!"; let rocket = utf8_slice::slice(s, 4, 5); // 结果是 "🚀" }
你可以在这里找到答案(在 solutions 路径下)
数组
数组的类型是 [T; Length],就如你所看到的,数组的长度是类型签名的一部分,因此数组的长度必须在编译期就已知,例如你不能使用以下方式来声明一个数组:
#![allow(unused)] fn main() { fn create_arr(n: i32) { let arr = [1; n]; } }
以上函数将报错,因为编译器无法在编译期知道 n 的具体大小。
- 🌟
fn main() { // 使用合适的类型填空 let arr: __ = [1, 2, 3, 4, 5]; // 修改以下代码,让它顺利运行 assert!(arr.len() == 4); }
- 🌟🌟
fn main() { // 很多时候,我们可以忽略数组的部分类型,也可以忽略全部类型,让编译器帮助我们推导 let arr0 = [1, 2, 3]; let arr: [_; 3] = ['a', 'b', 'c']; // 填空 // 数组分配在栈上, `std::mem::size_of_val` 函数会返回整个数组占用的内存空间 // 数组中的每个 char 元素占用 4 字节的内存空间,因为在 Rust 中, char 是 Unicode 字符 assert!(std::mem::size_of_val(&arr) == __); }
- 🌟 数组中的所有元素可以一起初始化为同一个值
fn main() { // 填空 let list: [i32; 100] = __ ; assert!(list[0] == 1); assert!(list.len() == 100); }
- 🌟 数组中的所有元素必须是同一类型
fn main() { // 修复错误 let _arr = [1, 2, '3']; }
- 🌟 数组的下标索引从 0 开始.
fn main() { let arr = ['a', 'b', 'c']; let ele = arr[1]; // 只修改此行来让代码工作 assert!(ele == 'a'); }
- 🌟 越界索引会导致代码的
panic.
// 修复代码中的错误 fn main() { let names = [String::from("Sunfei"), "Sunface".to_string()]; // `get` 返回 `Option<T>` 类型,因此它的使用非常安全 let name0 = names.get(0).unwrap(); // 但是下标索引就存在越界的风险了 let _name1 = &names[2]; }
你可以在这里找到答案(在 solutions 路径下)
切片( Slice )
切片跟数组相似,但是切片的长度无法在编译期得知,因此你无法直接使用切片类型。
- 🌟🌟 这里,
[i32]和str都是切片类型,但是直接使用它们会造成编译错误,如下代码所示。为了解决,你需要使用切片的引用:&[i32],&str。
// 修复代码中的错误,不要新增代码行! fn main() { let arr = [1, 2, 3]; let s1: [i32] = arr[0..2]; let s2: str = "hello, world" as str; }
一个切片引用占用了2个字大小的内存空间( 从现在开始,为了简洁性考虑,如无特殊原因,我们统一使用切片来特指切片引用 )。 该切片的第一个字是指向数据的指针,第二个字是切片的长度。字的大小取决于处理器架构,例如在 x86-64 上,字的大小是 64 位也就是 8 个字节,那么一个切片引用就是 16 个字节大小。
切片( 引用 )可以用来借用数组的某个连续的部分,对应的签名是 &[T],大家可以与数组的签名对比下 [T; Length]。
- 🌟🌟🌟
fn main() { let arr: [char; 3] = ['中', '国', '人']; let slice = &arr[..2]; // 修改数字 `8` 让代码工作 // 小提示: 切片和数组不一样,它是引用。如果是数组的话,那下面的 `assert!` 将会通过: '中'和'国'是char类型,char类型是Unicode编码,大小固定为4字节,两个字符为8字节。 assert!(std::mem::size_of_val(&slice) == 8); }
- 🌟🌟
fn main() { let arr: [i32; 5] = [1, 2, 3, 4, 5]; // 填空让代码工作起来 let slice: __ = __; assert_eq!(slice, &[2, 3, 4]); }
字符串切片
- 🌟
fn main() { let s = String::from("hello"); let slice1 = &s[0..2]; // 填空,不要再使用 0..2 let slice2 = &s[__]; assert_eq!(slice1, slice2); }
- 🌟
fn main() { let s = "你好,世界"; // 修改以下代码行,让代码工作起来 let slice = &s[0..2]; assert!(slice == "你"); }
- 🌟🌟
&String可以被隐式地转换成&str类型.
// 修复所有错误 fn main() { let mut s = String::from("hello world"); // 这里, &s 是 `&String` 类型,但是 `first_character` 函数需要的是 `&str` 类型。 // 尽管两个类型不一样,但是代码仍然可以工作,原因是 `&String` 会被隐式地转换成 `&str` 类型,如果大家想要知道更多,可以看看 Deref 章节: https://course.rs/advance/smart-pointer/deref.html let ch = first_character(&s); s.clear(); // error! println!("the first character is: {}", ch); } fn first_character(s: &str) -> &str { &s[..1] }
你可以在这里找到答案(在 solutions 路径下)
元组( Tuple )
- 🌟 元组中的元素可以是不同的类型。元组的类型签名是
(T1, T2, ...), 这里T1,T2是相对应的元组成员的类型.
fn main() { let _t0: (u8,i16) = (0, -1); // 元组的成员还可以是一个元组 let _t1: (u8, (i16, u32)) = (0, (-1, 1)); // 填空让代码工作 let t: (u8, __, i64, __, __) = (1u8, 2u16, 3i64, "hello", String::from(", world")); }
- 🌟 可以使用索引来获取元组的成员
// 修改合适的地方,让代码工作 fn main() { let t = ("i", "am", "sunface"); assert_eq!(t.1, "sunface"); }
- 🌟 过长的元组无法被打印输出
// 修复代码错误 fn main() { let too_long_tuple = (1, 2, 3, 4, 5, 6, 7, 8, 9, 10, 11, 12, 13); println!("too long tuple: {:?}", too_long_tuple); }
- 🌟 使用模式匹配来解构元组
fn main() { let tup = (1, 6.4, "hello"); // 填空 let __ = tup; assert_eq!(x, 1); assert_eq!(y, "hello"); assert_eq!(z, 6.4); }
- 🌟🌟 解构式赋值
fn main() { let (x, y, z); // 填空 __ = (1, 2, 3); assert_eq!(x, 3); assert_eq!(y, 1); assert_eq!(z, 2); }
- 🌟🌟 元组可以用于函数的参数和返回值
fn main() { // 填空,需要稍微计算下 let (x, y) = sum_multiply(__); assert_eq!(x, 5); assert_eq!(y, 6); } fn sum_multiply(nums: (i32, i32)) -> (i32, i32) { (nums.0 + nums.1, nums.0 * nums.1) }
你可以在这里找到答案(在 solutions 路径下)
结构体
三种类型的结构体
- 🌟 对于结构体,我们必须为其中的每一个字段都指定具体的值
// fix the error struct Person { name: String, age: u8, hobby: String } fn main() { let age = 30; let p = Person { name: String::from("sunface"), age, }; }
- 🌟 单元结构体没有任何字段。
struct Unit; trait SomeTrait { // ...定义一些行为 } // 我们并不关心结构体中有什么数据( 字段 ),但我们关心它的行为。 // 因此这里我们使用没有任何字段的单元结构体,然后为它实现一些行为 impl SomeTrait for Unit { } fn main() { let u = Unit; do_something_with_unit(u); } // 填空,让代码工作 fn do_something_with_unit(u: __) { }
- 🌟🌟🌟 元组结构体看起来跟元组很像,但是它拥有一个结构体的名称,该名称可以赋予它一定的意义。由于它并不关心内部数据到底是什么名称,因此此时元组结构体就非常适合。
// 填空并修复错误 struct Color(i32, i32, i32); struct Point(i32, i32, i32); fn main() { let v = Point(__, __, __); check_color(v); } fn check_color(p: Color) { let (x, _, _) = p; assert_eq!(x, 0); assert_eq!(p.1, 127); assert_eq!(__, 255); }
结构体上的一些操作
- 🌟 你可以在实例化一个结构体时将它整体标记为可变的,但是 Rust 不允许我们将结构体的某个字段专门指定为可变的.
// 填空并修复错误,不要增加或移除代码行 struct Person { name: String, age: u8, } fn main() { let age = 18; let p = Person { name: String::from("sunface"), age, }; // how can you believe sunface is only 18? p.age = 30; // 填空 __ = String::from("sunfei"); }
- 🌟 使用结构体字段初始化缩略语法可以减少一些重复代码
// 填空 struct Person { name: String, age: u8, } fn main() {} fn build_person(name: String, age: u8) -> Person { Person { age, __ } }
- 🌟 你可以使用结构体更新语法基于一个结构体实例来构造另一个
// 填空,让代码工作 struct User { active: bool, username: String, email: String, sign_in_count: u64, } fn main() { let u1 = User { email: String::from("someone@example.com"), username: String::from("sunface"), active: true, sign_in_count: 1, }; let u2 = set_email(u1); } fn set_email(u: User) -> User { User { email: String::from("contact@im.dev"), __ } }
打印结构体
- 🌟🌟 我们可以使用
#[derive(Debug)]让结构体变成可打印的.
// 填空,让代码工作 #[__] struct Rectangle { width: u32, height: u32, } fn main() { let scale = 2; let rect1 = Rectangle { width: dbg!(30 * scale), // 打印 debug 信息到标准错误输出 stderr,并将 `30 * scale` 的值赋给 `width` height: 50, }; dbg!(&rect1); // 打印 debug 信息到标准错误输出 stderr println!(__, rect1); // 打印 debug 信息到标准输出 stdout }
结构体的所有权
当解构一个变量时,可以同时使用 move 和引用模式绑定的方式。当这么做时,部分 move 就会发生:变量中一部分的所有权被转移给其它变量,而另一部分我们获取了它的引用。
在这种情况下,原变量将无法再被使用,但是它没有转移所有权的那一部分依然可以使用,也就是之前被引用的那部分。
示例
fn main() { #[derive(Debug)] struct Person { name: String, age: Box<u8>, } let person = Person { name: String::from("Alice"), age: Box::new(20), }; // 通过这种解构式模式匹配,person.name 的所有权被转移给新的变量 `name` // 但是,这里 `age` 变量却是对 person.age 的引用, 这里 ref 的使用相当于: let age = &person.age let Person { name, ref age } = person; println!("The person's age is {}", age); println!("The person's name is {}", name); // Error! 原因是 person 的一部分已经被转移了所有权,因此我们无法再使用它 //println!("The person struct is {:?}", person); // 虽然 `person` 作为一个整体无法再被使用,但是 `person.age` 依然可以使用 println!("The person's age from person struct is {}", person.age); }
练习
- 🌟🌟
// 修复错误 #[derive(Debug)] struct File { name: String, data: String, } fn main() { let f = File { name: String::from("readme.md"), data: "Rust By Practice".to_string() }; let _name = f.name; // 只能修改这一行 println!("{}, {}, {:?}",f.name, f.data, f); }
你可以在这里找到答案(在 solutions 路径下)
枚举 Enum
- 🌟🌟 在创建枚举时,你可以使用显式的整数设定枚举成员的值。
// 修复错误 enum Number { Zero, One, Two, } enum Number1 { Zero = 0, One, Two, } // C语言风格的枚举定义 enum Number2 { Zero = 0.0, One = 1.0, Two = 2.0, } fn main() { // 通过 `as` 可以将枚举值强转为整数类型 assert_eq!(Number::One, Number1::One); assert_eq!(Number1::One, Number2::One); }
- 🌟 枚举成员可以持有各种类型的值
// 填空 enum Message { Quit, Move { x: i32, y: i32 }, Write(String), ChangeColor(i32, i32, i32), } fn main() { let msg1 = Message::Move{__}; // 使用x = 1, y = 2 来初始化 let msg2 = Message::Write(__); // 使用 "hello, world!" 来初始化 }
- 🌟🌟 枚举成员中的值可以使用模式匹配来获取
// 仅填空并修复错误 enum Message { Quit, Move { x: i32, y: i32 }, Write(String), ChangeColor(i32, i32, i32), } fn main() { let msg = Message::Move{x: 1, y: 2}; if let Message::Move{__} = msg { assert_eq!(a, b); } else { panic!("不要让这行代码运行!"); } }
- 🌟🌟 使用枚举对类型进行同一化
// 填空,并修复错误 enum Message { Quit, Move { x: i32, y: i32 }, Write(String), ChangeColor(i32, i32, i32), } fn main() { let msgs: __ = [ Message::Quit, Message::Move{x:1, y:3}, Message::ChangeColor(255,255,0) ]; for msg in msgs { show_message(msg) } } fn show_message(msg: Message) { println!("{}", msg); }
- 🌟🌟 Rust 中没有
null,我们通过Option<T>枚举来处理值为空的情况
// 填空让 `println` 输出,同时添加一些代码不要让最后一行的 `panic` 执行到 fn main() { let five = Some(5); let six = plus_one(five); let none = plus_one(None); if let __ = six { println!("{}", n) } panic!("不要让这行代码运行!"); } fn plus_one(x: Option<i32>) -> Option<i32> { match x { __ => None, __ => Some(i + 1), } }
- 🌟🌟🌟🌟 使用枚举来实现链表.
// 填空,让代码运行 use crate::List::*; enum List { // Cons: 链表中包含有值的节点,节点是元组类型,第一个元素是节点的值,第二个元素是指向下一个节点的指针 Cons(u32, Box<List>), // Nil: 链表中的最后一个节点,用于说明链表的结束 Nil, } // 为枚举实现一些方法 impl List { // 创建空的链表 fn new() -> List { // 因为没有节点,所以直接返回 Nil 节点 // 枚举成员 Nil 的类型是 List Nil } // 在老的链表前面新增一个节点,并返回新的链表 fn prepend(self, elem: u32) -> __ { Cons(elem, Box::new(self)) } // 返回链表的长度 fn len(&self) -> u32 { match *self { // 这里我们不能拿走 tail 的所有权,因此需要获取它的引用 Cons(_, __ tail) => 1 + tail.len(), // 空链表的长度为 0 Nil => 0 } } // 返回链表的字符串表现形式,用于打印输出 fn stringify(&self) -> String { match *self { Cons(head, ref tail) => { // 递归生成字符串 format!("{}, {}", head, tail.__()) }, Nil => { format!("Nil") }, } } } fn main() { // 创建一个新的链表(也是空的) let mut list = List::new(); // 添加一些元素 list = list.prepend(1); list = list.prepend(2); list = list.prepend(3); // 打印列表的当前状态 println!("链表的长度是: {}", list.len()); println!("{}", list.stringify()); }
你可以在这里找到答案(在 solutions 路径下)
流程控制
Pattern Match
match, matches! 和 if let
match
- 🌟🌟
// 填空 enum Direction { East, West, North, South, } fn main() { let dire = Direction::South; match dire { Direction::East => println!("East"), __ => { // 在这里匹配 South 或 North println!("South or North"); }, _ => println!(__), }; }
- 🌟🌟
match是一个表达式,因此可以用在赋值语句中
fn main() { let boolean = true; // 使用 match 表达式填空,并满足以下条件 // // boolean = true => binary = 1 // boolean = false => binary = 0 let binary = __; assert_eq!(binary, 1); }
- 🌟🌟 使用 match 匹配出枚举成员持有的值
// 填空 enum Message { Quit, Move { x: i32, y: i32 }, Write(String), ChangeColor(i32, i32, i32), } fn main() { let msgs = [ Message::Quit, Message::Move{x:1, y:3}, Message::ChangeColor(255,255,0) ]; for msg in msgs { show_message(msg) } } fn show_message(msg: Message) { match msg { __ => { // 这里匹配 Message::Move assert_eq!(a, 1); assert_eq!(b, 3); }, Message::ChangeColor(_, g, b) => { assert_eq!(g, __); assert_eq!(b, __); } __ => println!("no data in these variants") } }
matches!
matches! 看起来像 match, 但是它可以做一些特别的事情
- 🌟🌟
fn main() { let alphabets = ['a', 'E', 'Z', '0', 'x', '9' , 'Y']; // 使用 `matches` 填空 for ab in alphabets { assert!(__) } }
- 🌟🌟
enum MyEnum { Foo, Bar } fn main() { let mut count = 0; let v = vec![MyEnum::Foo,MyEnum::Bar,MyEnum::Foo]; for e in v { if e == MyEnum::Foo { // 修复错误,只能修改本行代码 count += 1; } } assert_eq!(count, 2); }
if let
在有些时候, 使用 match 匹配枚举有些太重了,此时 if let 就非常适合.
- 🌟
fn main() { let o = Some(7); // 移除整个 `match` 语句块,使用 `if let` 替代 match o { Some(i) => { println!("This is a really long string and `{:?}`", i); } _ => {} }; }
- 🌟🌟
// 填空 enum Foo { Bar(u8) } fn main() { let a = Foo::Bar(1); __ { println!("foobar 持有的值是: {}", i); } }
- 🌟🌟
enum Foo { Bar, Baz, Qux(u32) } fn main() { let a = Foo::Qux(10); // 移除以下代码,使用 `match` 代替 if let Foo::Bar = a { println!("match foo::bar") } else if let Foo::Baz = a { println!("match foo::baz") } else { println!("match others") } }
变量遮蔽( Shadowing )
- 🌟🌟
// 就地修复错误 fn main() { let age = Some(30); if let Some(age) = age { // 创建一个新的变量,该变量与之前的 `age` 变量同名 assert_eq!(age, Some(30)); } // 新的 `age` 变量在这里超出作用域 match age { // `match` 也能实现变量遮蔽 Some(age) => println!("age 是一个新的变量,它的值是 {}",age), _ => () } }
你可以在这里找到答案(在 solutions 路径下)
模式
- 🌟🌟 使用
|可以匹配多个值, 而使用..=可以匹配一个闭区间的数值序列
fn main() {} fn match_number(n: i32) { match n { // 匹配一个单独的值 1 => println!("One!"), // 使用 `|` 填空,不要使用 `..` 或 `..=` __ => println!("match 2 -> 5"), // 匹配一个闭区间的数值序列 6..=10 => { println!("match 6 -> 10") }, _ => { println!("match 11 -> +infinite") } } }
- 🌟🌟🌟
@操作符可以让我们将一个与模式相匹配的值绑定到新的变量上
struct Point { x: i32, y: i32, } fn main() { // 填空,让 p 匹配第二个分支 let p = Point { x: __, y: __ }; match p { Point { x, y: 0 } => println!("On the x axis at {}", x), // 第二个分支 Point { x: 0..=5, y: y@ (10 | 20 | 30) } => println!("On the y axis at {}", y), Point { x, y } => println!("On neither axis: ({}, {})", x, y), } }
- 🌟🌟🌟
// 修复错误 enum Message { Hello { id: i32 }, } fn main() { let msg = Message::Hello { id: 5 }; match msg { Message::Hello { id: 3..=7, } => println!("id 值的范围在 [3, 7] 之间: {}", id), Message::Hello { id: newid@10 | 11 | 12 } => { println!("id 值的范围在 [10, 12] 之间: {}", newid) } Message::Hello { id } => println!("Found some other id: {}", id), } }
- 🌟🌟 匹配守卫(match guard)是一个位于 match 分支模式之后的额外 if 条件,它能为分支模式提供更进一步的匹配条件。
// 填空让代码工作,必须使用 `split` fn main() { let num = Some(4); let split = 5; match num { Some(x) __ => assert!(x < split), Some(x) => assert!(x >= split), None => (), } }
- 🌟🌟🌟 使用
..忽略一部分值
// 填空,让代码工作 fn main() { let numbers = (2, 4, 8, 16, 32, 64, 128, 256, 512, 1024, 2048); match numbers { __ => { assert_eq!(first, 2); assert_eq!(last, 2048); } } }
- 🌟🌟 使用模式
&mut V去匹配一个可变引用时,你需要格外小心,因为匹配出来的V是一个值,而不是可变引用
// 修复错误,尽量少地修改代码 // 不要移除任何代码行 fn main() { let mut v = String::from("hello,"); let r = &mut v; match r { &mut value => value.push_str(" world!") } }
你可以在这里找到答案(在 solutions 路径下)
方法和关联函数
Generics and Traits
泛型
函数
- 🌟🌟🌟
// 填空 struct A; // 具体的类型 `A`. struct S(A); // 具体的类型 `S`. struct SGen<T>(T); // 泛型 `SGen`. fn reg_fn(_s: S) {} fn gen_spec_t(_s: SGen<A>) {} fn gen_spec_i32(_s: SGen<i32>) {} fn generic<T>(_s: SGen<T>) {} fn main() { // 使用非泛型函数 reg_fn(__); // 具体的类型 gen_spec_t(__); // 隐式地指定类型参数 `A`. gen_spec_i32(__); // 隐式地指定类型参数`i32`. // 显式地指定类型参数 `char` generic::<char>(__); // 隐式地指定类型参数 `char`. generic(__); }
- 🌟🌟
// 实现下面的泛型函数 sum fn sum fn main() { assert_eq!(5, sum(2i8, 3i8)); assert_eq!(50, sum(20, 30)); assert_eq!(2.46, sum(1.23, 1.23)); }
结构体和 impl
- 🌟
// 实现一个结构体 Point 让代码工作 fn main() { let integer = Point { x: 5, y: 10 }; let float = Point { x: 1.0, y: 4.0 }; }
- 🌟🌟
// 修改以下结构体让代码工作 struct Point<T> { x: T, y: T, } fn main() { // 不要修改这行代码! let p = Point{x: 5, y : "hello".to_string()}; }
- 🌟🌟
// 为 Val 增加泛型参数,不要修改 `main` 中的代码 struct Val { val: f64, } impl Val { fn value(&self) -> &f64 { &self.val } } fn main() { let x = Val{ val: 3.0 }; let y = Val{ val: "hello".to_string()}; println!("{}, {}", x.value(), y.value()); }
方法
- 🌟🌟🌟
struct Point<T, U> { x: T, y: U, } impl<T, U> Point<T, U> { // 实现 mixup,不要修改其它代码! fn mixup } fn main() { let p1 = Point { x: 5, y: 10 }; let p2 = Point { x: "Hello", y: '中'}; let p3 = p1.mixup(p2); assert_eq!(p3.x, 5); assert_eq!(p3.y, '中'); }
- 🌟🌟
// 修复错误,让代码工作 struct Point<T> { x: T, y: T, } impl Point<f32> { fn distance_from_origin(&self) -> f32 { (self.x.powi(2) + self.y.powi(2)).sqrt() } } fn main() { let p = Point{x: 5, y: 10}; println!("{}",p.distance_from_origin()) }
你可以在这里找到答案(在 solutions 路径下)
Const 泛型
在之前的泛型中,可以抽象为一句话:针对类型实现的泛型,所有的泛型都是为了抽象不同的类型,那有没有针对值的泛型?答案就是 Const 泛型。
示例
- 下面的例子同时使用泛型和 const 泛型来实现一个结构体,该结构体的字段中的数组长度是可变的
struct ArrayPair<T, const N: usize> { left: [T; N], right: [T; N], } impl<T: Debug, const N: usize> Debug for ArrayPair<T, N> { // ... }
- 目前,const 泛型参数只能使用以下形式的实参:
- 一个单独的 const 泛型参数
- 一个字面量 (i.e. 整数, 布尔值或字符).
- 一个具体的 const 表达式( 表达式中不能包含任何 泛型参数)
fn foo<const N: usize>() {} fn bar<T, const M: usize>() { foo::<M>(); // ok: 符合第一种 foo::<2021>(); // ok: 符合第二种 foo::<{20 * 100 + 20 * 10 + 1}>(); // ok: 符合第三种 foo::<{ M + 1 }>(); // error: 违背第三种,const 表达式中不能有泛型参数 M foo::<{ std::mem::size_of::<T>() }>(); // error: 泛型表达式包含了泛型参数 T let _: [u8; M]; // ok: 符合第一种 let _: [u8; std::mem::size_of::<T>()]; // error: 泛型表达式包含了泛型参数 T } fn main() {}
- const 泛型还能帮我们避免一些运行时检查,提升性能
pub struct MinSlice<T, const N: usize> { pub head: [T; N], pub tail: [T], } fn main() { let slice: &[u8] = b"Hello, world"; let reference: Option<&u8> = slice.get(6); // 我们知道 `.get` 返回的是 `Some(b' ')` // 但编译器不知道 assert!(reference.is_some()); let slice: &[u8] = b"Hello, world"; // 当编译构建 MinSlice 时会进行长度检查,也就是在编译期我们就知道它的长度是 12 // 在运行期,一旦 `unwrap` 成功,在 `MinSlice` 的作用域内,就再无需任何检查 let minslice = MinSlice::<u8, 12>::from_slice(slice).unwrap(); let value: u8 = minslice.head[6]; assert_eq!(value, b' ') }
练习
- 🌟🌟
<T, const N: usize>是结构体类型的一部分,和数组类型一样,这意味着长度不同会导致类型不同:Array<i32, 3>和Array<i32, 4>是不同的类型
// 修复错误 struct Array<T, const N: usize> { data : [T; N] } fn main() { let arrays = [ Array{ data: [1, 2, 3], }, Array { data: [1.0, 2.0, 3.0], }, Array { data: [1, 2] } ]; }
- 🌟🌟
// 填空 fn print_array<__>(__) { println!("{:?}", arr); } fn main() { let arr = [1, 2, 3]; print_array(arr); let arr = ["hello", "world"]; print_array(arr); }
- 🌟🌟🌟 有时我们希望能限制一个变量占用内存的大小,例如在嵌入式环境中,此时 const 泛型参数的第三种形式
const 表达式就非常适合.
#![allow(incomplete_features)] #![feature(generic_const_exprs)] fn check_size<T>(val: T) where Assert<{ core::mem::size_of::<T>() < 768 }>: IsTrue, { //... } // 修复 main 函数中的错误 fn main() { check_size([0u8; 767]); check_size([0i32; 191]); check_size(["hello你好"; __]); // size of &str ? check_size([(); __].map(|_| "hello你好".to_string())); // size of String? check_size(['中'; __]); // size of char ? } pub enum Assert<const CHECK: bool> {} pub trait IsTrue {} impl IsTrue for Assert<true> {}
你可以在这里找到答案(在 solutions 路径下)
Traits
特征 Trait 可以告诉编译器一个特定的类型所具有的、且能跟其它类型共享的特性。我们可以使用特征通过抽象的方式来定义这种共享行为,还可以使用特征约束来限定一个泛型类型必须要具有某个特定的行为。
Note: 特征跟其它语言的接口较为类似,但是仍然有一些区别
示例
struct Sheep { naked: bool, name: String } impl Sheep { fn is_naked(&self) -> bool { self.naked } fn shear(&mut self) { if self.is_naked() { // `Sheep` 结构体上定义的方法可以调用 `Sheep` 所实现的特征的方法 println!("{} is already naked...", self.name()); } else { println!("{} gets a haircut!", self.name); self.naked = true; } } } trait Animal { // 关联函数签名;`Self` 指代实现者的类型 // 例如我们在为 Pig 类型实现特征时,那 `new` 函数就会返回一个 `Pig` 类型的实例,这里的 `Self` 指代的就是 `Pig` 类型 fn new(name: String) -> Self; // 方法签名 fn name(&self) -> String; fn noise(&self) -> String; // 方法还能提供默认的定义实现 fn talk(&self) { println!("{} says {}", self.name(), self.noise()); } } impl Animal for Sheep { // `Self` 被替换成具体的实现者类型: `Sheep` fn new(name: String) -> Sheep { Sheep { name: name, naked: false } } fn name(&self) -> String { self.name.clone() } fn noise(&self) -> String { if self.is_naked() { "baaaaah?".to_string() } else { "baaaaah!".to_string() } } // 默认的特征方法可以被重写 fn talk(&self) { println!("{} pauses briefly... {}", self.name, self.noise()); } } fn main() { // 这里的类型注释时必须的 let mut dolly: Sheep = Animal::new("Dolly".to_string()); // TODO ^ 尝试去除类型注释,看看会发生什么 dolly.talk(); dolly.shear(); dolly.talk(); }
Exercises
- 🌟🌟
// 完成两个 `impl` 语句块 // 不要修改 `main` 中的代码 trait Hello { fn say_hi(&self) -> String { String::from("hi") } fn say_something(&self) -> String; } struct Student {} impl Hello for Student { } struct Teacher {} impl Hello for Teacher { } fn main() { let s = Student {}; assert_eq!(s.say_hi(), "hi"); assert_eq!(s.say_something(), "I'm a good student"); let t = Teacher {}; assert_eq!(t.say_hi(), "Hi, I'm your new teacher"); assert_eq!(t.say_something(), "I'm not a bad teacher"); println!("Success!") }
Derive 派生
我们可以使用 #[derive] 属性来派生一些特征,对于这些特征编译器会自动进行默认实现,对于日常代码开发而言,这是非常方便的,例如大家经常用到的 Debug 特征,就是直接通过派生来获取默认实现,而无需我们手动去完成这个工作。
想要查看更多信息,可以访问这里。
- 🌟🌟
// `Centimeters`, 一个元组结构体,可以被比较大小 #[derive(PartialEq, PartialOrd)] struct Centimeters(f64); // `Inches`, 一个元组结构体可以被打印 #[derive(Debug)] struct Inches(i32); impl Inches { fn to_centimeters(&self) -> Centimeters { let &Inches(inches) = self; Centimeters(inches as f64 * 2.54) } } // 添加一些属性让代码工作 // 不要修改其它代码! struct Seconds(i32); fn main() { let _one_second = Seconds(1); println!("One second looks like: {:?}", _one_second); let _this_is_true = _one_second == _one_second; let _this_is_false = _one_second > _one_second; let foot = Inches(12); println!("One foot equals {:?}", foot); let meter = Centimeters(100.0); let cmp = if foot.to_centimeters() < meter { "smaller" } else { "bigger" }; println!("One foot is {} than one meter.", cmp); }
运算符
在 Rust 中,许多运算符都可以被重载,事实上,运算符仅仅是特征方法调用的语法糖。例如 a + b 中的 + 是 std::ops::Add 特征的 add 方法调用,因此我们可以为自定义类型实现该特征来支持该类型的加法运算。
- 🌟🌟
use std::ops; // 实现 fn multiply 方法 // 如上所述,`+` 需要 `T` 类型实现 `std::ops::Add` 特征 // 那么, `*` 运算符需要实现什么特征呢? 你可以在这里找到答案: https://doc.rust-lang.org/core/ops/ fn multiply fn main() { assert_eq!(6, multiply(2u8, 3u8)); assert_eq!(5.0, multiply(1.0, 5.0)); println!("Success!") }
- 🌟🌟🌟
// 修复错误,不要修改 `main` 中的代码! use std::ops; struct Foo; struct Bar; struct FooBar; struct BarFoo; // 下面的代码实现了自定义类型的相加: Foo + Bar = FooBar impl ops::Add<Bar> for Foo { type Output = FooBar; fn add(self, _rhs: Bar) -> FooBar { FooBar } } impl ops::Sub<Foo> for Bar { type Output = BarFoo; fn sub(self, _rhs: Foo) -> BarFoo { BarFoo } } fn main() { // 不要修改下面代码 // 你需要为 FooBar 派生一些特征来让代码工作 assert_eq!(Foo + Bar, FooBar); assert_eq!(Foo - Bar, BarFoo); println!("Success!") }
使用特征作为函数参数
除了使用具体类型来作为函数参数,我们还能通过 impl Trait 的方式来指定实现了该特征的参数:该参数能接受的类型必须要实现指定的特征。
- 🌟🌟🌟
// 实现 `fn summary` // 修复错误且不要移除任何代码行 trait Summary { fn summarize(&self) -> String; } #[derive(Debug)] struct Post { title: String, author: String, content: String, } impl Summary for Post { fn summarize(&self) -> String { format!("The author of post {} is {}", self.title, self.author) } } #[derive(Debug)] struct Weibo { username: String, content: String, } impl Summary for Weibo { fn summarize(&self) -> String { format!("{} published a weibo {}", self.username, self.content) } } fn main() { let post = Post { title: "Popular Rust".to_string(), author: "Sunface".to_string(), content: "Rust is awesome!".to_string(), }; let weibo = Weibo { username: "sunface".to_string(), content: "Weibo seems to be worse than Tweet".to_string(), }; summary(post); summary(weibo); println!("{:?}", post); println!("{:?}", weibo); } // 在下面实现 `fn summary` 函数
使用特征作为函数返回值
我们还可以在函数的返回值中使用 impl Trait 语法。然后只有在返回值是同一个类型时,才能这么使用,如果返回值是不同的类型,你可能更需要特征对象。
- 🌟🌟
struct Sheep {} struct Cow {} trait Animal { fn noise(&self) -> String; } impl Animal for Sheep { fn noise(&self) -> String { "baaaaah!".to_string() } } impl Animal for Cow { fn noise(&self) -> String { "moooooo!".to_string() } } // 返回一个类型,该类型实现了 Animal 特征,但是我们并不能在编译期获知具体返回了哪个类型 // 修复这里的错误,你可以使用虚假的随机,也可以使用特征对象 fn random_animal(random_number: f64) -> impl Animal { if random_number < 0.5 { Sheep {} } else { Cow {} } } fn main() { let random_number = 0.234; let animal = random_animal(random_number); println!("You've randomly chosen an animal, and it says {}", animal.noise()); }
特征约束
impl Trait 语法非常直观简洁,但它实际上是特征约束的语法糖。
当使用泛型参数时,我们往往需要为该参数指定特定的行为,这种指定方式就是通过特征约束来实现的。
- 🌟🌟
fn main() { assert_eq!(sum(1, 2), 3); } // 通过两种方法使用特征约束来实现 `fn sum` fn sum<T>(x: T, y: T) -> T { x + y }
- 🌟🌟
// 修复代码中的错误 struct Pair<T> { x: T, y: T, } impl<T> Pair<T> { fn new(x: T, y: T) -> Self { Self { x, y, } } } impl<T: std::fmt::Debug + PartialOrd> Pair<T> { fn cmp_display(&self) { if self.x >= self.y { println!("The largest member is x = {:?}", self.x); } else { println!("The largest member is y = {:?}", self.y); } } } struct Unit(i32); fn main() { let pair = Pair{ x: Unit(1), y: Unit(3) }; pair.cmp_display(); }
- 🌟🌟🌟
// 填空 fn example1() { // `T: Trait` 是最常使用的方式 // `T: Fn(u32) -> u32` 说明 `T` 只能接收闭包类型的参数 struct Cacher<T: Fn(u32) -> u32> { calculation: T, value: Option<u32>, } impl<T: Fn(u32) -> u32> Cacher<T> { fn new(calculation: T) -> Cacher<T> { Cacher { calculation, value: None, } } fn value(&mut self, arg: u32) -> u32 { match self.value { Some(v) => v, None => { let v = (self.calculation)(arg); self.value = Some(v); v }, } } } let mut cacher = Cacher::new(|x| x+1); assert_eq!(cacher.value(10), __); assert_eq!(cacher.value(15), __); } fn example2() { // 还可以使用 `where` 来约束 T struct Cacher<T> where T: Fn(u32) -> u32, { calculation: T, value: Option<u32>, } impl<T> Cacher<T> where T: Fn(u32) -> u32, { fn new(calculation: T) -> Cacher<T> { Cacher { calculation, value: None, } } fn value(&mut self, arg: u32) -> u32 { match self.value { Some(v) => v, None => { let v = (self.calculation)(arg); self.value = Some(v); v }, } } } let mut cacher = Cacher::new(|x| x+1); assert_eq!(cacher.value(20), __); assert_eq!(cacher.value(25), __); } fn main() { example1(); example2(); println!("Success!") }
你可以在这里找到答案(在 solutions 路径下)
特征对象
在特征练习中 我们已经知道当函数返回多个类型时,impl Trait 是无法使用的。
对于数组而言,其中一个限制就是无法存储不同类型的元素,但是通过之前的学习,大家应该知道枚举可以在部分场景解决这种问题,但是这种方法局限性较大。此时就需要我们的主角登场了。
使用 dyn 返回特征
Rust 编译器需要知道一个函数的返回类型占用多少内存空间。由于特征的不同实现类型可能会占用不同的内存,因此通过 impl Trait 返回多个类型是不被允许的,但是我们可以返回一个 dyn 特征对象来解决问题。
- 🌟🌟🌟
trait Bird { fn quack(&self) -> String; } struct Duck; impl Duck { fn swim(&self) { println!("Look, the duck is swimming") } } struct Swan; impl Swan { fn fly(&self) { println!("Look, the duck.. oh sorry, the swan is flying") } } impl Bird for Duck { fn quack(&self) -> String{ "duck duck".to_string() } } impl Bird for Swan { fn quack(&self) -> String{ "swan swan".to_string() } } fn main() { // 填空 let duck = __; duck.swim(); let bird = hatch_a_bird(2); // 变成鸟儿后,它忘记了如何游,因此以下代码会报错 // bird.swim(); // 但它依然可以叫唤 assert_eq!(bird.quack(), "duck duck"); let bird = hatch_a_bird(1); // 这只鸟儿忘了如何飞翔,因此以下代码会报错 // bird.fly(); // 但它也可以叫唤 assert_eq!(bird.quack(), "swan swan"); println!("Success!") } // 实现以下函数 fn hatch_a_bird...
在数组中使用特征对象
- 🌟🌟
trait Bird { fn quack(&self); } struct Duck; impl Duck { fn fly(&self) { println!("Look, the duck is flying") } } struct Swan; impl Swan { fn fly(&self) { println!("Look, the duck.. oh sorry, the swan is flying") } } impl Bird for Duck { fn quack(&self) { println!("{}", "duck duck"); } } impl Bird for Swan { fn quack(&self) { println!("{}", "swan swan"); } } fn main() { // 填空 let birds __; for bird in birds { bird.quack(); // 当 duck 和 swan 变成 bird 后,它们都忘了如何翱翔于天际,只记得该怎么叫唤了。。 // 因此,以下代码会报错 // bird.fly(); } }
&dyn and Box<dyn>
- 🌟🌟
// 填空 trait Draw { fn draw(&self) -> String; } impl Draw for u8 { fn draw(&self) -> String { format!("u8: {}", *self) } } impl Draw for f64 { fn draw(&self) -> String { format!("f64: {}", *self) } } fn main() { let x = 1.1f64; let y = 8u8; // draw x draw_with_box(__); // draw y draw_with_ref(&y); println!("Success!") } fn draw_with_box(x: Box<dyn Draw>) { x.draw(); } fn draw_with_ref(x: __) { x.draw(); }
静态分发和动态分发Static and Dynamic dispatch
关于这块内容的解析介绍,请参见 Rust语言圣经。
- 🌟🌟
trait Foo { fn method(&self) -> String; } impl Foo for u8 { fn method(&self) -> String { format!("u8: {}", *self) } } impl Foo for String { fn method(&self) -> String { format!("string: {}", *self) } } // 通过泛型实现以下函数 fn static_dispatch... // 通过特征对象实现以下函数 fn dynamic_dispatch... fn main() { let x = 5u8; let y = "Hello".to_string(); static_dispatch(x); dynamic_dispatch(&y); println!("Success!") }
对象安全
一个特征能变成特征对象,首先该特征必须是对象安全的,即该特征的所有方法都必须拥有以下特点:
- 返回类型不能是
Self. - 不能使用泛型参数
- 🌟🌟🌟🌟
// 使用至少两种方法让代码工作 // 不要添加/删除任何代码行 trait MyTrait { fn f(&self) -> Self; } impl MyTrait for u32 { fn f(&self) -> Self { 42 } } impl MyTrait for String { fn f(&self) -> Self { self.clone() } } fn my_function(x: Box<dyn MyTrait>) { x.f() } fn main() { my_function(Box::new(13_u32)); my_function(Box::new(String::from("abc"))); println!("Success!") }
你可以在这里找到答案(在 solutions 路径下)
进一步深入特征
关联类型
关联类型主要用于提升代码的可读性,例如以下代码 :
#![allow(unused)] fn main() { pub trait CacheableItem: Clone + Default + fmt::Debug + Decodable + Encodable { type Address: AsRef<[u8]> + Clone + fmt::Debug + Eq + Hash; fn is_null(&self) -> bool; } }
相比 AsRef<[u8]> + Clone + fmt::Debug + Eq + Hash, Address 的使用可以极大的减少其它类型在实现该特征时所需的模版代码.
- 🌟🌟🌟
struct Container(i32, i32); // 使用关联类型实现重新实现以下特征 // trait Contains { // type A; // type B; trait Contains<A, B> { fn contains(&self, _: &A, _: &B) -> bool; fn first(&self) -> i32; fn last(&self) -> i32; } impl Contains<i32, i32> for Container { fn contains(&self, number_1: &i32, number_2: &i32) -> bool { (&self.0 == number_1) && (&self.1 == number_2) } // Grab the first number. fn first(&self) -> i32 { self.0 } // Grab the last number. fn last(&self) -> i32 { self.1 } } fn difference<A, B, C: Contains<A, B>>(container: &C) -> i32 { container.last() - container.first() } fn main() { let number_1 = 3; let number_2 = 10; let container = Container(number_1, number_2); println!("Does container contain {} and {}: {}", &number_1, &number_2, container.contains(&number_1, &number_2)); println!("First number: {}", container.first()); println!("Last number: {}", container.last()); println!("The difference is: {}", difference(&container)); }
定义默认的泛型类型参数
当我们使用泛型类型参数时,可以为该泛型参数指定一个具体的默认类型,这样当实现该特征时,如果该默认类型可以使用,那用户再无需手动指定具体的类型。
- 🌟🌟
use std::ops::Sub; #[derive(Debug, PartialEq)] struct Point<T> { x: T, y: T, } // 用三种方法填空: 其中两种使用默认的泛型参数,另外一种不使用 impl __ { type Output = Self; fn sub(self, other: Self) -> Self::Output { Point { x: self.x - other.x, y: self.y - other.y, } } } fn main() { assert_eq!(Point { x: 2, y: 3 } - Point { x: 1, y: 0 }, Point { x: 1, y: 3 }); println!("Success!") }
完全限定语法
在 Rust 中,两个不同特征的方法完全可以同名,且你可以为同一个类型同时实现这两个特征。这种情况下,就出现了一个问题:该如何调用这两个特征上定义的同名方法。为了解决这个问题,我们需要使用完全限定语法( Fully Qualified Syntax )。
示例
trait UsernameWidget { fn get(&self) -> String; } trait AgeWidget { fn get(&self) -> u8; } struct Form { username: String, age: u8, } impl UsernameWidget for Form { fn get(&self) -> String { self.username.clone() } } impl AgeWidget for Form { fn get(&self) -> u8 { self.age } } fn main() { let form = Form{ username: "rustacean".to_owned(), age: 28, }; // 如果你反注释下面一行代码,将看到一个错误: Fully Qualified Syntax // 毕竟,这里有好几个同名的 `get` 方法 // // println!("{}", form.get()); let username = UsernameWidget::get(&form); assert_eq!("rustacean".to_owned(), username); let age = AgeWidget::get(&form); // 你还可以使用以下语法 `<Form as AgeWidget>::get` assert_eq!(28, age); println!("Success!") }
练习题
- 🌟🌟
trait Pilot { fn fly(&self) -> String; } trait Wizard { fn fly(&self) -> String; } struct Human; impl Pilot for Human { fn fly(&self) -> String { String::from("This is your captain speaking.") } } impl Wizard for Human { fn fly(&self) -> String { String::from("Up!") } } impl Human { fn fly(&self) -> String { String::from("*waving arms furiously*") } } fn main() { let person = Human; assert_eq!(__, "This is your captain speaking."); assert_eq!(__, "Up!"); assert_eq!(__, "*waving arms furiously*"); println!("Success!") }
Supertraits
有些时候我们希望在特征上实现类似继承的特性,例如让一个特征 A 使用另一个特征 B 的功能。这种情况下,一个类型要实现特征 A 首先要实现特征 B, 特征 B 就被称为 supertrait
- 🌟🌟🌟
trait Person { fn name(&self) -> String; } // Person 是 Student 的 supertrait . // 实现 Student 需要同时实现 Person. trait Student: Person { fn university(&self) -> String; } trait Programmer { fn fav_language(&self) -> String; } // CompSciStudent (computer science student) 是 Programmer // 和 Student 的 subtrait. 实现 CompSciStudent 需要先实现这两个 supertraits. trait CompSciStudent: Programmer + Student { fn git_username(&self) -> String; } fn comp_sci_student_greeting(student: &dyn CompSciStudent) -> String { format!( "My name is {} and I attend {}. My favorite language is {}. My Git username is {}", student.name(), student.university(), student.fav_language(), student.git_username() ) } struct CSStudent { name: String, university: String, fav_language: String, git_username: String } // 为 CSStudent 实现所需的特征 impl ... fn main() { let student = CSStudent { name: "Sunfei".to_string(), university: "XXX".to_string(), fav_language: "Rust".to_string(), git_username: "sunface".to_string() }; // 填空 println!("{}", comp_sci_student_greeting(__)); }
孤儿原则
关于孤儿原则的详细介绍请参见特征定义与实现的位置孤儿规则 和 在外部类型上实现外部特征。
- 🌟🌟
use std::fmt; // 定义一个 newtype `Pretty` impl fmt::Display for Pretty { fn fmt(&self, f: &mut fmt::Formatter) -> fmt::Result { write!(f, "\"{}\"", self.0.clone() + ", world") } } fn main() { let w = Pretty("hello".to_string()); println!("w = {}", w); }
你可以在这里找到答案(在 solutions 路径下)
集合类型
学习资源:
- 简体中文: Rust语言圣经 - 集合类型
String
std::string::String 是 UTF-8 编码、可增长的动态字符串. 它也是我们日常开发中最常用的字符串类型,同时对于它所拥有的内容拥有所有权。
基本操作
- 🌟🌟
// 填空并修复错误 // 1. 不要使用 `to_string()` // 2. 不要添加/删除任何代码行 fn main() { let mut s: String = "hello, "; s.push_str("world".to_string()); s.push(__); move_ownership(s); assert_eq!(s, "hello, world!"); println!("Success!") } fn move_ownership(s: String) { println!("ownership of \"{}\" is moved here!", s) }
String and &str
虽然 String 的底层是 Vec<u8> 也就是字节数组的形式存储的,但是它是基于 UTF-8 编码的字符序列。String 分配在堆上、可增长且不是以 null 结尾。
而 &str 是切片引用类型( &[u8] ),指向一个合法的 UTF-8 字符序列,总之,&str 和 String 的关系类似于 &[T] 和 Vec<T> 。
如果大家想了解更多,可以看看易混淆概念解析 - &str 和 String。
- 🌟🌟
// 填空 fn main() { let mut s = String::from("hello, world"); let slice1: &str = __; // 使用两种方法 assert_eq!(slice1, "hello, world"); let slice2 = __; assert_eq!(slice2, "hello"); let slice3: __ = __; slice3.push('!'); assert_eq!(slice3, "hello, world!"); println!("Success!") }
- 🌟🌟
// 问题: 我们的代码中发生了多少次堆内存分配? // 你的回答: fn main() { // 基于 `&str` 类型创建一个 String, // 字符串字面量的类型是 `&str` let s: String = String::from("hello, world!"); // 创建一个切片引用指向 String `s` let slice: &str = &s; // 基于刚创建的切片来创建一个 String let s: String = slice.to_string(); assert_eq!(s, "hello, world!"); println!("Success!") }
UTF-8 & 索引
由于 String 都是 UTF-8 编码的,这会带来几个影响:
- 如果你需要的是非 UTF-8 字符串,可以考虑 OsString
- 无法通过索引的方式访问一个 String
具体请看字符串索引。
- 🌟🌟🌟 我们无法通过索引的方式访问字符串中的某个字符,但是可以通过切片的方式来获取字符串的某一部分
&s1[start..end]
// 填空并修复错误 fn main() { let s = String::from("hello, 世界"); let slice1 = s[0]; //提示: `h` 在 UTF-8 编码中只占用 1 个字节 assert_eq!(slice1, "h"); let slice2 = &s[3..5];// 提示: `世` 在 UTF-8 编码中占用 3 个字节 assert_eq!(slice2, "世"); // 迭代 s 中的所有字符 for (i, c) in s.__ { if i == 7 { assert_eq!(c, '世') } } println!("Success!") }
utf8_slice
我们可以使用 utf8_slice 来按照字符的自然索引方式对 UTF-8 字符串进行切片访问,与之前的切片方式相比,它索引的是字符,而之前的方式索引的是字节.
示例
use utf8_slice; fn main() { let s = "The 🚀 goes to the 🌑!"; let rocket = utf8_slice::slice(s, 4, 5); // Will equal "🚀" }
- 🌟🌟🌟
提示: 也许你需要使用
from_utf8方法
// 填空 fn main() { let mut s = String::new(); __; let v = vec![104, 101, 108, 108, 111]; // 将字节数组转换成 String let s1 = __; assert_eq!(s, s1); println!("Success!") }
内部表示
事实上 String 是一个智能指针,它作为一个结构体存储在栈上,然后指向存储在堆上的字符串底层数据。
存储在栈上的智能指针结构体由三部分组成:一个指针只指向堆上的字节数组,已使用的长度以及已分配的容量 capacity (已使用的长度小于等于已分配的容量,当容量不够时,会重新分配内存空间)。
- 🌟🌟 如果 String 的当前容量足够,那么添加字符将不会导致新的内存分配
// 修改下面的代码以打印如下内容: // 25 // 25 // 25 // 循环中不会发生任何内存分配 fn main() { let mut s = String::new(); println!("{}", s.capacity()); for _ in 0..2 { s.push_str("hello"); println!("{}", s.capacity()); } println!("Success!") }
- 🌟🌟🌟
// 填空 use std::mem; fn main() { let story = String::from("Rust By Practice"); // 阻止 String 的数据被自动 drop let mut story = mem::ManuallyDrop::new(story); let ptr = story.__(); let len = story.__(); let capacity = story.__(); assert_eq!(16, len); // 我们可以基于 ptr 指针、长度和容量来重新构建 String. // 这种操作必须标记为 unsafe,因为我们需要自己来确保这里的操作是安全的 let s = unsafe { String::from_raw_parts(ptr, len, capacity) }; assert_eq!(*story, s); println!("Success!") }
常用方法(TODO)
关于 String 的常用方法练习,可以查看这里.
你可以在这里找到答案(在 solutions 路径下)
Vector
相比 [T; N] 形式的数组, Vector 最大的特点就是可以动态调整长度。
基本操作
- 🌟🌟🌟
fn main() { let arr: [u8; 3] = [1, 2, 3]; let v = Vec::from(arr); is_vec(v); let v = vec![1, 2, 3]; is_vec(v); // vec!(..) 和 vec![..] 是同样的宏,宏可以使用 []、()、{}三种形式,因此... let v = vec!(1, 2, 3); is_vec(v); // ...在下面的代码中, v 是 Vec<[u8; 3]> , 而不是 Vec<u8> // 使用 Vec::new 和 `for` 来重写下面这段代码 let v1 = vec!(arr); is_vec(v1); assert_eq!(v, v1); println!("Success!") } fn is_vec(v: Vec<u8>) {}
- 🌟🌟
Vec可以使用extend方法进行扩展
// 填空 fn main() { let mut v1 = Vec::from([1, 2, 4]); v1.pop(); v1.push(3); let mut v2 = Vec::new(); v2.__; assert_eq!(v1, v2); println!("Success!") }
将 X 类型转换(From/Into 特征)成 Vec
只要为 Vec 实现了 From<T> 特征,那么 T 就可以被转换成 Vec。
- 🌟🌟🌟
// 填空 fn main() { // array -> Vec // impl From<[T; N]> for Vec let arr = [1, 2, 3]; let v1 = __(arr); let v2: Vec<i32> = arr.__(); assert_eq!(v1, v2); // String -> Vec // impl From<String> for Vec let s = "hello".to_string(); let v1: Vec<u8> = s.__(); let s = "hello".to_string(); let v2 = s.into_bytes(); assert_eq!(v1, v2); // impl<'_> From<&'_ str> for Vec let s = "hello"; let v3 = Vec::__(s); assert_eq!(v2, v3); // 迭代器 Iterators 可以通过 collect 变成 Vec let v4: Vec<i32> = [0; 10].into_iter().collect(); assert_eq!(v4, vec![0; 10]); println!("Success!") }
索引
- 🌟🌟🌟
// 修复错误并实现缺失的代码 fn main() { let mut v = Vec::from([1, 2, 3]); for i in 0..5 { println!("{:?}", v[i]) } for i in 0..5 { // 实现这里的代码... } assert_eq!(v, vec![2, 3, 4, 5, 6]); println!("Success!") }
切片
与 String 的切片类似, Vec 也可以使用切片。如果说 Vec 是可变的,那它的切片就是不可变或者说只读的,我们可以通过 & 来获取切片。
在 Rust 中,将切片作为参数进行传递是更常见的使用方式,例如当一个函数只需要可读性时,那传递 Vec 或 String 的切片 &[T] / &str 会更加适合。
- 🌟🌟
// 修复错误 fn main() { let mut v = vec![1, 2, 3]; let slice1 = &v[..]; // 越界访问将导致 panic. // 修改时必须使用 `v.len` let slice2 = &v[0..4]; assert_eq!(slice1, slice2); // 切片是只读的 // 注意:切片和 `&Vec` 是不同的类型,后者仅仅是 `Vec` 的引用,并可以通过解引用直接获取 `Vec` let vec_ref: &mut Vec<i32> = &mut v; (*vec_ref).push(4); let slice3 = &mut v[0..3]; slice3.push(4); assert_eq!(slice3, &[1, 2, 3, 4]); println!("Success!") }
容量
容量 capacity 是已经分配好的内存空间,用于存储未来添加到 Vec 中的元素。而长度 len 则是当前 Vec 中已经存储的元素数量。如果要添加新元素时,长度将要超过已有的容量,那容量会自动进行增长:Rust 会重新分配一块更大的内存空间,然后将之前的 Vec 拷贝过去,因此,这里就会发生新的内存分配( 目前 Rust 的容量调整策略是加倍,例如 2 -> 4 -> 8 ..)。
若这段代码会频繁发生,那频繁的内存分配会大幅影响我们系统的性能,最好的办法就是提前分配好足够的容量,尽量减少内存分配。
- 🌟🌟
// 修复错误 fn main() { let mut vec = Vec::with_capacity(10); assert_eq!(vec.len(), __); assert_eq!(vec.capacity(), 10); // 由于提前设置了足够的容量,这里的循环不会造成任何内存分配... for i in 0..10 { vec.push(i); } assert_eq!(vec.len(), __); assert_eq!(vec.capacity(), __); // ...但是下面的代码会造成新的内存分配 vec.push(11); assert_eq!(vec.len(), 11); assert!(vec.capacity() >= 11); // 填写一个合适的值,在 `for` 循环运行的过程中,不会造成任何内存分配 let mut vec = Vec::with_capacity(__); for i in 0..100 { vec.push(i); } assert_eq!(vec.len(), __); assert_eq!(vec.capacity(), __); println!("Success!") }
在 Vec 中存储不同类型的元素
Vec 中的元素必须是相同的类型,例如以下代码会发生错误:
fn main() { let v = vec![1, 2.0, 3]; }
但是我们可以使用枚举或特征对象来存储不同的类型.
- 🌟🌟
#[derive(Debug)] enum IpAddr { V4(String), V6(String), } fn main() { // 填空 let v : Vec<IpAddr>= __; // 枚举的比较需要派生 PartialEq 特征 assert_eq!(v[0], IpAddr::V4("127.0.0.1".to_string())); assert_eq!(v[1], IpAddr::V6("::1".to_string())); println!("Success!") }
- 🌟🌟
trait IpAddr { fn display(&self); } struct V4(String); impl IpAddr for V4 { fn display(&self) { println!("ipv4: {:?}",self.0) } } struct V6(String); impl IpAddr for V6 { fn display(&self) { println!("ipv6: {:?}",self.0) } } fn main() { // 填空 let v: __= vec![ Box::new(V4("127.0.0.1".to_string())), Box::new(V6("::1".to_string())), ]; for ip in v { ip.display(); } }
你可以在这里找到答案(在 solutions 路径下)
HashMap
HashMap 默认使用 SipHash 1-3 哈希算法,该算法对于抵抗 HashDos 攻击非常有效。在性能方面,如果你的 key 是中型大小的,那该算法非常不错,但是如果是小型的 key( 例如整数 )亦或是大型的 key ( 例如字符串 ),那你需要采用社区提供的其它算法来提高性能。
哈希表的算法是基于 Google 的 SwissTable,你可以在这里找到 C++ 的实现,同时在 CppCon talk 上也有关于算法如何工作的演讲。
基本操作
- 🌟🌟
// 填空并修复错误 use std::collections::HashMap; fn main() { let mut scores = HashMap::new(); scores.insert("Sunface", 98); scores.insert("Daniel", 95); scores.insert("Ashley", 69.0); scores.insert("Katie", "58"); // get 返回一个 Option<&V> 枚举值 let score = scores.get("Sunface"); assert_eq!(score, Some(98)); if scores.contains_key("Daniel") { // 索引返回一个值 V let score = scores["Daniel"]; assert_eq!(score, __); scores.remove("Daniel"); } assert_eq!(scores.len(), __); for (name, score) in scores { println!("The score of {} is {}", name, score) } }
- 🌟🌟
use std::collections::HashMap; fn main() { let teams = [ ("Chinese Team", 100), ("American Team", 10), ("France Team", 50), ]; let mut teams_map1 = HashMap::new(); for team in &teams { teams_map1.insert(team.0, team.1); } // 使用两种方法实现 team_map2 // 提示:其中一种方法是使用 `collect` 方法 let teams_map2... assert_eq!(teams_map1, teams_map2); println!("Success!") }
- 🌟🌟
// 填空 use std::collections::HashMap; fn main() { // 编译器可以根据后续的使用情况帮我自动推断出 HashMap 的类型,当然你也可以显式地标注类型:HashMap<&str, u8> let mut player_stats = HashMap::new(); // 查询指定的 key, 若不存在时,则插入新的 kv 值 player_stats.entry("health").or_insert(100); assert_eq!(player_stats["health"], __); // 通过函数来返回新的值 player_stats.entry("health").or_insert_with(random_stat_buff); assert_eq!(player_stats["health"], __); let health = player_stats.entry("health").or_insert(50); assert_eq!(health, __); *health -= 50; assert_eq!(*health, __); println!("Success!") } fn random_stat_buff() -> u8 { // 为了简单,我们没有使用随机,而是返回一个固定的值 42 }
HashMap key 的限制
任何实现了 Eq 和 Hash 特征的类型都可以用于 HashMap 的 key,包括:
bool(虽然很少用到,因为它只能表达两种 key)int,uint以及它们的变体,例如u8、i32等String和&str(提示:HashMap的 key 是String类型时,你其实可以使用&str配合get方法进行查询
需要注意的是,f32 和 f64 并没有实现 Hash,原因是 浮点数精度 的问题会导致它们无法进行相等比较。
如果一个集合类型的所有字段都实现了 Eq 和 Hash,那该集合类型会自动实现 Eq 和 Hash。例如 Vect<T> 要实现 Hash,那么首先需要 T 实现 Hash。
- 🌟🌟
// 修复错误 // 提示: `derive` 是实现一些常用特征的好办法 use std::collections::HashMap; struct Viking { name: String, country: String, } impl Viking { fn new(name: &str, country: &str) -> Viking { Viking { name: name.to_string(), country: country.to_string(), } } } fn main() { // 使用 HashMap 来存储 viking 的生命值 let vikings = HashMap::from([ (Viking::new("Einar", "Norway"), 25), (Viking::new("Olaf", "Denmark"), 24), (Viking::new("Harald", "Iceland"), 12), ]); // 使用 derive 的方式来打印 viking 的当前状态 for (viking, health) in &vikings { println!("{:?} has {} hp", viking, health); } }
容量
关于容量,我们在之前的 Vector 中有详细的介绍,而 HashMap 也可以调整容量: 你可以通过 HashMap::with_capacity(uint) 使用指定的容量来初始化,或者使用 HashMap::new() ,后者会提供一个默认的初始化容量。
示例
use std::collections::HashMap; fn main() { let mut map: HashMap<i32, i32> = HashMap::with_capacity(100); map.insert(1, 2); map.insert(3, 4); // 事实上,虽然我们使用了 100 容量来初始化,但是 map 的容量很可能会比 100 更多 assert!(map.capacity() >= 100); // 对容量进行收缩,你提供的值仅仅是一个允许的最小值,实际上,Rust 会根据当前存储的数据量进行自动设置,当然,这个值会尽量靠近你提供的值,同时还可能会预留一些调整空间 map.shrink_to(50); assert!(map.capacity() >= 50); // 让 Rust 自行调整到一个合适的值,剩余策略同上 map.shrink_to_fit(); assert!(map.capacity() >= 2); println!("Success!") }
所有权
对于实现了 Copy 特征的类型,例如 i32,那类型的值会被拷贝到 HashMap 中。而对于有所有权的类型,例如 String,它们的值的所有权将被转移到 HashMap 中。
- 🌟🌟
// 修复错误,尽可能少的去修改代码 // 不要移除任何代码行! use std::collections::HashMap; fn main() { let v1 = 10; let mut m1 = HashMap::new(); m1.insert(v1, v1); println!("v1 is still usable after inserting to hashmap : {}", v1); let v2 = "hello".to_string(); let mut m2 = HashMap::new(); // 所有权在这里发生了转移 m2.insert(v2, v1); assert_eq!(v2, "hello"); println!("Success!") }
三方库 Hash 库
在开头,我们提到过如果现有的 SipHash 1-3 的性能无法满足你的需求,那么可以使用社区提供的替代算法。
例如其中一个社区库的使用方式如下:
#![allow(unused)] fn main() { use std::hash::BuildHasherDefault; use std::collections::HashMap; // 引入第三方的哈希函数 use twox_hash::XxHash64; let mut hash: HashMap<_, _, BuildHasherDefault<XxHash64>> = Default::default(); hash.insert(42, "the answer"); assert_eq!(hash.get(&42), Some(&"the answer")); }
你可以在这里找到答案(在 solutions 路径下)
Type conversions
There are several ways we can use to perform type conversions, such as as, From/Intro, TryFrom/TryInto, transmute etc.
使用 as 进行类型转换
Rust 并没有为基本类型提供隐式的类型转换( coercion ),但是我们可以通过 as 来进行显式地转换。
- 🌟
// 修复错误,填空 // 不要移除任何代码 fn main() { let decimal = 97.123_f32; let integer: __ = decimal as u8; let c1: char = decimal as char; let c2 = integer as char; assert_eq!(integer, 'b' as u8); println!("Success!") }
- 🌟🌟 默认情况下, 数值溢出会导致编译错误,但是我们可以通过添加一行全局注解的方式来避免编译错误(溢出还是会发生)
fn main() { assert_eq!(u8::MAX, 255); // 如上所示,u8 类型允许的最大值是 255. // 因此以下代码会报溢出的错误: literal out of range for `u8`. // **请仔细查看相应的编译错误,从中寻找到解决的办法** // **不要修改 main 中的任何代码** let v = 1000 as u8; println!("Success!") }
- 🌟🌟 当将任何数值转换成无符号整型
T时,如果当前的数值不在新类型的范围内,我们可以对当前数值进行加值或减值操作( 增加或减少T::MAX + 1),直到最新的值在新类型的范围内,假设我们要将300转成u8类型,由于u8最大值是 255,因此300不在新类型的范围内并且大于新类型的最大值,因此我们需要减去T::MAX + 1,也就是300-256=44。
fn main() { assert_eq!(1000 as u16, __); assert_eq!(1000 as u8, __); // 事实上,之前说的规则对于正整数而言,就是如下的取模 println!("1000 mod 256 is : {}", 1000 % 256); assert_eq!(-1_i8 as u8, __); // 从 Rust 1.45 开始,当浮点数超出目标整数的范围时,转化会直接取正整数取值范围的最大或最小值 assert_eq!(300.1_f32 as u8, __); assert_eq!(-100.1_f32 as u8, __); // 上面的浮点数转换有一点性能损耗,如果大家对于某段代码有极致的性能要求, // 可以考虑下面的方法,但是这些方法的结果可能会溢出并且返回一些无意义的值 // 总之,请小心使用 unsafe { // 300.0 is 44 println!("300.0 is {}", 300.0_f32.to_int_unchecked::<u8>()); // -100.0 as u8 is 156 println!("-100.0 as u8 is {}", (-100.0_f32).to_int_unchecked::<u8>()); // nan as u8 is 0 println!("nan as u8 is {}", f32::NAN.to_int_unchecked::<u8>()); } }
- 🌟🌟🌟 裸指针可以和代表内存地址的整数互相转换
// 填空 fn main() { let mut values: [i32; 2] = [1, 2]; let p1: *mut i32 = values.as_mut_ptr(); let first_address: usize = p1 __; let second_address = first_address + 4; // 4 == std::mem::size_of::<i32>() let p2: *mut i32 = second_address __; // p2 指向 values 数组中的第二个元素 unsafe { // 将第二个元素加 1 __ } assert_eq!(values[1], 3); println!("Success!") }
- 🌟🌟🌟
fn main() { let arr :[u64; 13] = [0; 13]; assert_eq!(std::mem::size_of_val(&arr), 8 * 13); let a: *const [u64] = &arr; let b = a as *const [u8]; unsafe { assert_eq!(std::mem::size_of_val(&*b), __) } }
你可以在这里找到答案(在 solutions 路径下)
From/Into
From 特征允许让一个类型定义如何基于另一个类型来创建自己,因此它提供了一个很方便的类型转换的方式。
From 和 Into 是配对的,我们只要实现了前者,那后者就会自动被实现:只要实现了 impl From<T> for U, 就可以使用以下两个方法: let u: U = U::from(T) 和 let u:U = T.into(),前者由 From 特征提供,而后者由自动实现的 Into 特征提供。
需要注意的是,当使用 into 方法时,你需要进行显式地类型标注,因为编译器很可能无法帮我们推导出所需的类型。
来看一个例子,我们可以简单的将 &str 转换成 String
fn main() { let my_str = "hello"; // 以下三个转换都依赖于一个事实:String 实现了 From<&str> 特征 let string1 = String::from(my_str); let string2 = my_str.to_string(); // 这里需要显式地类型标注 let string3: String = my_str.into(); }
这种转换可以发生是因为标准库已经帮我们实现了 From 特征: impl From<&'_ str> for String。你还可以在这里)找到其它实现 From 特征的常用类型。
- 🌟🌟🌟
fn main() { // impl From<bool> for i32 let i1: i32 = false.into(); let i2: i32 = i32::from(false); assert_eq!(i1, i2); assert_eq!(i1, 0); // 使用两种方式修复错误 // 1. 哪个类型实现 From 特征 : impl From<char> for ? , 你可以查看一下之前提到的文档,来找到合适的类型 // 2. 上一章节中介绍过的某个关键字 let i3: i32 = 'a'.into(); // 使用两种方法来解决错误 let s: String = 'a' as String; println!("Success!") }
为自定义类型实现 From 特征
- 🌟🌟
// From 被包含在 `std::prelude` 中,因此我们没必要手动将其引入到当前作用域来 // use std::convert::From; #[derive(Debug)] struct Number { value: i32, } impl From<i32> for Number { // 实现 `from` 方法 } // 填空 fn main() { let num = __(30); assert_eq!(num.value, 30); let num: Number = __; assert_eq!(num.value, 30); println!("Success!") }
- 🌟🌟🌟 当执行错误处理时,为我们自定义的错误类型实现
From特征是非常有用。这样就可以通过?自动将某个错误类型转换成我们自定义的错误类型
use std::fs; use std::io; use std::num; enum CliError { IoError(io::Error), ParseError(num::ParseIntError), } impl From<io::Error> for CliError { // 实现 from 方法 } impl From<num::ParseIntError> for CliError { // 实现 from 方法 } fn open_and_parse_file(file_name: &str) -> Result<i32, CliError> { // ? 自动将 io::Error 转换成 CliError let contents = fs::read_to_string(&file_name)?; // num::ParseIntError -> CliError let num: i32 = contents.trim().parse()?; Ok(num) } fn main() { println!("Success!") }
TryFrom/TryInto
类似于 From 和 Into, TryFrom 和 TryInto 也是用于类型转换的泛型特征。
但是又与 From/Into 不同, TryFrom 和 TryInto 可以对转换后的失败进行处理,然后返回一个 Result。
- 🌟🌟
// TryFrom 和 TryInto 也被包含在 `std::prelude` 中, 因此以下引入是没必要的 // use std::convert::TryInto; fn main() { let n: i16 = 256; // Into 特征拥有一个方法`into`, // 因此 TryInto 有一个方法是 ? let n: u8 = match n.__() { Ok(n) => n, Err(e) => { println!("there is an error when converting: {:?}, but we catch it", e.to_string()); 0 } }; assert_eq!(n, __); println!("Success!") }
- 🌟🌟🌟
#[derive(Debug, PartialEq)] struct EvenNum(i32); impl TryFrom<i32> for EvenNum { type Error = (); // 实现 `try_from` fn try_from(value: i32) -> Result<Self, Self::Error> { if value % 2 == 0 { Ok(EvenNum(value)) } else { Err(()) } } } fn main() { assert_eq!(EvenNum::try_from(8), Ok(EvenNum(8))); assert_eq!(EvenNum::try_from(5), Err(())); // 填空 let result: Result<EvenNum, ()> = 8i32.try_into(); assert_eq!(result, __); let result: Result<EvenNum, ()> = 5i32.try_into(); assert_eq!(result, __); println!("Success!") }
你可以在这里找到答案(在 solutions 路径下)
其它转换
将任何类型转换成 String
只要为一个类型实现了 ToString,就可以将任何类型转换成 String。事实上,这种方式并不是最好的,大家还记得 fmt::Display 特征吗?它可以控制一个类型如何打印,在实现它的时候还会自动实现 ToString。
- 🌟🌟
use std::fmt; struct Point { x: i32, y: i32, } impl fmt::Display for Point { // 实现 fmt 方法 } fn main() { let origin = Point { x: 0, y: 0 }; // 填空 assert_eq!(origin.__, "The point is (0, 0)"); assert_eq!(format!(__), "The point is (0, 0)"); println!("Success!") }
解析 String
- 🌟🌟🌟 使用
parse方法可以将一个String转换成i32数字,这是因为在标准库中为i32类型实现了FromStr: :impl FromStr for i32
// 为了使用 `from_str` 方法, 你需要引入该特征到当前作用域中 use std::str::FromStr; fn main() { let parsed: i32 = "5".__.unwrap(); let turbo_parsed = "10".__.unwrap(); let from_str = __.unwrap(); let sum = parsed + turbo_parsed + from_str; assert_eq!(sum, 35); println!("Success!") }
- 🌟🌟 还可以为自定义类型实现
FromStr特征
use std::str::FromStr; use std::num::ParseIntError; #[derive(Debug, PartialEq)] struct Point { x: i32, y: i32 } impl FromStr for Point { type Err = ParseIntError; fn from_str(s: &str) -> Result<Self, Self::Err> { let coords: Vec<&str> = s.trim_matches(|p| p == '(' || p == ')' ) .split(',') .collect(); let x_fromstr = coords[0].parse::<i32>()?; let y_fromstr = coords[1].parse::<i32>()?; Ok(Point { x: x_fromstr, y: y_fromstr }) } } fn main() { // 使用两种方式填空 // 不要修改其它地方的代码 let p = __; assert_eq!(p.unwrap(), Point{ x: 3, y: 4} ); println!("Success!") }
Deref 特征
Deref 特征在智能指针 - Deref章节中有更加详细的介绍。
transmute
std::mem::transmute 是一个 unsafe 函数,可以把一个类型按位解释为另一个类型,其中这两个类型必须有同样的位数( bits )。
transmute 相当于将一个类型按位移动到另一个类型,它会将源值的所有位拷贝到目标值中,然后遗忘源值。该函数跟 C 语言中的 memcpy 函数类似。
正因为此,transmute 非常非常不安全! 调用者必须要自己保证代码的安全性,当然这也是 unsafe 的目的。
示例
transmute可以将一个指针转换成一个函数指针,该转换并不具备可移植性,原因是在不同机器上,函数指针和数据指针可能有不同的位数( size )。
fn foo() -> i32 { 0 } fn main() { let pointer = foo as *const (); let function = unsafe { std::mem::transmute::<*const (), fn() -> i32>(pointer) }; assert_eq!(function(), 0); }
transmute还可以扩展或缩短一个不变量的生命周期,将 Unsafe Rust 的不安全性体现的淋漓尽致!
struct R<'a>(&'a i32); unsafe fn extend_lifetime<'b>(r: R<'b>) -> R<'static> { std::mem::transmute::<R<'b>, R<'static>>(r) } unsafe fn shorten_invariant_lifetime<'b, 'c>(r: &'b mut R<'static>) -> &'b mut R<'c> { std::mem::transmute::<&'b mut R<'static>, &'b mut R<'c>>(r) }
- 事实上我们还可以使用一些安全的方法来替代
transmute.
fn main() { /*Turning raw bytes(&[u8]) to u32, f64, etc.: */ let raw_bytes = [0x78, 0x56, 0x34, 0x12]; let num = unsafe { std::mem::transmute::<[u8; 4], u32>(raw_bytes) }; // use `u32::from_ne_bytes` instead let num = u32::from_ne_bytes(raw_bytes); // or use `u32::from_le_bytes` or `u32::from_be_bytes` to specify the endianness let num = u32::from_le_bytes(raw_bytes); assert_eq!(num, 0x12345678); let num = u32::from_be_bytes(raw_bytes); assert_eq!(num, 0x78563412); /*Turning a pointer into a usize: */ let ptr = &0; let ptr_num_transmute = unsafe { std::mem::transmute::<&i32, usize>(ptr) }; // Use an `as` cast instead let ptr_num_cast = ptr as *const i32 as usize; /*Turning an &mut T into an &mut U: */ let ptr = &mut 0; let val_transmuted = unsafe { std::mem::transmute::<&mut i32, &mut u32>(ptr) }; // Now, put together `as` and reborrowing - note the chaining of `as` // `as` is not transitive let val_casts = unsafe { &mut *(ptr as *mut i32 as *mut u32) }; /*Turning an &str into a &[u8]: */ // this is not a good way to do this. let slice = unsafe { std::mem::transmute::<&str, &[u8]>("Rust") }; assert_eq!(slice, &[82, 117, 115, 116]); // You could use `str::as_bytes` let slice = "Rust".as_bytes(); assert_eq!(slice, &[82, 117, 115, 116]); // Or, just use a byte string, if you have control over the string // literal assert_eq!(b"Rust", &[82, 117, 115, 116]); }
你可以在这里找到答案(在 solutions 路径下)
Result and panic
Learning resources:
- English: Rust Book 9.1, 9.2
- 简体中文: Rust语言圣经 - 返回值和错误处理
panic!
Rust 中最简单的错误处理方式就是使用 panic。它会打印出一条错误信息并打印出栈调用情况,最终结束当前线程:
- 若 panic 发生在
main线程,那程序会随之退出 - 如果是在生成的( spawn )子线程中发生 panic, 那么当前的线程会结束,但是程序依然会继续运行
- 🌟🌟
// 填空 fn drink(beverage: &str) { if beverage == "lemonade" { println!("Success!"); // 实现下面的代码 __ } println!("Exercise Failed if printing out this line!"); } fn main() { drink(__); println!("Exercise Failed if printing out this line!"); }
常见的 panic
- 🌟🌟
// 修复所有的 panic,让代码工作 fn main() { assert_eq!("abc".as_bytes(), [96, 97, 98]); let v = vec![1, 2, 3]; let ele = v[3]; let ele = v.get(3).unwrap(); // 大部分时候编译器是可以帮我们提前发现溢出错误,并阻止编译通过。但是也有一些时候,这种溢出问题直到运行期才会出现 let v = production_rate_per_hour(2); divide(15, 0); println!("Success!") } fn divide(x:u8, y:u8) { println!("{}", x / y) } fn production_rate_per_hour(speed: u8) -> f64 { let cph: u8 = 221; match speed { 1..=4 => (speed * cph) as f64, 5..=8 => (speed * cph) as f64 * 0.9, 9..=10 => (speed * cph) as f64 * 0.77, _ => 0 as f64, } } pub fn working_items_per_minute(speed: u8) -> u32 { (production_rate_per_hour(speed) / 60 as f64) as u32 }
详细的栈调用信息
默认情况下,栈调用只会展示最基本的信息:
thread 'main' panicked at 'index out of bounds: the len is 3 but the index is 99', src/main.rs:4:5
note: run with `RUST_BACKTRACE=1` environment variable to display a backtrace
但是有时候,我们还希望获取更详细的信息:
- 🌟
## 填空以打印全部的调用栈
## 提示: 你可以在之前的默认 panic 信息中找到相关线索
$ __ cargo run
thread 'main' panicked at 'assertion failed: `(left == right)`
left: `[97, 98, 99]`,
right: `[96, 97, 98]`', src/main.rs:3:5
stack backtrace:
0: rust_begin_unwind
at /rustc/9d1b2106e23b1abd32fce1f17267604a5102f57a/library/std/src/panicking.rs:498:5
1: core::panicking::panic_fmt
at /rustc/9d1b2106e23b1abd32fce1f17267604a5102f57a/library/core/src/panicking.rs:116:14
2: core::panicking::assert_failed_inner
3: core::panicking::assert_failed
at /rustc/9d1b2106e23b1abd32fce1f17267604a5102f57a/library/core/src/panicking.rs:154:5
4: study_cargo::main
at ./src/main.rs:3:5
5: core::ops::function::FnOnce::call_once
at /rustc/9d1b2106e23b1abd32fce1f17267604a5102f57a/library/core/src/ops/function.rs:227:5
note: Some details are omitted, run with `RUST_BACKTRACE=full` for a verbose backtrace.
unwinding 和 abort
当出现 panic! 时,程序提供了两种方式来处理终止流程:栈展开和直接终止。
其中,默认的方式就是 栈展开,这意味着 Rust 会回溯栈上数据和函数调用,因此也意味着更多的善后工作,好处是可以给出充分的报错信息和栈调用信息,便于事后的问题复盘。直接终止,顾名思义,不清理数据就直接退出程序,善后工作交与操作系统来负责。
对于绝大多数用户,使用默认选择是最好的,但是当你关心最终编译出的二进制可执行文件大小时,那么可以尝试去使用直接终止的方式,例如下面的配置修改 Cargo.toml 文件,实现在 release 模式下遇到 panic 直接终止:
#![allow(unused)] fn main() { [profile.release] panic = 'abort' }
你可以在这里找到答案(在 solutions 路径下)
result and ?
Result<T> 是一个枚举类型用于描述返回的结果或错误,它包含两个成员(变体 variants) :
Ok(T): 返回一个结果值 TErr(e): 返回一个错误,e是具体的错误值
简而言之,如果期待一个正确的结果,就返回 Ok,反之则是 Err。
- 🌟🌟
// 填空并修复错误 use std::num::ParseIntError; fn multiply(n1_str: &str, n2_str: &str) -> __ { let n1 = n1_str.parse::<i32>(); let n2 = n2_str.parse::<i32>(); Ok(n1.unwrap() * n2.unwrap()) } fn main() { let result = multiply("10", "2"); assert_eq!(result, __); let result = multiply("t", "2"); assert_eq!(result.__, 8); println!("Success!") }
?
? 跟 unwrap 非常像,但是 ? 会返回一个错误,而不是直接 panic.
- 🌟🌟
use std::num::ParseIntError; // 使用 `?` 来实现 multiply // 不要使用 unwrap ! fn multiply(n1_str: &str, n2_str: &str) -> __ { } fn main() { assert_eq!(multiply("3", "4").unwrap(), 12); println!("Success!") }
- 🌟🌟
use std::fs::File; use std::io::{self, Read}; fn read_file1() -> Result<String, io::Error> { let f = File::open("hello.txt"); let mut f = match f { Ok(file) => file, Err(e) => return Err(e), }; let mut s = String::new(); match f.read_to_string(&mut s) { Ok(_) => Ok(s), Err(e) => Err(e), } } // 填空 // 不要修改其它代码 fn read_file2() -> Result<String, io::Error> { let mut s = String::new(); __; Ok(s) } fn main() { assert_eq!(read_file1().unwrap_err().to_string(), read_file2().unwrap_err().to_string()); println!("Success!") }
map & and_then
map and and_then 是两个常用的组合器( combinator ),可以用于 Result<T, E> (也可用于 Option<T>).
- 🌟🌟
use std::num::ParseIntError; // 使用两种方式填空: map, and then fn add_two(n_str: &str) -> Result<i32, ParseIntError> { n_str.parse::<i32>().__ } fn main() { assert_eq!(add_two("4").unwrap(), 6); println!("Success!") }
- 🌟🌟🌟
use std::num::ParseIntError; // 使用 Result 重写后,我们使用模式匹配的方式来处理,而无需使用 `unwrap` // 但是这种写法实在过于啰嗦.. fn multiply(n1_str: &str, n2_str: &str) -> Result<i32, ParseIntError> { match n1_str.parse::<i32>() { Ok(n1) => { match n2_str.parse::<i32>() { Ok(n2) => { Ok(n1 * n2) }, Err(e) => Err(e), } }, Err(e) => Err(e), } } // 重写上面的 `multiply` ,让它尽量简介 // 提示:使用 `and_then` 和 `map` fn multiply1(n1_str: &str, n2_str: &str) -> Result<i32, ParseIntError> { // 实现... } fn print(result: Result<i32, ParseIntError>) { match result { Ok(n) => println!("n is {}", n), Err(e) => println!("Error: {}", e), } } fn main() { let twenty = multiply1("10", "2"); print(twenty); // 下面的调用会提供更有帮助的错误信息 let tt = multiply("t", "2"); print(tt); println!("Success!") }
类型别名
如果我们要在代码中到处使用 std::result::Result<T, ParseIntError> ,那毫无疑问,代码将变得特别冗长和啰嗦,对于这种情况,可以使用类型别名来解决。
例如在标准库中,就在大量使用这种方式来简化代码: io::Result.
- 🌟
use std::num::ParseIntError; // 填空 type __; // 使用上面的别名来引用原来的 `Result` 类型 fn multiply(first_number_str: &str, second_number_str: &str) -> Res<i32> { first_number_str.parse::<i32>().and_then(|first_number| { second_number_str.parse::<i32>().map(|second_number| first_number * second_number) }) } // 同样, 这里也使用了类型别名来简化代码 fn print(result: Res<i32>) { match result { Ok(n) => println!("n is {}", n), Err(e) => println!("Error: {}", e), } } fn main() { print(multiply("10", "2")); print(multiply("t", "2")); println!("Success!") }
在 fn main 中使用 Result
一个典型的 main 函数长这样:
fn main() { println!("Hello World!"); }
事实上 main 函数还可以返回一个 Result 类型:如果 main 函数内部发生了错误,那该错误会被返回并且打印出一条错误的 debug 信息。
use std::num::ParseIntError; fn main() -> Result<(), ParseIntError> { let number_str = "10"; let number = match number_str.parse::<i32>() { Ok(number) => number, Err(e) => return Err(e), }; println!("{}", number); Ok(()) }
你可以在这里找到答案(在 solutions 路径下)
包和模块
学习资料:
- 简体中文: Rust语言圣经 - 包和模块
Package and Crate
package 是你通过 Cargo 创建的工程或项目,因此在 package 的根目录下会有一个 Cargo.toml 文件。
- 🌟 创建一个
package,拥有以下目录结构:
.
├── Cargo.toml
└── src
└── main.rs
1 directory, 2 files
# in Cargo.toml
[package]
name = "hello-package"
version = "0.1.0"
edition = "2021"
注意! 我们会在包与模块中使用上面的项目作为演示,因此不要删除
- 🌟 创建一个 package,拥有以下目录结构:
.
├── Cargo.toml
└── src
└── lib.rs
1 directory, 2 files
# in Cargo.toml
[package]
name = "hello-package1"
version = "0.1.0"
edition = "2021"
该项目可以安全的移除
- 🌟
/* 使用你的答案填空 */ // Q: package 1# 和 2# 的区别是什么 ? // A: __
包Crate
一个包可以是二进制也可以一个依赖库。每一个包都有一个包根,例如二进制包的包根是 src/main.rs,库包的包根是 src/lib.rs。包根是编译器开始处理源代码文件的地方,同时也是包模块树的根部。
在 package hello-package 中,有一个二进制包,该包与 package 同名 : hello-package, 其中 src/main.rs 是该二进制包的包根.
与 hello-package 类似, hello-package1 同样包含一个包,但是与之前的二进制包不同,该 package 包含的是库包,其中 src/lib.rs 是其包根.
- 🌟
/* 填空 */ // Q: package `hello-package1` 中的库包名称是? // A: __
- 🌟🌟 为
hello-package添加一个库包,并且完成以下目录结构的填空:
# 填空
.
├── Cargo.lock
├── Cargo.toml
├── src
│ ├── __
│ └── __
在上一个步骤后,我们的 hello-package 中已经存在两个包:一个二进制包和一个库包,两个包的名称都与 package 相同:hello-package。
- 🌟🌟🌟 一个 package 最多只能包含一个库包,但是却可以包含多个二进制包:通过将二进制文件放入到
src/bin目录下实现: 该目录下的每个文件都是一个独立的二进制包,包名与文件名相同,不再与 package 的名称相同。.
# 创建一个 a package 包含以下包:
# 1. 三个二进制包: `hello-package`, `main1` and `main2`
# 2. 一个库包
# 并完成以下目录结构的填空
.
├── Cargo.toml
├── Cargo.lock
├── src
│ ├── __
│ ├── __
│ └── __
│ └── __
│ └── __
├── tests # 存放集成测试文件的目录
│ └── some_integration_tests.rs
├── benches # 存放 benchmark 文件的目录dir for benchmark files
│ └── simple_bench.rs
└── examples # 存放示例文件的目录
└── simple_example.rs
可以看到,上面的 package 结构非常标准,你可以在很多 Rust 项目中看到该结构的身影。
你可以在这里找到答案(在 solutions 路径下)
Module
在 Rust 语言圣经中,我们已经深入讲解过模块module,这里就不再赘述,直接开始我们的练习。
之前我们创建了一个 package hello-package,它的目录结构在经过多次修改后,变成了以下模样:
.
├── Cargo.toml
├── src
│ ├── lib.rs
│ └── main.rs
下面,我们来为其中的库包创建一些模块,然后在二进制包中使用这些模块。
- 🌟🌟 根据以下的模块树描述实现模块
front_of_house:
库包的根(src/lib.rs)
└── front_of_house
├── hosting
│ ├── add_to_waitlist
│ └── seat_at_table
└── serving
├── take_order
├── serve_order
├── take_payment
└── complain
// 填空 // in __.rs mod front_of_house { // 实现此模块 }
- 🌟🌟 让我们在库包的根中定义一个函数
eat_at_restaurant, 然后在该函数中调用之前创建的函数eat_at_restaurant
#![allow(unused)] fn main() { // in lib.rs // 填空并修复错误 // 提示:你需要通过 `pub` 将一些项标记为公有的,这样模块 `front_of_house` 中的项才能被模块外的项访问 mod front_of_house { /* ...snip... */ } pub fn eat_at_restaurant() { // 使用绝对路径调用 __.add_to_waitlist(); // 使用相对路径调用 __.add_to_waitlist(); } }
- 🌟🌟 我们还可以使用
super来导入父模块中的项
// in lib.rs mod back_of_house { fn fix_incorrect_order() { cook_order(); // 使用三种方式填空 //1. 使用关键字 `super` //2. 使用绝对路径 __.serve_order(); } fn cook_order() {} }
将模块分离并放入独立的文件中
#![allow(unused)] fn main() { // in lib.rs pub mod front_of_house { pub mod hosting { pub fn add_to_waitlist() {} pub fn seat_at_table() -> String { String::from("sit down please") } } pub mod serving { pub fn take_order() {} pub fn serve_order() {} pub fn take_payment() {} // 我猜你不希望顾客听到你在抱怨他们,因此让这个函数私有化吧 fn complain() {} } } pub fn eat_at_restaurant() -> String { front_of_house::hosting::add_to_waitlist(); back_of_house::cook_order(); String::from("yummy yummy!") } pub mod back_of_house { pub fn fix_incorrect_order() { cook_order(); crate::front_of_house::serving::serve_order(); } pub fn cook_order() {} } }
- 🌟🌟🌟🌟 请将上面的模块和代码分离到以下目录文件中e :
.
├── Cargo.toml
├── src
│ ├── back_of_house.rs
│ ├── front_of_house
│ │ ├── hosting.rs
│ │ ├── mod.rs
│ │ └── serving.rs
│ ├── lib.rs
│ └── main.rs
// in src/lib.rs // IMPLEMENT...
// in src/back_of_house.rs // IMPLEMENT...
// in src/front_of_house/mod.rs // IMPLEMENT...
// in src/front_of_house/hosting.rs // IMPLEMENT...
// in src/front_of_house/serving.rs // IMPLEMENT...
从二进制包中访问库包的代码
请确保你已经完成了第四题,然后再继续进行.
当到底此处时,你的项目结构应该如下所示:
.
├── Cargo.toml
├── src
│ ├── back_of_house.rs
│ ├── front_of_house
│ │ ├── hosting.rs
│ │ ├── mod.rs
│ │ └── serving.rs
│ ├── lib.rs
│ └── main.rs
- 🌟🌟🌟现在我们可以从二进制包中发起函数调用了.
// in src/main.rs // 填空并修复错误 fn main() { assert_eq!(__, "sit down please"); assert_eq!(__,"yummy yummy!"); }
你可以在这里找到答案(在 solutions 路径下)
use and pub
- 🌟 使用
use可以将两个同名类型引入到当前作用域中,但是别忘了as关键字.
use std::fmt::Result; use std::io::Result; fn main() {}
- 🌟🌟 如果我们在使用来自同一个包或模块中的多个不同项,那么可以通过简单的方式将它们一次性引入进来
// 使用两种方式填空 // 不要添加新的代码行 use std::collections::__; fn main() { let _c1:HashMap<&str, i32> = HashMap::new(); let mut c2 = BTreeMap::new(); c2.insert(1, "a"); let _c3: HashSet<i32> = HashSet::new(); }
使用 pub use 进行再导出
- 🌟🌟🌟 在之前创建的
hello-package的库包中, 添加一些代码让下面的代码能够正常工作
fn main() { assert_eq!(hello_package::hosting::seat_at_table(), "sit down please"); assert_eq!(hello_package::eat_at_restaurant(),"yummy yummy!"); }
pub(in Crate)
有时我们希望某一个项只对特定的包可见,那么就可以使用 pub(in Crate) 语法.
示例
pub mod a { pub const I: i32 = 3; fn semisecret(x: i32) -> i32 { use self::b::c::J; x + J } pub fn bar(z: i32) -> i32 { semisecret(I) * z } pub fn foo(y: i32) -> i32 { semisecret(I) + y } mod b { pub(in crate::a) mod c { pub(in crate::a) const J: i32 = 4; } } }
完整代码
至此,包与模块章节已经结束,关于 hello-package 的完整代码可以在这里 找到.
你可以在这里找到答案(在 solutions 路径下)
注释和文档
格式化输出
生命周期
学习资料:
- 简体中文: Rust语言圣经 - 生命周期
生命周期基础
编译器通过生命周期来确保所有的借用都是合法的,典型的,一个变量在创建时生命周期随之开始,销毁时生命周期也随之结束。
生命周期的范围
- 🌟
/* 为 `i` 和 `borrow2` 标注合适的生命周期范围 */ // `i` 拥有最长的生命周期,因为它的作用域完整的包含了 `borrow1` 和 `borrow2` 。 // 而 `borrow1` 和 `borrow2` 的生命周期并无关联,因为它们的作用域没有重叠 fn main() { let i = 3; { let borrow1 = &i; // `borrow1` 生命周期开始. ──┐ // │ println!("borrow1: {}", borrow1); // │ } // `borrow1` 生命周期结束. ──────────────────────────────────┘ { let borrow2 = &i; println!("borrow2: {}", borrow2); } }
- 🌟🌟
示例
#![allow(unused)] fn main() { { let x = 5; // ----------+-- 'b // | let r = &x; // --+-- 'a | // | | println!("r: {}", r); // | | // --+ | } // ----------+ }
/* 像上面的示例一样,为 `r` 和 `x` 标准生命周期,然后从生命周期的角度. */ fn main() { { let r; // ---------+-- 'a // | { // | let x = 5; // -+-- 'b | r = &x; // | | } // -+ | // | println!("r: {}", r); // | } // ---------+ }
生命周期标注
Rust 的借用检查器使用显式的生命周期标注来确定一个引用的合法范围。但是对于用户来说,我们在大多数场景下,都无需手动去标注生命周期,原因是编译器会在某些情况下自动应用生命周期消除规则。
在了解编译器使用哪些规则帮我们消除生命周期之前,首先还是需要知道该如何手动标记生命周期。
函数
大家先忽略生命周期消除规则,让我们看看,函数签名中的生命周期有哪些限制:
- 需要为每个引用标注上合适的生命周期
- 返回值中的引用,它的生命周期要么跟某个引用参数相同,要么是
'static
示例
// 引用参数中的生命周期 'a 至少要跟函数活得一样久 fn print_one<'a>(x: &'a i32) { println!("`print_one`: x is {}", x); } // 可变引用依然需要标准生命周期 fn add_one<'a>(x: &'a mut i32) { *x += 1; } // 下面代码中,每个参数都拥有自己独立的生命周期,事实上,这个例子足够简单,因此它们应该被标记上相同的生命周期 `'a`,但是对于复杂的例子而言,独立的生命周期标注是可能存在的 fn print_multi<'a, 'b>(x: &'a i32, y: &'b i32) { println!("`print_multi`: x is {}, y is {}", x, y); } // 返回一个通过参数传入的引用是很常见的,但是这种情况下需要标注上正确的生命周期 fn pass_x<'a, 'b>(x: &'a i32, _: &'b i32) -> &'a i32 { x } fn main() { let x = 7; let y = 9; print_one(&x); print_multi(&x, &y); let z = pass_x(&x, &y); print_one(z); let mut t = 3; add_one(&mut t); print_one(&t); }
- 🌟
/* 添加合适的生命周期标注,让下面的代码工作 */ fn longest(x: &str, y: &str) -> &str { if x.len() > y.len() { x } else { y } } fn main() {}
- 🌟🌟🌟
/* 使用三种方法修复下面的错误 */ fn invalid_output<'a>() -> &'a String { &String::from("foo") } fn main() { }
- 🌟🌟
// `print_refs` 有两个引用参数,它们的生命周期 `'a` 和 `'b` 至少得跟函数活得一样久 fn print_refs<'a, 'b>(x: &'a i32, y: &'b i32) { println!("x is {} and y is {}", x, y); } /* 让下面的代码工作 */ fn failed_borrow<'a>() { let _x = 12; // ERROR: `_x` 活得不够久does not live long enough let y: &'a i32 = &_x; // 在函数内使用 `'a` 将会报错,原因是 `&_x` 的生命周期显然比 `'a` 要小 // 你不能将一个小的生命周期强转成大的 } fn main() { let (four, nine) = (4, 9); print_refs(&four, &nine); // 这里,four 和 nice 的生命周期必须要比函数 print_refs 长 failed_borrow(); // `failed_borrow` 没有传入任何引用去限制生命周期 `'a`,因此,此时的 `'a` 生命周期是没有任何限制的,它默认是 `'static` }
Structs
- 🌟
/* 增加合适的生命周期标准,让代码工作 */ // `i32` 的引用必须比 `Borrowed` 活得更久 #[derive(Debug)] struct Borrowed(&i32); // 类似的,下面两个引用也必须比结构体 `NamedBorrowed` 活得更久 #[derive(Debug)] struct NamedBorrowed { x: &i32, y: &i32, } #[derive(Debug)] enum Either { Num(i32), Ref(&i32), } fn main() { let x = 18; let y = 15; let single = Borrowed(&x); let double = NamedBorrowed { x: &x, y: &y }; let reference = Either::Ref(&x); let number = Either::Num(y); println!("x is borrowed in {:?}", single); println!("x and y are borrowed in {:?}", double); println!("x is borrowed in {:?}", reference); println!("y is *not* borrowed in {:?}", number); }
- 🌟🌟
/* 让代码工作 */ #[derive(Debug)] struct NoCopyType {} #[derive(Debug)] struct Example<'a, 'b> { a: &'a u32, b: &'b NoCopyType } fn main() { let var_a = 35; let example: Example; { let var_b = NoCopyType {}; /* 修复错误 */ example = Example { a: &var_a, b: &var_b }; } println!("(Success!) {:?}", example); }
- 🌟🌟
#[derive(Debug)] struct NoCopyType {} #[derive(Debug)] #[allow(dead_code)] struct Example<'a, 'b> { a: &'a u32, b: &'b NoCopyType } /* 修复函数的签名 */ fn fix_me(foo: &Example) -> &NoCopyType { foo.b } fn main() { let no_copy = NoCopyType {}; let example = Example { a: &1, b: &no_copy }; fix_me(&example); println!("Success!") }
方法
方法的生命周期标注跟函数类似。
示例
struct Owner(i32); impl Owner { fn add_one<'a>(&'a mut self) { self.0 += 1; } fn print<'a>(&'a self) { println!("`print`: {}", self.0); } } fn main() { let mut owner = Owner(18); owner.add_one(); owner.print(); }
- 🌟🌟
/* 添加合适的生命周期让下面代码工作 */ struct ImportantExcerpt { part: &str, } impl ImportantExcerpt { fn level(&'a self) -> i32 { 3 } } fn main() {}
生命周期消除( Elision )
有一些生命周期的标注方式很常见,因此编译器提供了一些规则,可以让我们在一些场景下无需去标注生命周期,既节省了敲击键盘的繁琐,又能提升可读性。
这种规则被称为生命周期消除规则( Elision ),该规则之所以存在,仅仅是因为这些场景太通用了,为了方便用户而已。事实上对于借用检查器而言,该有的生命周期一个都不能少,只不过对于用户而言,可以省去一些。
- 🌟🌟
/* 移除所有可以消除的生命周期标注 */ fn nput<'a>(x: &'a i32) { println!("`annotated_input`: {}", x); } fn pass<'a>(x: &'a i32) -> &'a i32 { x } fn longest<'a, 'b>(x: &'a str, y: &'b str) -> &'a str { x } struct Owner(i32); impl Owner { fn add_one<'a>(&'a mut self) { self.0 += 1; } fn print<'a>(&'a self) { println!("`print`: {}", self.0); } } struct Person<'a> { age: u8, name: &'a str, } enum Either<'a> { Num(i32), Ref(&'a i32), } fn main() {}
你可以在这里找到答案(在 solutions 路径下)
&'static and T: 'static
'static 是一个 Rust 保留的生命周期名称,在之前我们可能已经见过好几次了:
#![allow(unused)] fn main() { // 引用的生命周期是 'static : let s: &'static str = "hello world"; // 'static 也可以用于特征约束中: fn generic<T>(x: T) where T: 'static {} }
虽然它们都是 'static,但是也稍有不同。
&'static
作为一个引用生命周期,&'static 说明该引用指向的数据可以跟程序活得一样久,但是该引用的生命周期依然有可能被强转为一个更短的生命周期。
- 🌟🌟 有好几种方法可以将一个变量标记为
'static生命周期, 其中两种都是和保存在二进制文件中相关( 例如字符串字面量就是保存在二进制文件中,它的生命周期是'static)。
/* 使用两种方法填空 */ fn main() { __; need_static(v); println!("Success!") } fn need_static(r : &'static str) { assert_eq!(r, "hello"); }
- 🌟🌟🌟🌟 使用
Box::leak也可以产生'static生命周期
#[derive(Debug)] struct Config { a: String, b: String, } static mut config: Option<&mut Config> = None; /* 让代码工作,但不要修改函数的签名 */ fn init() -> Option<&'static mut Config> { Some(&mut Config { a: "A".to_string(), b: "B".to_string(), }) } fn main() { unsafe { config = init(); println!("{:?}",config) } }
- 🌟
&'static只能说明引用指向的数据是能一直存活的,但是引用本身依然受限于它的作用域
fn main() { { // 字符串字面量能跟程序活得一样久,因此 `static_string` 的生命周期是 `'static` let static_string = "I'm in read-only memory"; println!("static_string: {}", static_string); // 当 `static_string` 超出作用域时,该引用就无法再被使用,但是引用指向的数据( 字符串字面量 ) 依然保存在二进制 binary 所占用的内存中 } println!("static_string reference remains alive: {}", static_string); }
&'static可以被强转成一个较短的生命周期
Example
// 声明一个 static 常量,它拥有 `'static` 生命周期. static NUM: i32 = 18; // 返回常量 `Num` 的引用,注意,这里的生命周期从 `'static` 强转为 `'a` fn coerce_static<'a>(_: &'a i32) -> &'a i32 { &NUM } fn main() { { let lifetime_num = 9; let coerced_static = coerce_static(&lifetime_num); println!("coerced_static: {}", coerced_static); } println!("NUM: {} stays accessible!", NUM); }
T: 'static
关于 'static 的特征约束详细解释,请参见 Rust 语言圣经,这里就不再赘述。
- 🌟🌟
/* 让代码工作 */ use std::fmt::Debug; fn print_it<T: Debug + 'static>( input: T) { println!( "'static value passed in is: {:?}", input ); } fn print_it1( input: impl Debug + 'static ) { println!( "'static value passed in is: {:?}", input ); } fn print_it2<T: Debug + 'static>( input: &T) { println!( "'static value passed in is: {:?}", input ); } fn main() { // i 是有所有权的数据,并没有包含任何引用,因此它是 'static let i = 5; print_it(i); // 但是 &i 是一个引用,生命周期受限于作用域,因此它不是 'static print_it(&i); print_it1(&i); // 但是下面的代码可以正常运行 ! print_it2(&i); }
- 🌟🌟🌟
use std::fmt::Display; fn main() { let mut string = "First".to_owned(); string.push_str(string.to_uppercase().as_str()); print_a(&string); print_b(&string); print_c(&string); // Compilation error print_d(&string); // Compilation error print_e(&string); print_f(&string); print_g(&string); // Compilation error } fn print_a<T: Display + 'static>(t: &T) { println!("{}", t); } fn print_b<T>(t: &T) where T: Display + 'static, { println!("{}", t); } fn print_c(t: &'static dyn Display) { println!("{}", t) } fn print_d(t: &'static impl Display) { println!("{}", t) } fn print_e(t: &(dyn Display + 'static)) { println!("{}", t) } fn print_f(t: &(impl Display + 'static)) { println!("{}", t) } fn print_g(t: &'static String) { println!("{}", t); }
你可以在这里找到答案(在 solutions 路径下)
深入生命周期
特征约束
就像泛型类型可以有约束一样,生命周期也可以有约束 ,如下所示:
T: 'a,所有引用在T必须超过生命周期'aT: Trait + 'a:T必须实现特征Trait并且所有引用在T必须超过生命周期'a
示例
use std::fmt::Debug; // 特征约束使用 #[derive(Debug)] struct Ref<'a, T: 'a>(&'a T); // `Ref` 包含对泛型类型 `T` 的引用,该泛型类型具有 // 未知的生命周期 `'a`. `T` 是约定任何 // 引用在 `T` 必须大于 `'a` 。此外,在生命周期 // 里 `Ref` 不能超过 `'a`。 // 使用 `Debug` 特征打印的通用函数。 fn print<T>(t: T) where T: Debug { println!("`print`: t is {:?}", t); } // 这里引用 `T` 使用 where `T` 实现 // `Debug` 和所有引用 `T` 都要比 `'a` 长 // 此外,`'a`必须要比函数声明周期长 fn print_ref<'a, T>(t: &'a T) where T: Debug + 'a { println!("`print_ref`: t is {:?}", t); } fn main() { let x = 7; let ref_x = Ref(&x); print_ref(&ref_x); print(ref_x); }
- 🌟
/* 使用生命周期注释结构体 1. `r` 和 `s` 必须是不同生命周期 2. `s` 的生命周期需要大于 'r' */ struct DoubleRef<T> { r: &T, s: &T } fn main() { println!("Success!") }
- 🌟🌟
/* 添加类型约束使下面代码正常运行 */ struct ImportantExcerpt<'a> { part: &'a str, } impl<'a, 'b> ImportantExcerpt<'a> { fn announce_and_return_part(&'a self, announcement: &'b str) -> &'b str { println!("Attention please: {}", announcement); self.part } } fn main() { println!("Success!") }
- 🌟🌟
/* 添加类型约束使下面代码正常运行 */ fn f<'a, 'b>(x: &'a i32, mut y: &'b i32) { y = x; let r: &'b &'a i32 = &&0; } fn main() { println!("Success!") }
HRTB(更高等级特征约束)(Higher-ranked trait bounds)
类型约束可能在生命周期中排名更高。这些约束指定了一个约束对于所有生命周期都为真。例如,诸如此类的约束 for<'a> &'a T: PartialEq<i32> 需要如下实现:
#![allow(unused)] fn main() { impl<'a> PartialEq<i32> for &'a T { // ... } }
然后可以用于将一个 &'a T 与任何生命周期进行比较 i32 。
这里只能使用更高级别的约束,因为引用的生命周期比函数上任何可能的生命周期参数都短。
- 🌟🌟🌟
/* 添加 HRTB 使下面代码正常运行! */ fn call_on_ref_zero<'a, F>(f: F) where F: Fn(&'a i32) { let zero = 0; f(&zero); } fn main() { println!("Success!") }
NLL(非词汇生命周期)(Non-Lexical Lifetime)
在解释 NLL 之前,我们先看一段代码:
fn main() { let mut s = String::from("hello"); let r1 = &s; let r2 = &s; println!("{} and {}", r1, r2); let r3 = &mut s; println!("{}", r3); }
根据我们目前的知识,这段代码会因为违反 Rust 中的借用规则而导致错误。
但是,如果您执行 cargo run ,那么一切都没问题,那么这里发生了什么?
编译器在作用域结束之前判断不再使用引用的能力称为 非词法生命周期(简称 NLL )。
有了这种能力,编译器就知道最后一次使用引用是什么时候,并根据这些知识优化借用规则。
#![allow(unused)] fn main() { let mut u = 0i32; let mut v = 1i32; let mut w = 2i32; // lifetime of `a` = α ∪ β ∪ γ let mut a = &mut u; // --+ α. lifetime of `&mut u` --+ lexical "lifetime" of `&mut u`,`&mut u`, `&mut w` and `a` use(a); // | | *a = 3; // <-----------------+ | ... // | a = &mut v; // --+ β. lifetime of `&mut v` | use(a); // | | *a = 4; // <-----------------+ | ... // | a = &mut w; // --+ γ. lifetime of `&mut w` | use(a); // | | *a = 5; // <-----------------+ <--------------------------+ }
再借用
学习了 NLL 之后,我们现在可以很容易地理解再借用了。
示例
#[derive(Debug)] struct Point { x: i32, y: i32, } impl Point { fn move_to(&mut self, x: i32, y: i32) { self.x = x; self.y = y; } } fn main() { let mut p = Point { x: 0, y: 0 }; let r = &mut p; // 这里是再借用 let rr: &Point = &*r; println!("{:?}", rr); // 这里结束再借用 // 再借用结束,现在我们可以继续使用 `r` r.move_to(10, 10); println!("{:?}", r); }
- 🌟🌟
/* 通过重新排序一些代码使下面代码正常运行 */ fn main() { let mut data = 10; let ref1 = &mut data; let ref2 = &mut *ref1; *ref1 += 1; *ref2 += 2; println!("{}", data); }
未约束的生命周期
在 Nomicon - Unbounded Lifetimes 中查看更多信息。
更多省略规则
#![allow(unused)] fn main() { impl<'a> Reader for BufReader<'a> { // 'a 在以下方法中不使用 } // 可以写为: impl Reader for BufReader<'_> { } }
#![allow(unused)] fn main() { // Rust 2015 struct Ref<'a, T: 'a> { field: &'a T } // Rust 2018 struct Ref<'a, T> { field: &'a T } }
艰难的练习
- 🌟🌟🌟🌟
/* 使下面代码正常运行 */ struct Interface<'a> { manager: &'a mut Manager<'a> } impl<'a> Interface<'a> { pub fn noop(self) { println!("interface consumed"); } } struct Manager<'a> { text: &'a str } struct List<'a> { manager: Manager<'a>, } impl<'a> List<'a> { pub fn get_interface(&'a mut self) -> Interface { Interface { manager: &mut self.manager } } } fn main() { let mut list = List { manager: Manager { text: "hello" } }; list.get_interface().noop(); println!("Interface should be dropped here and the borrow released"); use_list(&list); } fn use_list(list: &List) { println!("{}", list.manager.text); }
你可以在这里找到答案(在 solutions 路径下)
Functional programing
Closure
下面代码是Rust圣经课程中闭包章节的课内练习题答案:
struct Cacher<T,E> where T: Fn(E) -> E, E: Copy { query: T, value: Option<E>, } impl<T,E> Cacher<T,E> where T: Fn(E) -> E, E: Copy { fn new(query: T) -> Cacher<T,E> { Cacher { query, value: None, } } fn value(&mut self, arg: E) -> E { match self.value { Some(v) => v, None => { let v = (self.query)(arg); self.value = Some(v); v } } } } fn main() { } #[test] fn call_with_different_values() { let mut c = Cacher::new(|a| a); let v1 = c.value(1); let v2 = c.value(2); assert_eq!(v2, 1); }
你可以在这里找到答案(在 solutions 路径下)
Iterator
你可以在这里找到答案(在 solutions 路径下)
newtype 和 Sized todo
Smart pointers
Box
Deref
Drop
Rc and Arc
Cell and RefCell
Weak 和循环引用todo
自引用 todo
Threads
Basic using
Message passing
Sync
Atomic
Send and Sync
全局变量 todo
错误处理 todo
Unsafe doing
内联汇编
Rust provides support for inline assembly via the asm! macro.
It can be used to embed handwritten assembly in the assembly output generated by the compiler.
Generally this should not be necessary, but might be where the required performance or timing
cannot be otherwise achieved. Accessing low level hardware primitives, e.g. in kernel code, may also demand this functionality.
Note: the examples here are given in x86/x86-64 assembly, but other architectures are also supported.
Inline assembly is currently supported on the following architectures:
- x86 and x86-64
- ARM
- AArch64
- RISC-V
Basic usage
Let us start with the simplest possible example:
#![allow(unused)] fn main() { use std::arch::asm; unsafe { asm!("nop"); } }
This will insert a NOP (no operation) instruction into the assembly generated by the compiler.
Note that all asm! invocations have to be inside an unsafe block, as they could insert
arbitrary instructions and break various invariants. The instructions to be inserted are listed
in the first argument of the asm! macro as a string literal.
Inputs and outputs
Now inserting an instruction that does nothing is rather boring. Let us do something that actually acts on data:
#![allow(unused)] fn main() { use std::arch::asm; let x: u64; unsafe { asm!("mov {}, 5", out(reg) x); } assert_eq!(x, 5); }
This will write the value 5 into the u64 variable x.
You can see that the string literal we use to specify instructions is actually a template string.
It is governed by the same rules as Rust format strings.
The arguments that are inserted into the template however look a bit different than you may
be familiar with. First we need to specify if the variable is an input or an output of the
inline assembly. In this case it is an output. We declared this by writing out.
We also need to specify in what kind of register the assembly expects the variable.
In this case we put it in an arbitrary general purpose register by specifying reg.
The compiler will choose an appropriate register to insert into
the template and will read the variable from there after the inline assembly finishes executing.
Let us see another example that also uses an input:
#![allow(unused)] fn main() { use std::arch::asm; let i: u64 = 3; let o: u64; unsafe { asm!( "mov {0}, {1}", "add {0}, 5", out(reg) o, in(reg) i, ); } assert_eq!(o, 8); }
This will add 5 to the input in variable i and write the result to variable o.
The particular way this assembly does this is first copying the value from i to the output,
and then adding 5 to it.
The example shows a few things:
First, we can see that asm! allows multiple template string arguments; each
one is treated as a separate line of assembly code, as if they were all joined
together with newlines between them. This makes it easy to format assembly
code.
Second, we can see that inputs are declared by writing in instead of out.
Third, we can see that we can specify an argument number, or name as in any format string. For inline assembly templates this is particularly useful as arguments are often used more than once. For more complex inline assembly using this facility is generally recommended, as it improves readability, and allows reordering instructions without changing the argument order.
We can further refine the above example to avoid the mov instruction:
#![allow(unused)] fn main() { use std::arch::asm; let mut x: u64 = 3; unsafe { asm!("add {0}, 5", inout(reg) x); } assert_eq!(x, 8); }
We can see that inout is used to specify an argument that is both input and output.
This is different from specifying an input and output separately in that it is guaranteed to assign both to the same register.
It is also possible to specify different variables for the input and output parts of an inout operand:
#![allow(unused)] fn main() { use std::arch::asm; let x: u64 = 3; let y: u64; unsafe { asm!("add {0}, 5", inout(reg) x => y); } assert_eq!(y, 8); }
Late output operands
The Rust compiler is conservative with its allocation of operands. It is assumed that an out
can be written at any time, and can therefore not share its location with any other argument.
However, to guarantee optimal performance it is important to use as few registers as possible,
so they won't have to be saved and reloaded around the inline assembly block.
To achieve this Rust provides a lateout specifier. This can be used on any output that is
written only after all inputs have been consumed.
There is also a inlateout variant of this specifier.
Here is an example where inlateout cannot be used:
#![allow(unused)] fn main() { use std::arch::asm; let mut a: u64 = 4; let b: u64 = 4; let c: u64 = 4; unsafe { asm!( "add {0}, {1}", "add {0}, {2}", inout(reg) a, in(reg) b, in(reg) c, ); } assert_eq!(a, 12); }
Here the compiler is free to allocate the same register for inputs b and c since it knows they have the same value. However it must allocate a separate register for a since it uses inout and not inlateout. If inlateout was used, then a and c could be allocated to the same register, in which case the first instruction to overwrite the value of c and cause the assembly code to produce the wrong result.
However the following example can use inlateout since the output is only modified after all input registers have been read:
#![allow(unused)] fn main() { use std::arch::asm; let mut a: u64 = 4; let b: u64 = 4; unsafe { asm!("add {0}, {1}", inlateout(reg) a, in(reg) b); } assert_eq!(a, 8); }
As you can see, this assembly fragment will still work correctly if a and b are assigned to the same register.
Explicit register operands
Some instructions require that the operands be in a specific register.
Therefore, Rust inline assembly provides some more specific constraint specifiers.
While reg is generally available on any architecture, explicit registers are highly architecture specific. E.g. for x86 the general purpose registers eax, ebx, ecx, edx, ebp, esi, and edi among others can be addressed by their name.
#![allow(unused)] fn main() { use std::arch::asm; let cmd = 0xd1; unsafe { asm!("out 0x64, eax", in("eax") cmd); } }
In this example we call the out instruction to output the content of the cmd variable to port 0x64. Since the out instruction only accepts eax (and its sub registers) as operand we had to use the eax constraint specifier.
Note: unlike other operand types, explicit register operands cannot be used in the template string: you can't use
{}and should write the register name directly instead. Also, they must appear at the end of the operand list after all other operand types.
Consider this example which uses the x86 mul instruction:
#![allow(unused)] fn main() { use std::arch::asm; fn mul(a: u64, b: u64) -> u128 { let lo: u64; let hi: u64; unsafe { asm!( // The x86 mul instruction takes rax as an implicit input and writes // the 128-bit result of the multiplication to rax:rdx. "mul {}", in(reg) a, inlateout("rax") b => lo, lateout("rdx") hi ); } ((hi as u128) << 64) + lo as u128 } }
This uses the mul instruction to multiply two 64-bit inputs with a 128-bit result.
The only explicit operand is a register, that we fill from the variable a.
The second operand is implicit, and must be the rax register, which we fill from the variable b.
The lower 64 bits of the result are stored in rax from which we fill the variable lo.
The higher 64 bits are stored in rdx from which we fill the variable hi.
Clobbered registers
In many cases inline assembly will modify state that is not needed as an output. Usually this is either because we have to use a scratch register in the assembly or because instructions modify state that we don't need to further examine. This state is generally referred to as being "clobbered". We need to tell the compiler about this since it may need to save and restore this state around the inline assembly block.
use core::arch::asm; fn main() { // three entries of four bytes each let mut name_buf = [0_u8; 12]; // String is stored as ascii in ebx, edx, ecx in order // Because ebx is reserved, we get a scratch register and move from // ebx into it in the asm. The asm needs to preserve the value of // that register though, so it is pushed and popped around the main asm // (in 64 bit mode for 64 bit processors, 32 bit processors would use ebx) unsafe { asm!( "push rbx", "cpuid", "mov [{0}], ebx", "mov [{0} + 4], edx", "mov [{0} + 8], ecx", "pop rbx", // We use a pointer to an array for storing the values to simplify // the Rust code at the cost of a couple more asm instructions // This is more explicit with how the asm works however, as opposed // to explicit register outputs such as `out("ecx") val` // The *pointer itself* is only an input even though it's written behind in(reg) name_buf.as_mut_ptr(), // select cpuid 0, also specify eax as clobbered inout("eax") 0 => _, // cpuid clobbers these registers too out("ecx") _, out("edx") _, ); } let name = core::str::from_utf8(&name_buf).unwrap(); println!("CPU Manufacturer ID: {}", name); }
In the example above we use the cpuid instruction to read the CPU manufacturer ID.
This instruction writes to eax with the maximum supported cpuid argument and ebx, esx, and ecx with the CPU manufacturer ID as ASCII bytes in that order.
Even though eax is never read we still need to tell the compiler that the register has been modified so that the compiler can save any values that were in these registers before the asm. This is done by declaring it as an output but with _ instead of a variable name, which indicates that the output value is to be discarded.
This code also works around the limitation that ebx is a reserved register by LLVM. That means that LLVM assumes that it has full control over the register and it must be restored to its original state before exiting the asm block, so it cannot be used as an output. To work around this we save the register via push, read from ebx inside the asm block into a temporary register allocated with out(reg) and then restoring ebx to its original state via pop. The push and pop use the full 64-bit rbx version of the register to ensure that the entire register is saved. On 32 bit targets the code would instead use ebx in the push/pop.
This can also be used with a general register class (e.g. reg) to obtain a scratch register for use inside the asm code:
#![allow(unused)] fn main() { use std::arch::asm; // Multiply x by 6 using shifts and adds let mut x: u64 = 4; unsafe { asm!( "mov {tmp}, {x}", "shl {tmp}, 1", "shl {x}, 2", "add {x}, {tmp}", x = inout(reg) x, tmp = out(reg) _, ); } assert_eq!(x, 4 * 6); }
Symbol operands and ABI clobbers
By default, asm! assumes that any register not specified as an output will have its contents preserved by the assembly code. The clobber_abi argument to asm! tells the compiler to automatically insert the necessary clobber operands according to the given calling convention ABI: any register which is not fully preserved in that ABI will be treated as clobbered. Multiple clobber_abi arguments may be provided and all clobbers from all specified ABIs will be inserted.
#![allow(unused)] fn main() { use std::arch::asm; extern "C" fn foo(arg: i32) -> i32 { println!("arg = {}", arg); arg * 2 } fn call_foo(arg: i32) -> i32 { unsafe { let result; asm!( "call *{}", // Function pointer to call in(reg) foo, // 1st argument in rdi in("rdi") arg, // Return value in rax out("rax") result, // Mark all registers which are not preserved by the "C" calling // convention as clobbered. clobber_abi("C"), ); result } } }
Register template modifiers
In some cases, fine control is needed over the way a register name is formatted when inserted into the template string. This is needed when an architecture's assembly language has several names for the same register, each typically being a "view" over a subset of the register (e.g. the low 32 bits of a 64-bit register).
By default the compiler will always choose the name that refers to the full register size (e.g. rax on x86-64, eax on x86, etc).
This default can be overridden by using modifiers on the template string operands, just like you would with format strings:
#![allow(unused)] fn main() { use std::arch::asm; let mut x: u16 = 0xab; unsafe { asm!("mov {0:h}, {0:l}", inout(reg_abcd) x); } assert_eq!(x, 0xabab); }
In this example, we use the reg_abcd register class to restrict the register allocator to the 4 legacy x86 registers (ax, bx, cx, dx) of which the first two bytes can be addressed independently.
Let us assume that the register allocator has chosen to allocate x in the ax register.
The h modifier will emit the register name for the high byte of that register and the l modifier will emit the register name for the low byte. The asm code will therefore be expanded as mov ah, al which copies the low byte of the value into the high byte.
If you use a smaller data type (e.g. u16) with an operand and forget the use template modifiers, the compiler will emit a warning and suggest the correct modifier to use.
Memory address operands
Sometimes assembly instructions require operands passed via memory addresses/memory locations.
You have to manually use the memory address syntax specified by the target architecture.
For example, on x86/x86_64 using Intel assembly syntax, you should wrap inputs/outputs in [] to indicate they are memory operands:
#![allow(unused)] fn main() { use std::arch::asm; fn load_fpu_control_word(control: u16) { unsafe { asm!("fldcw [{}]", in(reg) &control, options(nostack)); } } }
Labels
Any reuse of a named label, local or otherwise, can result in an assembler or linker error or may cause other strange behavior. Reuse of a named label can happen in a variety of ways including:
- explicitly: using a label more than once in one
asm!block, or multiple times across blocks. - implicitly via inlining: the compiler is allowed to instantiate multiple copies of an
asm!block, for example when the function containing it is inlined in multiple places. - implicitly via LTO: LTO can cause code from other crates to be placed in the same codegen unit, and so could bring in arbitrary labels.
As a consequence, you should only use GNU assembler numeric local labels inside inline assembly code. Defining symbols in assembly code may lead to assembler and/or linker errors due to duplicate symbol definitions.
Moreover, on x86 when using the default Intel syntax, due to an LLVM bug, you shouldn't use labels exclusively made of 0 and 1 digits, e.g. 0, 11 or 101010, as they may end up being interpreted as binary values. Using options(att_syntax) will avoid any ambiguity, but that affects the syntax of the entire asm! block. (See Options, below, for more on options.)
#![allow(unused)] fn main() { use std::arch::asm; let mut a = 0; unsafe { asm!( "mov {0}, 10", "2:", "sub {0}, 1", "cmp {0}, 3", "jle 2f", "jmp 2b", "2:", "add {0}, 2", out(reg) a ); } assert_eq!(a, 5); }
This will decrement the {0} register value from 10 to 3, then add 2 and store it in a.
This example shows a few things:
- First, that the same number can be used as a label multiple times in the same inline block.
- Second, that when a numeric label is used as a reference (as an instruction operand, for example), the suffixes “b” (“backward”) or ”f” (“forward”) should be added to the numeric label. It will then refer to the nearest label defined by this number in this direction.
Options
By default, an inline assembly block is treated the same way as an external FFI function call with a custom calling convention: it may read/write memory, have observable side effects, etc. However, in many cases it is desirable to give the compiler more information about what the assembly code is actually doing so that it can optimize better.
Let's take our previous example of an add instruction:
#![allow(unused)] fn main() { use std::arch::asm; let mut a: u64 = 4; let b: u64 = 4; unsafe { asm!( "add {0}, {1}", inlateout(reg) a, in(reg) b, options(pure, nomem, nostack), ); } assert_eq!(a, 8); }
Options can be provided as an optional final argument to the asm! macro. We specified three options here:
puremeans that the asm code has no observable side effects and that its output depends only on its inputs. This allows the compiler optimizer to call the inline asm fewer times or even eliminate it entirely.nomemmeans that the asm code does not read or write to memory. By default the compiler will assume that inline assembly can read or write any memory address that is accessible to it (e.g. through a pointer passed as an operand, or a global).nostackmeans that the asm code does not push any data onto the stack. This allows the compiler to use optimizations such as the stack red zone on x86-64 to avoid stack pointer adjustments.
These allow the compiler to better optimize code using asm!, for example by eliminating pure asm! blocks whose outputs are not needed.
See the reference for the full list of available options and their effects.
macro 宏 todo
Tests
Write Tests
Benchmark
https://doc.rust-lang.org/unstable-book/library-features/test.html